
Users Guide


56 Configuring IT Assistant to Monitor Your Systems
7
Under
Date/Time Range Configuration
, enter values for any or all of the optional categories.
Tom selects different time and day values for each of the three filters. Tom does not select date filters,
but could use this value if he wanted to create a filter and action for a vacation, an outside service
vendor, or another special situation.
For the DC 1st Shift filter, Tom enables the time range 7:00:00 A.M. to 7:00:00 P.M. and enables the
days Monday through Friday.
For the DC 2nd Shift filter, Tom enables the time range 7:00:00 P.M. to 7:00:00 A.M. and enables the
days Monday through Friday.
For the Weekend Admin filter, Tom enables the time range 12:00:00 A.M. to 12:00:00 P.M. and enables
the days Saturday and Sunday.
8
Under
Alert Action Associations
, select whether you want the event captured by the filter to trigger an
alert or be written to a log file.
Tom selects
Alert
, since he wants IT Assistant to notify the selected administrators by e-mail when the
system enters a Critical or Warning state.
9
The
New Filter Summary
shows your selections. Click
Finish
to accept, or
Back
to make changes.
10
Verify that the filter name you assigned in step 3 appears in the
Summary of Alert Action
Filters
window.
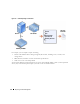
Notification Alert Actions in the Enterprise Environment
Tom’s alert action filters and groups are now configured so that he can set up e-mail alert actions to
automatically notify himself and his three administrators. Tom’s strategy is as follows:
• Set up IT Assistant to send e-mail to his administrators when any warning or critical events occur,
depending on their on-call or shift status
• Copy himself on all messages so he can to stay aware of overall server events
Tom is configuring e-mail for himself, as well as for his first- and second-shift datacenter administrators
and his weekend administrator. Therefore, he will repeat the following procedure four times -- for
himself, Bob, John, and Jill.
NOTE: To send e-mail through IT Assistant, the enterprise’s SMTP server must be correctly configured. To
configure the SMTP server, go to Preferences
→
Web Server on the top navigation bar, and configure the SMTP
Server Name (or IP Address) and DNS Suffix for SMTP Server.
Creating an Alert Action
To create an alert action:
1
Select
Alerts
→
Actions
from the menu bar.
2
Right-click
Alert Actions
in the navigation and select
New Alert Action
.
The
Add Alert Action Wizard
appears.