
Install Guide


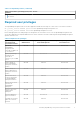

In case of multiple connection profiles, configure MID servers based on the number of OpenManage Enterprise and
SupportAssist Enterprise connection profiles. It is recommended to use one MID server per OpenManage Enterprise profile.
For more information about downloading, installing, and configuring a MID Server in your data center, see the ServiceNow
documentation at https://docs.servicenow.com/.
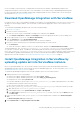
Download OpenManage Integration with ServiceNow
Do keep the Service Tag of your Dell EMC PowerEdge server handy. It is recommended that you use the Service Tag to access
all support on the Dell Support Website. This ensures that you download the appropriate version of the software for your
platform.
To download the OpenManage Integration with ServiceNow installer package:
1. Go to Dell.com/support.
2. Perform one of the following actions:
● Enter the Service Tag of your Dell EMC PowerEdge server, and then select Search.
● Select Browse all products > Servers > PowerEdge, and select the appropriate model of your PowerEdge server.
3. On the support page of your server, select Drivers & downloads.
4. From the Category list, select Systems Management.
The supported version of OpenManage Integration with ServiceNow is displayed.
5. Perform one of the following actions to download the installer package on your file system:
● Click Download.
● Select the check box to add the software to your download list, and then click Downloaded Selected Files.
The downloaded DELL_EMC_OpenManage_Integration_1.1_ServiceNow_288_A00.tar.gz file contains an update
set (.xml file), a connector .jar file, a readme file, an installation guide, an End User License Agreement (.PDF file), and a
DELL_EMC_OpenManage_Integration_ServiceNow_Background_Scripts folder contains the scripts for performing
certain installation, upgrade, and uninstallation steps. For more information about installing the OpenManage Integration
application in a ServiceNow instance, see Installing OpenManage Integration with ServiceNow on page 6.
Install OpenManage Integration in ServiceNow by
uploading update set into ServiceNow instance
Before you upload the update set to the ServiceNow instance, ensure that you have downloaded and extracted the
OpenManage Integration with ServiceNow installer file from the Dell EMC Support Site. For more information, see Download
OpenManage Integration with ServiceNow on page 9
To upload the OpenManage Integration with ServiceNow update set into the ServiceNow instance:
1. Enable permissions for the following tables.
● Read, create, update, and delete permission to the table sysauto_script.
● Read, create, update, and delete permission to the table cmdb_ci_outofband_device.
● Read permission to the table sysevent-read.
You can either manually or run the script installation_permissions.js to enable required permission to the tables.
To enable permission using the script, do the following:
a. Go to the file system where you have extracted the
DELL_EMC_OpenManage_Integration_ServiceNow_Background_Scripts folder that contains the scripts.
b. Open and copy the installation_permissions.js content.
c. In the navigation filter, select System Definition > Scripts - Background.
d. In the Run script box, paste the installation_permissions.js content, select the scope as Global, and then
click Run script.
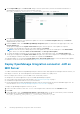
2. In the ServiceNow instance, enter System Update Sets in the navigation filter, and then select Retrieved Update
Sets.
The Retrieved Update Sets page is displayed.
3. Under Related Links, click Import Update Set from XML.
Installing OpenManage Integration with ServiceNow
9