
Users Guide


ServiceNow에서 SupportAssist Enterprise 인
스턴스 추가
SupportAssist Enterprise에서 케이스를 검색하려면 OpenManage Integration with ServiceNow를 사용하여 SupportAssist Enterprise 연
결 프로필을 생성해야 합니다.
• SupportAssist Enterprise 연결 프로필을 만들려면 SupportAssist Enterprise 연결 프로필 생성을(를) 참조하십시오.
• SupportAssist Enterprise 연결 프로필을 편집하려면 SupportAssist Enterprise 연결 프로필 편집을(를) 참조하십시오.
• SupportAssist Enterprise 연결 프로필을 삭제하려면 SupportAssist Enterprise 연결 프로필 삭제을(를) 참조하십시오.
주제:
• SupportAssist Enterprise 연결 프로필 생성
• SupportAssist Enterprise 연결 프로필 편집
• SupportAssist Enterprise 연결 프로필 삭제
SupportAssist Enterprise 연결 프로필 생성
SupportAssist Enterprise 연결 프로필을 생성하기 전에 다음을 확인합니다.
• Dell EMC 지원 사이트에서 업데이트 세트를 가져와서 ServiceNow에 OpenManage Integration with ServiceNow 애플리케이션을 설
치했습니다. 자세한 내용은 지원 사이트에서 Dell EMC OpenManage Integration with ServiceNow
설치
가이드
를 참조하십시오.
• 데이터 센터 환경에 MID(Management, Instrumentation, Discovery) Server를 설치 및 구성했습니다.
• MID 서버에 OpenManage Integration with ServiceNow 커넥터 .jar 파일을 배포했습니다.
• 필요한 사용자 권한. 필수 사용자 권한을(를) 참조하십시오.
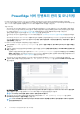
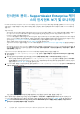
SupportAssist Enterprise 연결 프로필을 생성하려면 다음을 수행합니다.
1. 탐색 필터에서 Dell EMC OpenManage Integration을 입력하고 연결 프로필에서 SupportAssist Enterprise를 선택합니
다.
2. 새로 만들기를 클릭합니다.
3. 연결 프로필 이름을 입력합니다.
4. 다음 SupportAssist Enterprise 세부 정보를 입력합니다.
• IP 주소 또는 FQDN 주소
• 사용자 이름
• 암호
제공된 SupportAssist Enterprise 세부 정보는 ServiceNow 인스턴스에 대한 연결을 확인하는 데 사용됩니다.
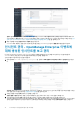
5. 각 드롭다운 메뉴를 선택하여 케이스의 영향 및 긴급도를 지정합니다.
6. MID 서버를 선택하려면 검색 아이콘을 클릭하고 목록에서 구성된 MID 서버를 선택합니다.
7. ServiceNow 인스턴스와 SupportAssist Enterprise 간에 연결이 설정되었는지 확인하려면 연결 테스트를 클릭합니다.
8. SupportAssist Enterprise에 연결되면 제출을 클릭합니다.
이제 SupportAssist Enterprise 연결 프로필이 생성되어 SAE 연결 프로필 페이지에 나열됩니다.
노트: OpenManage Integration with ServiceNow 버전 1.0에서는 SupportAssist Enterprise 연결 프로필을 하나만 만들
수 있습니다.
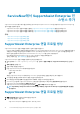
SupportAssist Enterprise 연결 프로필 편집
1. SAE 연결 프로필 페이지에서 연결 프로필을 선택합니다.
2. 다음 필드를 편집할 수 있습니다.
• SupportAssist Enterprise 어플라이언스의 IP 주소 또는 FQDN.
6
14 ServiceNow에서 SupportAssist Enterprise 인스턴스 추가