
Install Guide


進度會顯示在更新分割集認可對話方塊。在成功完成更新分割集認可後,關閉對話方塊,更新分割集的狀態欄位會更新為已認
可。
上傳的更新分割集會列在系統更新分割集 > 已擷取的更新分割集下方。如需更新分割集傳輸的詳細資訊,請前往以下網址參閱
ServiceNow 文件:https://www.docs.servicenow.com/。
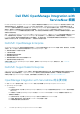
在 MID 伺服器上部署 OpenManage Integration 連接
器 .JAR
若要啟用 OpenManage Enterprise 與 ServiceNow 和 SupportAssist Enterprise 與 ServiceNow 之間的通訊,您必須在 Management,
Instrumentation, and Discovery (MID) 伺服器上部署連接器 .jar。
在 MID 伺服器上部署連接器 .jar 之前,請先確保:
● 將 ServiceNow Application 領域變更為 Dell EMC OpenManage Integration。
● 擁有必要使用者權限的 ServiceNow 使用者。請參閱必要使用者權限 第頁的 7。
● 已在您的環境安裝並設定 MID 伺服器。
● 已從 Dell EMC 支援網站下載並解壓縮 OpenManage Integration with ServiceNow 安裝程式檔案。如需詳細資訊,請參閱 下載
OpenManage Integration with ServiceNow 第頁的 8。
若要部署 OpenManage Integration 連接器 .jar 檔案:
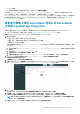
1. 在 ServiceNow 例項的瀏覽篩選器中輸入 MID Server,然後選取 JAR 檔案模組。
2. 按一下新增。
3. 在右上角按一下管理附件 > 選擇檔案,前往您解壓縮 OpenManage Integration with ServiceNow 安裝程式檔案的檔案系統,然後
上傳 Dell_EMC_OpenManage_Integration_1_1_ServiceNow_Connector.jar 檔案。
成功上傳附件後,請關閉附件對話方塊。
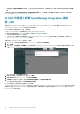
4. 為匯入的連接器 .jar 檔案輸入名稱,然後按一下提交。
5. 在瀏覽篩選器中輸入 MID Server,然後選取伺服器模組。
6. 在名稱欄下方選取 MID 伺服器,然後在對所選列執行的動作下方選取重新啟動 MID。
MID 伺服器成功重新啟動後,狀態會從關閉變更為啟動。
Dell EMC 連接器 .jar 檔案此時便已部署在 MID 伺服器上。
OpenManage Integration with ServiceNow 安裝已完成。若要從 OpenManage Enterprise 和 SupportAssist Enterprise 擷取裝置、活動和
支援案例,請在 OpenManage Integration 中新增連線設定檔。如需詳細資訊,請參閱支援網站的 Dell EMC OpenManage Integration
with ServiceNow
使用者指南
。
10 安裝 OpenManage Integration with ServiceNow