
Users Guide


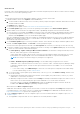
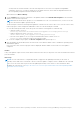


Table Of Contents
- Dell EMC OpenManage Integration Version 2.1 with Microsoft Windows Admin Center User’s Guide
- Contents
- Overview of OpenManage Integration with Microsoft Windows Admin Center
- Getting started with OpenManage Integration with Microsoft Windows Admin Center
- Ports required by Dell EMC OpenManage Integration with Microsoft Windows Admin Center
- Manage Dell EMC PowerEdge Servers
- Manage Failover clusters, Azure Stack HCI, and Windows Server HCI clusters
- View iDRAC details of the PowerEdge servers and nodes of HCI and Failover clusters
- Update PowerEdge servers and nodes of Windows Server HCI, Azure Stack HCI, and Failover clusters using OpenManage Integration extension
- Integrated deploy and update of Azure Stack HCI clusters
- Full Stack Cluster-Aware Updating for Azure Stack HCI clusters using OpenManage Integration snap-in
- Manage CPU cores in clusters or individual nodes
- Add nodes to existing clusters
- Troubleshooting and Frequently asked questions
- Identifying the generation of your Dell EMC PowerEdge server
- Contacting Dell EMC
- Glossary
- Appendix

Manage CPU cores in clusters or individual
nodes
Prerequisites
● See best practices for proper functioning of OMIMSWAC in the 'Getting started with OpenManage Integration' section.
● Ensure that the cluster contains homogenous nodes. For example, the nodes should have the CPUs either from Intel or AMD
and from the same processor family. Having nodes that include CPUs from both Intel and AMD or from different processor
family is not supported.
● To manage CPU core in a cluster, "OMIWAC Premium License for MSFT HCI Solutions" must be installed on each cluster
nodes. To manage CPU core in an individual node (AX, S2D, or PowerEdge node), 'OMIWAC Premium License for MSFT HCI
Solutions' must be installed in AX/S2D node and 'OMIWAC Premium License for PowerEdge' must be installed in PowerEdge
node.
About this task
To manage workload demands and power consumption, you can change the amount of CPU cores allocated to a node or
cluster by using the 'CPU core management' feature. This feature helps you to maintain the right balance between power and
performance. This feature also helps you to optimize CPU cores in clusters to keep the Total Cost of Ownership at an optimal
level.
The CPU core management feature is supported in Azure Stack HCI clusters, Windows Server based HCI clusters, and individual
nodes with OMIWAC Premium License installed on each node.
NOTE:
CPU core management feature is not supported in Failover clusters and individual node that is part of an Azure
Stack HCI or Windows Server HCI cluster.
Steps
In the Windows Admin Center, connect to a cluster or individual node and then perform the following steps:
1. In Windows Admin Center, under Extensions, click Dell EMC OpenManage Integration.
2. In Dell EMC OpenManage Integration, click the Configure tab.
3. Under CPU Core Management, a summary of CPU core distributions of the cluster nodes or individual node is displayed as
follows:
● The horizontal bar chart under CPU Core Configuration Summary displays the number of cores that are currently
enabled in the cluster or individual node and the number cores available for use. The maximum number of CPU cores
present in the node or cluster is mentioned below the bar chart.
● Under Current Configuration, total number of nodes, CPUs, and currently enabled cores along with CPU model number
are displayed.
● Switch the Show Node Level Details on or off to show or hide the node details such as node name, CPU model used in
the node, number of CPUs, number of cores per CPU, and core speed.
a. In the Show Node Level Details, select a node to see the Advanced Details of the node as follows:
● Dell Controlled Turbo
● Logical Processor
● Configurable TDP
● Virtualization technology
● X2APIC mode
4. To manage CPU cores, click Update CPU Core.
Update CPU Core wizard is displayed on the right.
5. In the Update CPU Core wizard, move the slider left or right to decrease or increase the number of cores to be used based
on workloads.
10
Manage CPU cores in clusters or individual nodes 37