OpenManage Integration for Microsoft System Center Version 7.
Notes, cautions, and warnings NOTE: A NOTE indicates important information that helps you make better use of your product. CAUTION: A CAUTION indicates either potential damage to hardware or loss of data and tells you how to avoid the problem. WARNING: A WARNING indicates a potential for property damage, personal injury, or death. © 2009 - 2019 Dell Inc. or its subsidiaries. All rights reserved. Dell, EMC, and other trademarks are trademarks of Dell Inc. or its subsidiaries.
Contents 1 Introduction to OMIMSSC............................................................................................................. 7 What's new ?......................................................................................................................................................................... 7 2 Use cases of OMIMSSC ............................................................................................................... 8 Use cases for deployment scenarios...........
Discovering MX7000 by using manual discovery...................................................................................................... 23 Synchronization of OMIMSSC console extension with enrolled SCCM...................................................................... 24 Synchronization of OMIMSSC console extension with enrolled SCVMM............................................................. 24 Synchronizing with enrolled Microsoft console...................................................
Creating update source................................................................................................................................................ 43 Modifying update source.............................................................................................................................................. 44 Deleting update source.................................................................................................................................................
Run update..................................................................................................................................................................... 62 Deploy Azure Stack HCI cluster........................................................................................................................................ 62 12 Appendix.................................................................................................................................. 63 13 Appendix 2.....
1 Introduction to OMIMSSC OpenManage Integration for Microsoft System Center (OMIMSSC) is an appliance-based integration into System Center suite of products. OMIMSSC enables full lifecycle management of Dell EMC PowerEdge servers by using integrated Dell Remote Access Controller (iDRAC) with Lifecycle Controller (LC). OMIMSSC offers operating system deployment, Storage Spaces Direct cluster creation, hardware patching, firmware update, and maintenance of servers and modular systems.
2 Use cases of OMIMSSC Use cases for deployment scenarios Use OMIMSSC to deploy Windows and non-Windows operating system in SCCM or SCVMM environments using Operational Templates. NOTE: Ensure that you upgrade the device firmware versions to the latest versions available at ftp.dell.com or downloads.dell.com before deploying the operating system. NOTE: Non-windows operating system deployment is not supported on 11th generation of servers.
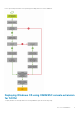
Here is a pictorial representation of the operating system deployment use cases in OMIMSSC.
NOTE: Before deploying OS on a host server, ensure that in SCCM, the Client status of the server is No. 1. Download the latest Dell EMC Deployment ToolKit (DTK) and create a Windows Preinstallation Environment (WinPE) boot WIM image. For more information, see the WinPE update. 2. Import this .WIN image into the SCCM console, and create a boot image in SCCM. For more information, see the Microsoft documentation. 3. Create a task sequence in SCCM. For more information, see Creating task sequence. 4.
3. Create an Operational Template, by capturing all the details of the discovered server. For more information, see Creating Operational Template from reference servers. 4. Assign an Operational Template on managed device, and check for the template compliance. For more information, see Assigning Operational Template and running Operational Template compliance. 5. Deploy an Operational Template to make the device template compliant. For more information, see Deploying Operational Template. 6.
You can update the selected devices by using the following update sources: • • • • Online FTP or local FTP source Online HTTP or local HTTP source Online HTTPS or local HTTPS source Local Dell Repository Manager (DRM) source 1. Create or select a default update source. For more information about update source, see Update source.
NOTE: Ensure that you update the update source with the latest catalog by using the polling and notification feature. For more information about polling and notification, see Polling and notification. If you are updating Storage Spaces Direct clusters, select a predefined update source specific for Storage Spaces Direct clusters. These update sources are displayed only in the Maintenance Center page. If you are updating MX7000 devices, select a predefined update source specific for Modular Systems.
3 Views in OMIMSSC View all the devices discovered in OMIMSSC in Configuration and Deployment page along with their hardware and firmware inventory information. Also, view all the jobs with status in Jobs and Logs Center page.
• • When you log in to OMIMSSC as a delegated admin, you can view all the host and unassigned servers that are not specific to this user. Hence, ensure that you have the required privileges before performing any operations on the servers. If there are multiple Microsoft consoles enrolled in OMIMSSC, and then host servers are specific to the Microsoft console where they are managed. And the unassigned servers are common to all consoles.
1. In OMIMSSC, click Configuration and Deployment, and then click Modular Systems View. Expand the Modular Systems View, and click service tag. All service tag of that model are displayed. 2. To view the Input/Output module, click I/O Modules tab. Launching Input Output Modules console To launch Input Output Module console, perform the following steps: 1. In OMIMSSC, expand Configuration and Deployment, click Modular Systems View. Expand the model to individual devices level.
NOTE: Baseline version of a specific component of a device is marked as not available if the update is not present in the selected update source catalog. You can perform the following tasks on Maintenance Center page: • • • • • • • • • Create update source Set polling frequency Select predefined update groups or Create custom update groups.
4 Managing profiles Profiles contain all the data that is required for performing any operations in OMIMSSC. Topics: • • About credential profile About hypervisor profile (for SCVMM users) About credential profile Credential profiles simplify the use and management of user credentials by authenticating the role-based capabilities of the user. Each credential profile contains a user name and password for a single user account. OMIMSSC uses credential profiles to connect to the managed systems’ iDRAC.
• • If you are creating a Device Credential Profile, select to make this profile as the default profile to log in to iDRAC or CMC by selecting the Default Profile for option. Select None, if you choose not to set the profile as a default profile. If you are creating a Windows Credential Profile, provide the domain details in Domain. NOTE: While creating the credential profile for console enrollment, if the NETBIOS name is configured in Active Directory (AD), provide the NETBIOS name as a Domain.
• Create a host group, and host profile or physical computer profile, in SCVMM. For information about creating host groups in SCVMM, see Microsoft documentation. 1. In OMIMSSC, perform any one of the following tasks: • • In the OMIMSSC dashboard, click Create Hypervisor Profiles. In the left navigation pane, click Profiles and Templates, Hypervisor Profile, and then click Create. The Hypervisor Profile Wizard is displayed. 2. In the Welcome page click Next. 3.
5 Discovering devices and synchronizing servers with MSSC console Discovery is the process of adding supported modular systems and PowerEdge bare-metal servers or host servers or nodes in to OMIMSSC. Synchronization with MSSC console is the process of adding host servers from registered Microsoft console (SCCM or SCVMM) in to OMIMSSC. Hence, using any one of the processes, you can add devices in to OMIMSSC . Only after discovering the devices, you can manage them in OMIMSSC.
Device discovery in OMIMSSC console extension for SCCM Discover devices in OMIMSSC console extension for SCCM. After discovering a server, the server is added to a predefined group in OMIMSSC, and one of the following SCCM predefined groups or collections—All Dell Lifecycle Controller Servers collection and Import Dell Server collection that are created under the Device Collections.
• In the navigation pane, click Configuration and Deployment, click Server View, and then click Discover. 2. In the Discover page, select the required option: • • Discover Using an IP Address—to discover a server using an IP address. Discover Using an IP Range—to discover all servers within an IP range. 3. Select the device type credential profile, or click Create New to create a device type credential profile. The selected profile is applied to all the servers. 4.
• Select Enable Exclude Range if you want to exclude an IP address range and in IP Address Start Range and IP Address End Range, provide the range that you want to exclude. 6. In Modular Systems Discovery Methods, select one of the following: • • Shallow discovery—discovers Modular Systems and also number of servers in the Modular System. Deep discovery—discovers Modular Systems and devices present in the Modular System such as Input Output Modules (IOM) and storage devices.
NOTE: During resynchronization, host servers that are deleted from the enrolled MSSC environment are moved to the Unassigned Servers tab in the OMIMSSC console extensions. If a server is decommissioned, and then remove that server from the list of unassigned servers. To resynchronize servers with credential profile issues: 1. In OMIMSSC, click Configuration and Deployment, click Server View, and then click Resolve Sync Errors. 2.
6 Preparing for operating system deployment Before deploying Windows operating system on the managed servers, update the WinPE image, create a task sequence, LC boot media file, and task sequence media bootable ISO file. The steps vary for SCCM and SCVMM console users. Refer the bellow section for more details. For deploying non-windows operating system remember the points mentioned in Preparing for non-Windows OS deployment section.
latest version of the file, and do not use the Dell EMC OpenManage Deployment Toolkit Windows Driver Cabinet file for the WinPE update. 1. Double-click the DTK executable file. 2. To unzip the DTK drivers, select a folder. For example, C:\DTK501. 3. Copy the unzipped DTK folder to a share folder. For example, \\Shareip\sharefolder\DTK\DTK501 NOTE: If you are upgrading from SCVMM SP1 to SCVMM R2, and then upgrade to Windows PowerShell 4.0. and create a WinPE ISO image.
Types of task sequence You can create a task sequence in two ways: • • Create a Dell-specific task sequence using OMIMSSC Deployment template. Create a custom task sequence. The task sequence goes to the next task sequence step irrespective of the success or failure of the command. Creating Dell specific task sequence To create a Dell-specific task sequence by using OMIMSSC Server Deployment Template option in SCCM: 1. Launch Configuration Manager. The Configuration Manager console screen is displayed.
NOTE: When editing a task sequence for the first time, the error message, Setup Windows and Configuration Manager is displayed. To resolve the error, create and select the Configurations Manager Client Upgrade package. For more information about creating packages, see the Configuration Manager documentation at technet.microsoft.com. NOTE: When editing a task sequence on SCCM 2016 and 2019, the missing objects references messages do not list the Setup windows and ConfigMgr package.
• 30 It is recommended that the network adapter is connected to the network port in the server on which the operating system is being deployed.
7 Managing Operational Templates Operational Templates contain complete device configuration and are used for deploying operating system and update firmware for PowerEdge servers and Modular Systems within Microsoft environment. Operational Template replicates hardware and firmware of a reference server (golden server) on to many other servers while provisioning for operating systems.
Predefined Operational Templates Predefined templates have all the configurations that are required to create Storage Spaces Direct clusters or Windows Server SoftwareDefined (WSSD). OMIMSSC supports creating clusters on R740XD, R740XD2, and R640 Storage Spaces Direct Ready Node models along with their specific network adapters. Table 3.
NOTE: You can capture the configuration of reference server with iDRAC 2.0 and later. 4. In Device Components, click a component to view the available attributes and their values. The components are as follows: • • Firmware update Hardware components, which are RAID, NIC, and BIOS. NOTE: In iDRAC Embedded 1 component, following are the privileges and their values for User Admin Privilege attribute. Table 4.
• • Stage ISO to vFlash and Reboot—downloads the ISO to vFlash and reboots. Reboot to vFlash—reboots to vFlash. Ensure that the ISO is present in the vFlash. NOTE: To use the Reboot to vFlash option, the label name of the partition that is created on vFlash must be ISOIMG. 3. (Optional) To use the image present in the network share, select the Use Network ISO as Fallback option. 4. enter an LC boot media image file. 5. Select the drivers required for the operating system.
NOTE: User account’s passwords are not captured in Operational Template, from reference Modular System for security reasons. Edit the Operational Template to add a new user account and password, and then apply the Operational Template on the managed Modular Systems. Else, you can apply the Operational Template without any changes to user accounts, and the same passwords that are used in the reference Modular System are applied on the managed Modular System. 1.
4. Modify the values of the available attributes. NOTE: Select the check box against each component since only the selected component’s configurations are applied on the managed system, when the Operational Template is applied. NOTE: When editing Operational Template, few Advanced Host Controller Interface (AHCI) component attributes that are read-only are listed as editable.
Assigning Operational Template and running Operational Template compliance for servers Assign an Operational Template to a server, and run the Operational Template compliance. Only after assigning an Operational Template to a server, you can view its Operational Template compliance status. You can compare a server’s configuration with an Operational Template by assigning the template to a server.
4. Enter a unique job name, description for the job, and click Deploy. To track this job, the Go to the Job List option is selected by default. Assigning Operational Template for Modular Systems Assign an Operational Template to a Modular System and run the Operational Template compliance. This operation compares the configuration of a Modular System and an Operational Template by assigning the selected template to a Modular System.
To track this job, the Go to the Job List option is selected by default. Unassigning Operational Template 1. In OMIMSSC, perform any one of the following tasks: • • Click Configuration and Deployment, and click Server View. Click Configuration and Deployment, and click Modular System View. Select the required devices and click Assign Operational Template and Run Compliance. The Assign Operational Template and Run Compliance page is displayed. 2.
8 Firmware update in OMIMSSC Maintain Dell EMC devices up-to-date by upgrading to the latest firmware to use security, issue fixes, and enhancements, using OMIMSSC. Update the firmware of devices using Dell EMC update repositories. Updating firmware is supported only on hardware compatible devices. For using the features available in OMIMSSC on the managed devices, the managed devices must have the minimum required firmware versions of iDRAC, Lifecycle Controller (LC), and BIOS.
Viewing update groups To view update groups: 1. In OMIMSSC, click Maintenance Center and then click Maintenance Settings. 2. In Maintenance Settings, click Update Groups. All the custom groups created are displayed with name, group type, and number of servers in the group. Creating custom update groups 1. In OMIMSSC console, click Maintenance Center, and then click Maintenance Settings. 2. In Maintenance Settings, click Update Groups, and then click Create. The Firmware Update Group page is displayed. 3.
Online update sources are repositories that are maintained by Dell EMC. Offline update sources are local repositories and used when there is no Internet connection. It is recommended that you create custom repositories and place the network share in the local intranet of OMIMSSC Appliance. This would save the Internet bandwidth and also provide a secure internal repository. Update firmware using one of the following update sources: • • DRM repository—is an offline repository.
DELL ONLINE FTP MX7000 CATALOG is a predefined update source of type FTP, and is part of DELL ONLINE FTP CATALOG. DELL ONLINE HTTP MX7000 CATALOG is a predefined update source of type HTTP, and is part of DELL ONLINE HTTP CATALOG. DELL ONLINE HTTPS MX7000 CATALOG is a predefined default update source of type HTTPS, and is part of DELL ONLINE HTTPS CATALOG.
1. In the OMIMSSC console, click Maintenance Center and then click Maintenance Settings. 2. In the Update Source page, click Create New and provide the update source name and description. 3. Select any of the following types of update source from the Source Type drop-down menu: • • • • FTP Sources—select to create an online or local FTP update source.
Integration with Dell EMC Repository Manager(DRM) OMIMSSC is integrated with DRM to create custom update sources in OMIMSSC. The integration is available from DRM version 2.2 onwards. Provide the discovered device information from OMIMSSC Appliance to DRM, and using the available inventory information, you can create a custom repository in DRM and set it as an update source in OMIMSSC for performing firmware updates and creating clusters on managed devices.
changing the update source. Server inventory is compared with update source, and suggestive actions are listed. This activity takes considerable time based on the number of devices and device components present. You cannot perform other tasks during this process. Refreshing inventory refreshes the entire device’s inventory even though you select a single component in that device. Sometimes, the inventory of the device is updated, but the page does not display the latest inventory.
• • When there are multiple network interfaces available in a single NIC card, there is only one entry for all the interfaces in the Component Information list. After the firmware updates are applied, all the NIC cards are upgraded. When a NIC card is added along with the existing cards, the newly added NIC card is listed as another instance in the Component Information list. After the firmware updates are applied, all the NIC cards are upgraded.
• • Run Now—select to apply the updates immediately. Select a date and time to schedule a firmware update in future. 5. Select any one of the following methods, and click Finish. • • Agent-free staged updates—updates that are applicable without a system restart are applied immediately, and the updates that require a restart are applied when the system restarts. To check if all the updates are applied, refresh the inventory. The entire update job fails, if the operation fails on even one device.
9 Creating clusters using Operational Template Creating logical switch for Storage Spaces Direct clusters Create logical switch from OMIMSSC in SCVMM. NOTE: The IP address that is entered in Configuration for Management section overrides the IP address that is entered in operating system component of Storage Spaces Direct predefined Operational Template. 1. In OMIMSSC, expand Configuration and Deployment, click Cluster View, and then click Create logical switch for Cluster. 2.
The Cluster View page is displayed. 2. Provide a cluster name, and select the predefined Operational Template for creating Storage Spaces Direct clusters. • Unassigned servers that belong only to a specific server model and NIC card are displayed based on the Operational Template you select from Operational Template drop-down menu. 3. To add servers into a cluster, select the servers by using the check box. 4. To add system-specific pool values, click Export Attribute Value Pool.
10 Managing devices in OMIMSSC Maintain servers and Modular Systems up-to-date by scheduling jobs for upgrading firmware for server and Modular Systems components. Manage servers by recovering servers to an earlier state by exporting its earlier configuration, applying the configurations of the old component on replaced component, and exporting LC logs for troubleshooting.
• There is a scheduled job associated with the protection vault. However, to delete such a protection vault, delete the scheduled job, and then delete the protection vault. 1. In OMIMSSC, click Maintenance Center > Maintenance Settings > Protection Vault. 2. Select the vault to delete and click Delete.
• • You cannot import a server profile after applying the filters. To import server profiles, clear all the applied filters. To import server profiles, you must have the iDRAC Enterprise license. 1. In OMIMSSC, under Maintenance Center, select the servers’ whose profiles you want to import, and click Import from Device Profile drop-down menu. The Import Server Profile page is displayed. 2. Provide the details, select the Import Server Profile Type you want.
The exported LC log file is saved in a folder and the folder is named after the server's service tag. LC logs are saved in the format: .. For example, 201607201030010597.xml.gz is the LC file name, which includes the date and time of the file when it was created. There are two options to collect LC logs: • • Complete LC logs—exports active and archived LC log files. They are large in size, and hence compressed to .
File description Use this page to view detailed information about recommended actions and some other technical information that are useful for tracking or alert purposes for a particular server. To view the contents of a file, click a file name: • • • You can search for particular message descriptions. You can either view the log files in the window or download the file to view additional log messages. You can view any comments provided by a user for an activity.
11 Configuration and deployment Discover 1. In OMIMSSC console, perform any one of the following steps: • • In the dashboard, click Discover Servers. In the navigation pane, click Configuration and Deployment, click Server View, and then click Discover. 2. Click Discover. To view the changes made, refresh the Credential Profile page.
• For SCCM users: • • • Create a task sequence. For more information, see Creating task sequence. For non-Windows operating system deployment, have a device type credential profile. For more information, see Creating credential profile. For SCVMM users: • • Create a hypervisor profile. For information about creating hypervisor profile, see Creating hypervisor profile. For Windows deployment, have a device type credential profile. For more information, see Creating credential profile. 1.
• • • For Windows operating system deployment on SCVMM, see Windows component for the OMIMSSC console extension for SCVMM. OMIMSSC For non-Windows operating system deployment, see Non-Windows component for the OMIMSSC console extensions. 8. To save the profile, click Finish. Installer folders The following folders are created after installing the console extension: • Log—this folder consists of console-related log information.
NOTE: Before exporting the pool values, add the IP address of the OMIMSSC Appliance where the OMIMSSC console extension is installed, to the local intranet site. For more information about adding the IP address in IE browser, see Browser settings section in Dell EMC OpenManage Integration for Microsoft System Center Version 7.1 for System Center Configuration Manager and System Center Virtual Machine Manager Installation Guide. 4.
Host name is a pool value and if you disable DHCP option, and then the following fields are pool values: • • • • • IP Address Subnet Mask Default Gateway Primary DNS Secondary DNS NOTE: Network File System (NFS) and Common Internet File System (CIFS) share types are supported for nonWindows operating system deployment. Discovery in enrolled MSSC After discovery, the server is added to the Hosts tab or the Unassigned tab.
The Part Replacement Configuration window is displayed. 2. Select the servers’ whose component you want to configure, and then click Part Replacement. NOTE: The option name expands to Configure Part Replacement when you hover over to Part Replacement. The Part Replacement Configuration window is displayed. Polling and notification 1. In OMIMSSC, click Maintenance Center, and then click Polling and Notification. 2. Click Polling and Notification. Launch iDRAC 1.
Run update 1. In OMIMSSC, click Maintenance Center, select the servers or Modular System groups, and an update source, and then click Run Update. 2. Select the servers or Modular System groups, and an update source, and then click Run Update. 3. enter a unique job name, description for the job, and click Create. To track this job, the Go to the Job List option is selected by default. Deploy Azure Stack HCI cluster 1. Create the required Windows and device credential profiles. 2.
12 Appendix Provide the time zone attribute values manually in MX7000 devices by referring to the bellow table: Table 6.
Time zone ID Time zone difference TZ_ID_32 (GMT+00:00) Casablanca TZ_ID_33 (GMT+00:00) Coordinated Universal Time TZ_ID_34 (GMT+00:00) Dublin, Edinburgh, Lisbon, London TZ_ID_35 (GMT+00:00) Monrovia, Reykjavik TZ_ID_36 (GMT+01:00) Amsterdam, Berlin, Bern, Rome, Stockholm, Vienna TZ_ID_37 (GMT+01:00) Belgrade, Bratislava, Budapest, Ljubljana, Prague TZ_ID_38 (GMT+01:00) Brussels, Copenhagen, Madrid, Paris TZ_ID_39 (GMT+01:00) Sarajevo, Skopje, Warsaw, Zagreb TZ_ID_40 (GMT+01:00) West Centr
Time zone ID Time zone difference TZ_ID_70 (GMT+06:00) Novosibirsk TZ_ID_71 (GMT+06:30) Yangon (Rangoon) TZ_ID_72 (GMT+07:00) Bangkok, Hanoi, Jakarta TZ_ID_73 (GMT+07:00) Krasnoyarsk TZ_ID_74 (GMT+08:00) Beijing, Chongqing, Hong Kong, Urumqi TZ_ID_75 (GMT+08:00) Irkutsk TZ_ID_76 (GMT+08:00) Kuala Lumpur, Singapore TZ_ID_77 (GMT+08:00) Perth TZ_ID_78 (GMT+08:00) Taipei TZ_ID_79 (GMT+08:00) Ulaanbaatar TZ_ID_80 (GMT+08:30) Pyongyang TZ_ID_81 (GMT+09:00) Osaka, Sapporo, Tokyo TZ_ID_82
13 Appendix 2 Populating Pool value CSV file Table 7.
14 Accessing documents from the Dell EMC support site You can access the required documents in one of the following ways: • Using the following links: • • • • • • For Dell EMC Enterprise Systems Management, Dell EMC Remote Enterprise Systems Management, and Dell EMC Virtualization Solutions documents — www.dell.com/esmmanuals For Dell EMC OpenManage documents — www.dell.com/openmanagemanuals For iDRAC documents — www.dell.