
Users Guide


You can update the selected devices by using the following update sources:
• Online FTP or local FTP source
• Online HTTP or local HTTP source
• Online HTTPS or local HTTPS source
• Local Dell Repository Manager (DRM) source
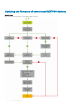
Steps
1 Create or select a default update source. For more information about update source, see Update source.
NOTE: Ensure that you update the update source with the latest catalog by using the polling and notication feature.
For more information about polling and notication, see Polling and notication.
If you are updating Storage Spaces Direct clusters, select a predened update source specic for Storage Spaces Direct clusters.
These update sources are displayed only in the Maintenance Center page.
If you are updating MX7000 devices, select a predened update source specic for Modular Systems. These update sources are
displayed only in Maintenance Center page.
2 Create or select the default update groups. For more information about update groups, see Update groups.
3 Discover or synchronize the devices with a registered Microsoft console, and ensure that the device inventory is up-to-date. For more
information about discovery and synchronization, see Device discovery and synchronization . For more information about server
inventory, see
Launching server view.
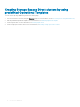
4 Update the device by using one of the following options:
• Select the required devices, and click Run Update. For more information, see Upgrading or downgrading rmware versions using
run update method.
NOTE
: To downgrade the rmware of device components, select the Allow Downgrade check-box. If this option
is not selected, there is no action on the component that requires a rmware downgrade.
• Select the rmware update component in Operational Template and deploy this template. For more information about Operational
Template, see Operational Template.
Conguring replaced components
To match the rmware version, or the conguration settings of the replaced component to that of the old component, see Applying
rmware and conguration settings.
Exporting and importing server proles
About this task
Export the server prole at a particular instance, and then import the prole to reinstate the server:
Steps
1 Create a protection vault. For more information about creating protection vault, see Creating protection vault.
2 Export a server prole. For more information about exporting server prole, see Exporting server prole.
3 Import server prole to the same server from which it was exported. For more information about importing server prole, see
Importing server prole.
NOTE
: You can import the server prole including the RAID conguration only if the RAID conguration is exported to
the prole.
Use cases of OMIMSSC 15