
Setup Guide
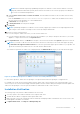


Table Of Contents
- OpenManage Integration for VMware vCenter Quick Installation Guide for vSphere Web Client Version 3.2
- Quick Start Installation
- Installation Introduction
- Prerequisites
- Hardware Requirements
- Software Requirements
- Installation and Configuration Overview
- Deploying the OMIVV OVF Using the vSphere Web Client
- Registering a vCenter server by using a user with necessary privileges
- Registering OpenManage Integration for VMware vCenter and importing license file
- Installation Verification
- Upgrading OMIVV from existing version to current version
- Migrating from 2.x to 3.2
- Recovering OMIVV after unregistering earlier version of OMIVV
- Understanding How to Configure or Edit the OpenManage Integration for VMware vCenter
- Additional Configuration Settings
- OpenManage Integration for VMware vCenter licensing
- For More Configuration Information
- Related documentation and resources

NOTE: Dell recommends registering OpenManage Integration for VMware vCenter with the VMware vCenter by
using Fully Qualified Domain Name (FQDN). Ensure that the host name of the vCenter is properly resolvable by the
DNS server for FQDN-based registrations.
b. Under vCenter User Account, in vCenter User Name, enter the Admin user name or the user name with necessary
privileges.
Enter the username as domain\user or domain/user or user@domain. OMIVV uses the Admin user account or
the user with necessary privileges for vCenter administration.
c. In Password, enter the password.
d. In Verify Password, enter the password again.
22. Click Register.
NOTE: OpenManage Integration for VMware vCenter currently supports up to 1000 hosts for large deployment mode
with a single vCenter instance or multiple vCenter servers by using the linked mode.
23. Perform one of the following actions:
● If you are using the OMIVV trial version, you can view the OMIVV icon.
● If you are using the full product version, the license file is emailed to you, and you can import this license to your virtual
appliance. To import the license file, click Upload License.
24. In the Upload License window, click Browse to navigate to the license file, and then click Upload to import the license file.
NOTE: If you modify or edit the license file, the license file does not work and you can contact Dell Support by going
to
www.dell.com/support/softwarecontacts
to locate the regional Dell Support phone number for your product. The
license file used in this procedure does not come with a hard-coded file name.
Once OMIVV is registered, the OMIVV icon is displayed under the Administration category of the web client home page.
Figure 4. OpenManage Integration for VMware vCenter successfully added to vCenter
For all vCenter operations, OMIVV uses the privileges of a registered user and not the privileges of a logged-in user.
For example: User X with the necessary privileges registers OMIVV with vCenter, and user Y has only Dell privileges. User Y
can now log in to the vCenter and can trigger a firmware update task from OMIVV. While performing the firmware update task,
OMIVV uses the privileges of user X to put the machine into maintenance mode or reboot the host.
Installation Verification
The following steps verify that the OMIVV installation was successful:
1. Close any vSphere Client windows and start a new vSphere Web Client.
2. Confirm that the OMIVV icon appears inside vSphere Web Client.
3. Make sure that vCenter can communicate with the OMIVV by attempting a PING command from the vCenter server to the
virtual appliance IP address or hostname.
4. In vSphere Web Client, click Plug-ins > Managed Plug-ins.
Quick Start Installation
11