OpenManage Integration for VMware vCenter Quick Installation Guide for vSphere Web Client Version 3.2 April 2017 Rev.
Notes, cautions, and warnings NOTE: A NOTE indicates important information that helps you make better use of your product. CAUTION: A CAUTION indicates either potential damage to hardware or loss of data and tells you how to avoid the problem. WARNING: A WARNING indicates a potential for property damage, personal injury, or death. Copyright © 2017 Dell Inc. or its subsidiaries. All rights reserved. Dell, EMC, and other trademarks are trademarks of Dell Inc. or its subsidiaries.
Contents Chapter 1: Quick Start Installation................................................................................................ 4 Installation Introduction......................................................................................................................................................4 Prerequisites.........................................................................................................................................................................
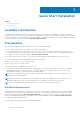
1 Quick Start Installation Topics: • • Installation Introduction Prerequisites Installation Introduction This guide provides step-by-step instructions for the installation and configuration of OpenManage Integration for VMware vCenter (OMIVV) on Dell servers.
● OMSA support for older servers and ESXi version support (both deployment and management) Software Requirements The vSphere environment must fulfill virtual appliance, port access, and listening port requirements. NOTE: VMware vSphere has both a desktop client and Web client. Requirements for Web Client Supported for vCenter version 5.5 upto vCenter version 6.0 U3. NOTE: You will be able to register vCenters under one Platform Services Controller to a single OMIVV appliance only.
The Deploy OVF Template wizard is displayed. 6. In the Select Source window, do the following: a. URL: If you want to download the OVF package from internet, select URL. b. Local file: If you want to select the OVF package from your local system, select the Local file and click Browse. NOTE: The installation can take between 10 to 30 minutes, if the OVF package resides on a network share. For a quick installation, it is recommended that you host the OVF on a local drive. 7. Click Next.
Now, a user with the required privileges can experience the OMIVV features with Dell hosts.
Assigning Dell privileges to the role in vSphere Web client You can edit an existing role to assign Dell privileges. When completed, these privileges are applied to the user or group that is assigned the edited role. NOTE: Ensure that you are logged in as a user with Administrator privileges. To assign the Dell privileges to an existing role, perform the following: 1. Log in to the vSphere Web client with administrative rights. 2. Browse to Administration → Role Manager in vSphere Web client. 3.
Figure 1. Console tab 7. In the Date and Time tab, select the Synchronize date and time over the network. The NTP Servers box is displayed. 8. Add valid NTP server details to which your vCenter is synchronized with. 9. Click Time Zone and select the applicable time zone, and click OK. 10. To configure static IP to the OMIVV appliance, click Network Configuration, or skip to step 17. 11. Select Auto eth0, and then click Edit. 12. Select the IPV4 Settings tab, and select Manual in the Method drop-down. 13.
Figure 2. Administration Console 19. In the Administration Console login window, enter the password, and then click Login. Figure 3. vCenter registration window from Administration Console 20. In the vCenter Registration window, click Register a New vCenter Server. 21. In the Register a New vCenter Server window, perform the following substeps: a. Under vCenter Name, in the vCenter Server IP or Hostname text box, enter the server IP or host name, and then in the Description text box, enter a description.
NOTE: Dell recommends registering OpenManage Integration for VMware vCenter with the VMware vCenter by using Fully Qualified Domain Name (FQDN). Ensure that the host name of the vCenter is properly resolvable by the DNS server for FQDN-based registrations. b. Under vCenter User Account, in vCenter User Name, enter the Admin user name or the user name with necessary privileges. Enter the username as domain\user or domain/user or user@domain.
5. In the Plug-in Manager window verify the OMIVV is installed and enabled. Upgrading OMIVV from existing version to current version 1. To open Administration Console, in the Help and Support tab of OpenManage Integration for VMware vCenter, click the link under Administration Console or start a web browser and provide the https:\\ url. 2. In the Login dialog box, type the password. 3. In Administration Console, in the left pane, click APPLIANCE MANAGEMENT. 4.
5. Set up the network and time zone on the appliance. Ensure that the new OpenManage Integration version 3.2 appliance has the same IP address as the old appliance. To set up the network details, see Registering OMIVV and importing the license file. NOTE: The OMIVV plug-in might not work properly if the IP address for the OMIVV 3.2 appliance is different from the IP address of the older appliance. In such a scenario, unregister and re-register all the vCenter instances. 6.
2 Understanding How to Configure or Edit the OpenManage Integration for VMware vCenter After you complete the basic installation of the OMIVV, the Initial Configuration Wizard is displayed when you click the OMIVV icon. Use the Initial Configuration Wizard to configure the Settings on first launch. For subsequent instances use the Settings page. From the Initial Configuration Wizard you can create a connection profile, edit the settings of warranty, inventory, events and alarms.
● all available vCenters 1. In the Initial Configuration Wizard, click Next in the Welcome screen. 2. Select one vCenter or all vCenters from the vCenters drop-down list. Select an individual vCenter for those not configured yet or if you have added a new vCenter to your environment. The vCenter selection page allows you to select one or more vCenters to configure settings. 3. Click Next to proceed to the Connection Profile description page.
○ Perform one of the following actions: ■ To download and store the iDRAC certificate and validate it during all future connections, select Enable Certificate Check. ■ To not store and perform the iDRAC certificate check during all future connections, clear Enable Certificate Check. 4.
NOTE: For servers that do not have either an iDRAC Express or Enterprise card, the iDRAC test connection result states Not Applicable for this system. Scheduling Inventory Jobs [Wizard] You can configure inventory schedule using the Configuration Wizard or OpenManage Integration under OpenManage Integration > Manage > Settings. NOTE: To make sure that the OMIVV continues to display updated information, it is recommended that you schedule a periodic inventory job.
1. In the Initial Configuration Wizard, under Event Posting Levels, select one of the following: ● ● ● ● Do not post any events — Block hardware events. Post All Events — Post all hardware events. Post only Critical and Warning Events — Post only critical or warning level hardware events. Post only Virtualization-Related Critical and Warning Events — Post only virtualization-related critical and warning events; this is the default event posting level. 2.
NOTE: You can also add or remove a chassis by clicking the Plus Icon displayed on the top left corner of the Associated Chassis page.
3 Additional Configuration Settings The following configuration settings are optional. However, it can be used for monitoring the hosts in your VMware vCenter using the plug-in. ● Warranty Expiration Notification ● Firmware Update Repository ● OMSA Web Server URL Topics: • • • Warranty Expiration Notification Firmware Update Repository OMSA Web Server URL Warranty Expiration Notification Viewing Warranty Expiration Notification Settings 1. In the OMIVV, click Manage > Settings tab. 2.
NOTE: OMIVV connects to the Internet to get the catalog and firmware packages applicable for your hosts. Depending on your network settings, configure proxy for the firmware update task to run successfully from Dell online. ● Shared Network Folder — Created with Dell Repository Manager. These local repositories should be located on CIFS or NFS file share. Setting Up the Firmware Update Repository You can configure the firmware update repository on the OMIVV in the Settings tab. 1.
4 OpenManage Integration for VMware vCenter licensing The OpenManage Integration for VMware vCenter has two types of licenses: ● Evaluation license—when the OMIVV version 3.2 appliance is powered on for the first time, an evaluation license is automatically installed. The trial version contains an evaluation license for five hosts (servers) managed by the OpenManage Integration for VMware vCenter.
NOTE: The license file might be packaged inside a .zip file. Ensure that you unzip the .zip file and upload only the license .xml file. The license file is likely to be named based on your order number, such as 123456789.xml. Options after uploading Licenses License file for new purchases When you place an order for purchasing a new license, an email is sent from Dell about the order confirmation, and you can download the new license file from the Dell Digital store that is available at http://www.dell.
5 For More Configuration Information For a complete guide on Dell Management Plug-in configuration, management, and deployment options, see the Dell Management Plug-in for VMware vCenter User's Guide.
6 Related documentation and resources In addition to this guide, you can access the other guides available at dell.com/support/manuals. On the Manuals page, click View products under the Choose from all products category. In the All products section, click Software & Security > Virtualization Solutions. Click OpenManage Integration for VMware vCenter 3.