
Install Guide

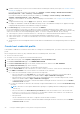
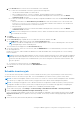
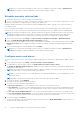


Table Of Contents
- OpenManage Integration for VMware vCenter Version 5.1 Installation Guide
- Introduction
- Install and configure OMIVV
- Prerequisite checklist
- Download OpenManage Integration for VMware vCenter
- Deploy OMIVV OVF using vSphere Client (HTML-5)
- Generate a Certificate Signing Request (CSR)
- Upload HTTPS certificate
- Restore default HTTPS certificate
- Configure deployment mode
- Register new vCenter server
- Configure OMIVV appliance
- Reconfigure OMIVV after upgrading registered vCenter version
- Manage backup and restore
- Update OMIVV appliance and repository location
- Upgrade OMIVV appliance using RPM
- Upgrade OMIVV appliance using backup and restore
- Unregister OpenManage Integration for VMware vCenter
- Recover OMIVV after un-registration
- Configure OMIVV appliance using initial configuration wizard
- Accessing documents from the Dell EMC support site
- Related Documentation
- Contacting Dell

d. In the Host Root area, enter the host local credentials or AD credentials.
● To enter the local credentials of ESXi host, perform the following tasks:
○ The default username is root. You cannot edit it.
○ Enter a valid password. For vCenter 6.7 and later, entering valid password is not mandatory.
○ To download and store the host certificate and validate it during all future connections, select the Enable
Certificate Check check box.
● To enter the credentials for hosts that are already configured and enabled for AD, select the Use Active Directory
check box.
○ Enter the username in the Active Directory User Name box. Enter the username in one of the formats such
as domain\username or username@domain. The username is limited to 256 characters. See the Microsoft
Active Directory Documentation for username restrictions.
○ Enter password.
○ To download and store the host certificate and validate it during all future connections, select the Enable
Certificate Check check box.
NOTE: For hosts running ESXi 6.5 U2 and later versions, OMIVV can obtain the iDRAC information even if incorrect
host credentials are entered.
5. Click Next.
The Select Hosts page is displayed.
6. On the Select Hosts page, expand the tree view and select the hosts, and then click OK.
● Click ADD HOST to add or remove hosts from the Associated Hosts page.
NOTE: Do not add a PowerEdge MX server with a disabled iDRAC IPv4 to a host credential profile. These servers
are managed using a chassis credential profile.
The selected hosts are displayed on the Associated Hosts page.
7. To test the connection, select one or more hosts, and click BEGIN TEST. It is recommended that you test the connection
for all configured hosts.
During test connection, OMIVV enables the WBEM service and then disables after retrieving iDRAC IP for hosts running
ESXi 6.5 and later.
NOTE:
Even after entering valid credentials, the test connection operation may fail for host, and a message is displayed
indicating that invalid credentials are entered. This issue is observed if ESXi is blocking the access. Multiple attempts to
connect the ESXi by using incorrect credentials blocks you from accessing ESXi for 15 minutes. Wait 15 minutes, and
retry the operation.
● To stop the test connection process, click ABORT TEST.
You can view the test connection results in the TEST RESULTS section.
8. Click Finish.
Schedule inventory job
To view the latest inventory data on OMIVV, you must schedule an inventory job to run periodically to ensure that inventory
information of hosts or the chassis is up-to-date. It is recommended that you run the inventory job on a weekly- basis.
NOTE:
The chassis is managed in OMIVV context. There is no context of vCenter in chassis management. After scheduled
host inventory is complete, the chassis inventory is triggered for all the chassis that are managed using OMIVV.
NOTE: The settings in this page are reset to default each time the configuration wizard is invoked. If you have previously
configured a schedule for inventory, ensure that you replicate the previous schedule in this page before completing the
wizard functions so that the previous schedule is not overridden by the default settings.
1. On the OMIVV home page, click Settings > vCenter Settings > Data Retrieval Schedule > Inventory Retrieval.
2. Select the Enable Inventory Data Retrieval (Recommended) check box.
In PSC environment with multiple vCenter servers, if the schedule for individual vCenter is different and you select the All
Registered vCenters option to update the inventory schedule, the inventory schedule settings page displays the default
schedule.
3. Select the inventory data retrieval day and time, and click APPLY.
Configure OMIVV appliance using initial configuration wizard
41