
Install Guide
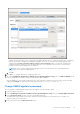

Table Of Contents
- OpenManage Integration for VMware vCenter Version 5.1 Installation Guide
- Introduction
- Install and configure OMIVV
- Prerequisite checklist
- Download OpenManage Integration for VMware vCenter
- Deploy OMIVV OVF using vSphere Client (HTML-5)
- Generate a Certificate Signing Request (CSR)
- Upload HTTPS certificate
- Restore default HTTPS certificate
- Configure deployment mode
- Register new vCenter server
- Configure OMIVV appliance
- Reconfigure OMIVV after upgrading registered vCenter version
- Manage backup and restore
- Update OMIVV appliance and repository location
- Upgrade OMIVV appliance using RPM
- Upgrade OMIVV appliance using backup and restore
- Unregister OpenManage Integration for VMware vCenter
- Recover OMIVV after un-registration
- Configure OMIVV appliance using initial configuration wizard
- Accessing documents from the Dell EMC support site
- Related Documentation
- Contacting Dell

If the path is different, in the Appliance Management window, in the APPLIANCE UPDATE area, click Edit to update
the path to https://linux.dell.com/repo/hardware/vcenter-plugin-x64/latest/ in the Update Repository Path text box,
and click Apply.
3. Compare the available OMIVV appliance version and current OMIVV appliance version.
4. To apply the update to the OMIVV appliance, under Appliance Settings, click Update Virtual Appliance.
5. In the UPDATE APPLIANCE dialog box, click Update.
After you click Update, you are logged out from the ADMINISTRATION CONSOLE window.
6. Close the web browser.
Once the appliance is RPM upgraded, ensure that you clear the browser cache before logging in to the Dell admin portal.
NOTE: During the upgrade process, the appliance restarts once or twice.
NOTE: After the RPM upgrade is complete, you can view the login screen in the OMIVV console. Open a browser, enter
the https:\\<ApplianceIP|hostname> link, and go to the APPLIANCE UPDATE area. You can verify that the available and
current OMIVV appliance versions are same. If you have enabled Proactive HA on clusters, OMIVV unregisters the Dell Inc
provider for those clusters and re-registers the Dell Inc provider after upgrade. Health updates for the Dell EMC hosts are
not available until upgrade is complete.
Upgrade OMIVV appliance using backup and restore
It is recommended that you do not change or remove cluster or host that is managed by OMIVV after taking backup and before
restoring the backup file. If the cluster or host that is managed by OMIVV is changed or removed, reconfigure profiles (for
example, Host credential profile, cluster profile) associated with those clusters and hosts after restore.
Do not unregister the OMIVV plug-in from vCenter. Unregistering the plug-in from vCenter removes Dell health update provider
for Proactive HA clusters that are registered on vCenter by the OMIVV plugin.
To update the OMIVV appliance from an older version to current version, perform the following steps:
1. Back up the data of earlier releases.
2. Turn off the older OMIVV appliance from vCenter.
3. Deploy the new OpenManage Integration appliance OVF.
4. Power on the OpenManage Integration new appliance.
5. Set up the network and time zone for the new appliance.
NOTE:
It is recommended that you retain the identity (IP or FQDN) of the earlier OMIVV appliance for the new OMIVV
appliance.
NOTE: If the IP address for the new appliance is different from the IP address of the older appliance the Proactive HA
feature may not work properly. In such a scenario, disable and enable the Proactive HA for each cluster where Dell EMC
host is present.
6. The OMIVV appliance comes with default certificate. If you want to have a custom certificate for your appliance, update the
same. See Generate a Certificate Signing Request (CSR) on page 17 and Upload HTTPS certificate on page 18. Else, skip this
step.
7. Restore the database to the new OMIVV appliance. See Restoring the OMIVV database from a backup.
8. Verify the appliance. For more information, see Verify installation on page 24.
9. After the upgrade, It is recommended that you run the inventory again on all the hosts that the OMIVV plugin manages.
The events and alarms settings are not enabled after restoring the appliance. You can enable the Events and Alarms settings
again from the Settings tab.
If you upgrade from an earlier version of OMIVV to the available version, all the scheduled job continues to run.
NOTE:
If the identity (IP or FQDN) of the new OMIVV version Y is changed from the OMIVV version X, configure the
trap destination for the SNMP traps to point to the new appliance. The identity change is fixed by running the inventory
on these hosts. While running the inventory on hosts, if SNMP traps do not point to the new IP, those hosts are listed as
noncomplaint. To fix host compliance issues, see Management compliance section in User's Guide.
36 Install and configure OMIVV