
Install Guide
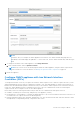
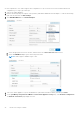
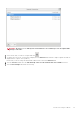
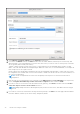
Table Of Contents
- OpenManage Integration for VMware vCenter Version 5.1 Installation Guide
- Introduction
- Install and configure OMIVV
- Prerequisite checklist
- Download OpenManage Integration for VMware vCenter
- Deploy OMIVV OVF using vSphere Client (HTML-5)
- Generate a Certificate Signing Request (CSR)
- Upload HTTPS certificate
- Restore default HTTPS certificate
- Configure deployment mode
- Register new vCenter server
- Configure OMIVV appliance
- Reconfigure OMIVV after upgrading registered vCenter version
- Manage backup and restore
- Update OMIVV appliance and repository location
- Upgrade OMIVV appliance using RPM
- Upgrade OMIVV appliance using backup and restore
- Unregister OpenManage Integration for VMware vCenter
- Recover OMIVV after un-registration
- Configure OMIVV appliance using initial configuration wizard
- Accessing documents from the Dell EMC support site
- Related Documentation
- Contacting Dell

● If you are using the OMIVV trial version, you can view the OMIVV icon.
● If you are using the full product version, the license file can be downloaded from the Dell Digital Locker at https://
www.dell.com/support, and you can import this license to your virtual appliance. To import the license file, click
Upload License. For more information about uploading a license, see Upload license to OMIVV Administration Console on
page 21.
Figure 3. OpenManage Integration for VMware vCenter successfully added to vCenter
For all vCenter operations, OMIVV uses the privileges of a registered user and not the privileges of a logged-in user.
For example: User X with the necessary privileges registers OMIVV with vCenter, and user Y has only Dell privileges. User Y
can now log in to the vCenter and can trigger a firmware update task from OMIVV. While performing the firmware update task,
OMIVV uses the privileges of user X to put the machine into maintenance mode or reboot the host.
Upload license to OMIVV Administration Console
Ensure that your licenses are ready for download at Dell Digital Locker at https://www.dell.com/support . If you have
ordered more than one license, they might be shipped separately at different times. You can check the status of other license
items at Order Status at https://www.dell.com/support. The license file is available as an .XML format.
1. Go to https://<ApplianceIP/hostname/>.
2. In the Login dialog box, type the password.
3. In the left pane, click VCENTER REGISTRATION.
The registered vCenter servers are displayed in the working pane.
4. Click Upload License.
5. In the UPLOAD LICENSE dialog box, click Browse to go to the license file, and then click Upload.
NOTE:
If you modify or edit the license file, the license file (.XML file) does not work. You can download the .XML
file (license key) through the Dell Digital Locker. If you are unable to download your license keys, contact Dell Support
by going to Contact Technical Support at https://www.dell.com/support to locate the regional Dell Support phone
number for your product.
Install and configure OMIVV 21