OpenManage Integration for VMware vCenter Version 5.1 Installation Guide 1 April 2020 Rev.
Notes, cautions, and warnings NOTE: A NOTE indicates important information that helps you make better use of your product. CAUTION: A CAUTION indicates either potential damage to hardware or loss of data and tells you how to avoid the problem. WARNING: A WARNING indicates a potential for property damage, personal injury, or death. © 2010 - 2020 Dell Inc. or its subsidiaries. All rights reserved. Dell, EMC, and other trademarks are trademarks of Dell Inc. or its subsidiaries.
Contents Chapter 1: Introduction................................................................................................................. 5 OpenManage Integration for VMware vCenter (OMIVV) licensing........................................................................ 5 Buy software license.....................................................................................................................................................5 Manage Licenses............................................
Reset backup and restore settings......................................................................................................................... 35 Update OMIVV appliance and repository location.................................................................................................... 35 Upgrade OMIVV appliance using RPM.........................................................................................................................
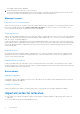
1 Introduction This guide provides instructions to install and configure OpenManage Integration for VMware vCenter (OMIVV). OMIVV is used to discover, monitor, and manage PowerEdge servers running VMware vCenter. After successfully completing the installation of OMIVV, to perform inventory management, monitoring and alerts, firmware updates, and warranty management, see OpenManage Integration for VMware vCenter User's Guide available at https://www.dell.com/support.
The DellEMC support page is displayed. 2. Download and save the license file to a known location. The license file might be packaged inside a .zip file. Ensure that you unzip the .zip file and upload only the license .xml file. The license file is likely to be named based on your order number, such as 123456789.xml. Manage Licenses License file for new purchases When you order a new license, an email is sent from Dell EMC after the order confirmation.
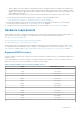
○ OMIVV supports only IPv4 IP addresses. Although both static IP assignment and DHCP assignment are supported, it is recommended that you assign a static IP address. Assign a static IP address and hostname when you deploy an OMIVV appliance with a valid DNS registration. A static IP address ensures that during the system restart, the IP address of the OMIVV appliance remains same. ○ Ensure that OMIVV hostname entries are present in both forward and reverse lookup zones in your DNS server.
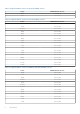
Table 1. Supported BIOS version for 12G PowerEdge servers Server Minimum BIOS Version R820 1.7.2 or later R920 1.1.0 or later Table 2. Supported BIOS version for 13G PowerEdge servers Server Minimum BIOS Version R630 1.0.4 or later R730 1.0.4 or later R730xd 1.0.4 or later R430 1.0.4 or later R530 1.0.2 or later R830 1.0.2 or later R930 1.0.2 or later R230 1.0.2 or later R330 1.0.2 or later T630 1.0.2 or later T130 1.0.2 or later T330 1.0.2 or later T430 1.0.
Table 3. Supported BIOS version for iDRAC9-based PowerEdge servers Server Minimum BIOS Version T640 1.0.0 or later T440 1.0.0 or later R540 1.0.0 or later FC640 1.0.0 or later R6415 1.0.0 or later R7425 1.0.0 or later R7415 1.0.0 or later XR2 2.2.11 or later MX740C 1.0.0 or later MX840C 1.0.0 or later R6515 1.0.3 or later R7515 1.0.3 or later R6525 1.0.0 or later R7525 1.2.4 or later Table 4.
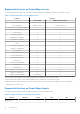
Supported features on PowerEdge servers The following features are supported on the hosts that are managed by OpenManage Integration for VMware vCenter: Table 7.
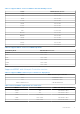
Table 8. Supported features on modular infrastructure Features M1000e VRTX FX2s MX Hardware Inventory Y Y Y Y Link and Launch CMC or Management Module Y Y Y Y N/A Y Y Y Warranty Information Y Y Y Y Health Reporting Y Y Y Y Multi-chassis management group relationship information N N N Y Firmware Update N N N Y License Information Storage space required for provisioned storage The OMIVV virtual appliance requires at least 95 GB of disk space for provisioned storage.
Supported ESXi versions on managed hosts The following table provides information about the supported ESXi versions on managed hosts: Table 10. Supported ESXi versions ESXi Version Platform 12G 13G iDRAC9-based servers 6.0 U3 Y Y N 6.5 Y Y N 6.5 U1 Y Y Y 6.5 U2 Y Y Y 6.5 U3 Y Y Y 6.7 N Y Y 6.7 U1 N Y Y 6.7 U2 N Y Y 6.7 U3 N Y Y 7.0 N Y Y NOTE: The PowerEdge MX host is supported only when used with ESXi 6.5 U2 and later.
Table 11. Virtual appliance Port Protocols Number Port Type Maximum Directi Encryptio on n Level Destination Usage Description by vSphere Client and Dell Admin portal.
Table 13. Dell Online destination URL Feature Destination URL Warranty https://apigtwb2c.us.dell.com Firmware Update https://downloads.dell.com RPM Upgrade https://linux.dell.
2 Install and configure OMIVV Ensure that all requirements are met and you are running the required VMware vCenter. For more information, see Hardware requirements on page 7 and Software requirements on page 11. The following high-level steps outline the overall installation and configuration procedure for OMIVV: 1. Download the DellEMC_OpenManage_Integration_..zip file from the Dell support website at https://www.dell.com/support.
● The vCenter server is running. ● You determine the location of the OMIVV installation directory. ● The OMIVV and vCenter server are on the same network. ● There is a route between the vCenter, OMIVV, and the iDRAC networks, if vCenter, OMIVV, and iDRAC are connected to different networks. This is applicable only If the OMIVV appliance is not configured with two NICs.
The Select a Name and Folder window is displayed. NOTE: If the OVF package is saved on a network share, the installation process can take between 10—30 minutes. For a quick installation, it is recommended that you host the OVF on a local drive. 7. In the Select Name and Folder window, perform the following: a. In the Virtual machine name field, enter the name of the template. The name can include up to 80 characters. b.
2. If you continue with the request, in the GENERATE CERTIFICATE SIGNING REQUEST dialog box, enter information about the common name, organization, locality, state, country, and email address. Click Continue. 3. Click Download, and then save the resulting CSR to an accessible location. Upload HTTPS certificate Ensure that the certificate uses the PEM format. You can use the HTTPS certificates for secure communication between OMIVV appliance and host systems.
● If the verification is successful, the OMIVV appliance restarts and the deployment mode is changed after you confirm the change. ● If the required deployment mode is already set, a message is displayed. 5. If the deployment mode is changed, confirm the changes, and then the appliance is restarted to enable the deployment mode to be updated. NOTE: During the OMIVV appliance bootup, the allocated system resources are verified against the set deployment mode.
Figure 2. vCenter Registration 3. In the vCenter Registration window, click Register a New vCenter Server. 4. In the Register a New vCenter Server window, perform the following substeps: a. Under vCenter Name, in the vCenter Server IP or Hostname text box, enter the server IP or FQDN, NOTE: It is recommended that you register OMIVV with the VMware vCenter by using Fully Qualified Domain Name (FQDN).
● If you are using the OMIVV trial version, you can view the OMIVV icon. ● If you are using the full product version, the license file can be downloaded from the Dell Digital Locker at https:// www.dell.com/support, and you can import this license to your virtual appliance. To import the license file, click Upload License. For more information about uploading a license, see Upload license to OMIVV Administration Console on page 21. Figure 3.
Register vCenter server using a non-administrative account You can register vCenter servers for the OMIVV appliance with vCenter administrator credentials or a non-administrator user with the Dell privileges. To enable a non-administrator user with the required privileges to register a vCenter server, perform the following steps: 1. Create a role or modify existing role with a required privileges for the role.
● Lifecycle Manager: General Privileges ○ Read NOTE: The vSphere Lifecycle Manager General Privileges are applicable only for vCenter 7.0 and later. ● Host profile ○ Edit ○ View ● Permissions ○ Modify permission ○ Modify role ● Sessions ○ Validate session ● Task ○ Create ○ Update NOTE: If a vCenter server is registered using non-administrator user to access any OMIVV features, non-administrator user must have Dell privileges.
2. On the VCENTER REGISTRATION page, under vSphere Lifecycle Manager, click Register. The REGISTER VSPHERE LIFECYCLE MANAGER dialog box is displayed. 3. Click Register vSphere Lifecycle Manager. The confirmation message is displayed that indicates the successful registration of vSphere Lifecycle Manager. For information about managing cluster using vSphere Lifecycle Manager, see the OMIVV User's Guide available at https:// www.dell.com/support.
NOTE: When the OMIVV appliance is not able to retrieve an IP address from the network (DHCP), 0.0.0.0 is displayed as the IP address. To resolve this, you must manually configure the static IP. a. On the Date and Time tab, select the Synchronize date and time over the network check box. The Synchronize date and time over the network check box is enabled only after NTP is configured successfully using the Admin portal.
a. Click the IPv4 Settings tab, select Manual from the Method drop-down list, and click Add. NOTE: If you select Automatic (DHCP), do not enter any IP address because the OMIVV appliance will automatically receive IP from the DHCP server during the next restart. b. Enter a valid IP, netmask (in the Classless Inter-Domain Routing (CIDR) format), and gateway information. If you enter an IP address in the Netmask box, it is automatically converted to its respective CIDR format. c.
NOTE: Sometimes, after you configure the OMIVV appliance with a static IP, the OMIVV terminal utility page does not immediately refresh and display the updated IP. To resolve this issue, exit the OMIVV terminal utility, and then log in again. 8. To change the hostname of the OMIVV appliance, click Change Hostname. a. Enter a valid hostname, and click Update hostname. NOTE: If any vCenter servers are already registered with the OMIVV appliance, unregister and re-register all the vCenter instances.
● DNS requirements—The OMIVV supports DNS configuration for only one network. For more information about DNS configuration, go to step 9 (b) in this topic. 1. Turn off the OMIVV appliance. 2. Edit the VM settings using the vSphere Client (HTML-5) and add the additional Network adapter. To edit the VM settings, right-click VM, and then click Edit Settings. 3. Click ADD NEW DEVICE, select Network Adapter. a. Select the appropriate network for the NIC, and then select the Connect At Power On check box. b.
WARNING: Do not use "+" to add any new network interface. It is mandatory to use the vSphere Edit Settings to add a NIC. 6. Select the NIC that you want to configure and click . 7. To identify the correct NIC, use the MAC ID displayed on the Ethernet tab, and then compare it against the MAC ID displayed in the vSphere Client (HTML-5). Ensure that you do not change the default MAC address that is listed in the Ethernet tab. 8.
a. Select Manual or Automatic (DHCP) from the Method drop-down list. b. If you select the Manual method, click Add, and then enter the valid IP address, Netmask (in the CIDR format), and gateway details. It is recommended that you use the static IP in case if you want to control over the priority of the DNS servers (primary and secondary DNS entries). Typically, vSphere elements of data center such as vCenter and ESXi hosts are managed using hostname or FQDN.
Typically, the network that you have configured as the default gateway does not require any manual route configuration because the gateway is capable of providing the reachability. However, for networks where default gateway is not configured (the Use this connection only for resources on its network check box is selected), a manual route configuration may be required. Because the default gateway is not configured for this network to reach external networks, manual routing configurations are required.
5. Retype the new password in the Confirm New Password text box. 6. Click Change Admin Password. Configure Network Time Protocol (NTP) and set local time zone 1. Open the OMIVV web console. 2. In the OpenManage Integration for VMware vCenter Virtual Appliance Setup utility, click Date/Time Properties. Ensure to enter the NTP details in Admin console. For more information, see Set up Network Time Protocol (NTP) servers on page 32. 3.
The following message is displayed: All the settings in the appliance will be Reset to Factory Defaults and the appliance will be rebooted. Do you still wish to continue? 3. To reset the appliance, click Yes. If you click Yes, the OMIVV appliance is reset to the factory default settings and all other settings and existing data is deleted. After the factory reset is complete, register vCenters to OMIVV appliance again.
c. In Password, enter the password. d. In Enter the password used to encrypt backups, type the encrypted password in the box. The encryption password can contain alphanumeric characters and special characters, such as, “!, @, #, $, %, and *”. e. In Verify Password, retype the encrypted password. 3. To save these settings, click Apply. 4. Configure the backup schedule. See Scheduling automatic backups. After this procedure, configure a backup schedule.
Reset backup and restore settings Using reset settings feature, you can reset settings to the unconfigured state. 1. On the BACKUP AND RESTORE SETTINGS page, click Reset Settings. 2. In the Reset Settings dialog box, click Apply. The appliance is restarted. Update OMIVV appliance and repository location ● To ensure that all data is protected, perform a backup of the OMIVV database before updating the OMIVV appliance. See Manage backup and restore on page 33.
If the path is different, in the Appliance Management window, in the APPLIANCE UPDATE area, click Edit to update the path to https://linux.dell.com/repo/hardware/vcenter-plugin-x64/latest/ in the Update Repository Path text box, and click Apply. 3. Compare the available OMIVV appliance version and current OMIVV appliance version. 4. To apply the update to the OMIVV appliance, under Appliance Settings, click Update Virtual Appliance. 5. In the UPDATE APPLIANCE dialog box, click Update.
After backing up and restoring from an earlier version of OMIVV to an updated version, if you observe that the 200000 message is displayed, or the Dell EMC logo is not displayed, or the OMIVV UI is not responding on the vCenter UI, do the following: ● Restart vSphere Client services for both vSphere Client (HTML-5) and vSphere Web Client (FLEX) on the vCenter server. ● If the issue persists: ○ For VMware vCenter Server Appliance: Go to—/etc/vmware/vsphere-ui/vc-packages/vsphereclient-serenity.
Manage un-registration and re-registration It is recommended that you to take backup before performing un-registration. NOTE: Unregistering the plugin removes all the customization that was implemented on the registered alarms and Dell health update provider for PHA cluster. The following steps do not restore the customization. However, it re-registers the alarms in their default state. 1. Take a backup of OMIVV. 2. Unregister vCenter from OMIVV. 3. Perform any planned configuration change.
3 Configure OMIVV appliance using initial configuration wizard After you complete the basic installation of OMIVV and registration of the vCenters, the Initial Configuration Wizard is displayed automatically for the first time, when you launch OMIVV in vCenter.
b. Schedule warranty retrieval job. For more information about scheduling the warranty retrieval job, see Schedule warranty retrieval jobs on page 42. If you want to modify the inventory job schedule, go to Settings > vCenter Settings > Data Retrieval Schedule > Inventory Retrieval or Jobs > Inventory > Hosts Inventory. If you want to modify the warranty retrieval job schedule, go to Settings > vCenter Settings > Data Retrieval Schedule > Warranty Retrieval or Jobs > Warranty. c.
d. In the Host Root area, enter the host local credentials or AD credentials. ● To ○ ○ ○ enter the local credentials of ESXi host, perform the following tasks: The default username is root. You cannot edit it. Enter a valid password. For vCenter 6.7 and later, entering valid password is not mandatory. To download and store the host certificate and validate it during all future connections, select the Enable Certificate Check check box.
NOTE: In PSC environment with multiple vCenter servers, if you update the inventory schedule of All Registered vCenters, the update overrides the individual vCenter inventory schedule settings. Schedule warranty retrieval jobs 1. Ensure that the inventory is run successfully on hosts and chassis. 2. To use the warranty features of OMIVV, you must have an Internet connection. If your environment requires proxy to reach Internet, ensure that you configure the proxy settings in the Admin portal.
The RESTORE ALARMS option is a convenient way to restore the default alarm configuration without uninstalling and reinstalling the product. If any Dell EMC alarm configurations are changed since installation, those changes are reverted using the RESTORE ALARMS option. NOTE: The events and alarms settings are not enabled after restoring the appliance. You can enable the Events and Alarms settings again from the Settings tab.
Override severity of health update notification You can configure to override the existing severity of the Dell Proactive HA events for the Dell EMC host and its components with customized severity, which is aligned to your environment. The following are the severity levels that apply to each of the Proactive HA events: ● Info ● Moderately Degraded ● Severely Degraded NOTE: You cannot customize the severity of the Proactive HA components with the Info severity level. 1.
A Accessing documents from the Dell EMC support site You can access the required documents using the following links: ● For Dell EMC Enterprise Systems Management documents — www.dell.com/SoftwareSecurityManuals ● For Dell EMC OpenManage documents — www.dell.com/OpenManageManuals ● For Dell EMC Remote Enterprise Systems Management documents — www.dell.com/esmmanuals ● For iDRAC documents — www.dell.com/idracmanuals ● For Dell EMC OpenManage Connections Enterprise Systems Management documents — www.dell.
B Related Documentation In addition to this guide, you can access the other guides available at https://www.dell.com/support. Click Browse all products, then click Software > Virtualization Solutions. Click OpenManage Integration for VMware vCenter 5.1 to access the following documents: ● OpenManage Integration for VMware vCenter Version 5.1 User's Guide ● OpenManage Integration for VMware vCenter Version 5.1 Release Notes ● OpenManage Integration for VMware vCenter Version 5.
C Contacting Dell NOTE: If you do not have an active Internet connection, you can find contact information on your purchase invoice, packing slip, bill, or Dell product catalog. Dell provides several online and telephone-based support and service options. Availability varies by country and product, and some services may not be available in your area. To contact Dell for sales, technical support, or customer service issues: 1. Go to Dell.com/support. 2. Select your support category. 3.