
Install Guide
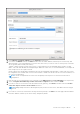
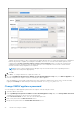
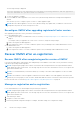

Table Of Contents
- OpenManage Integration for VMware vCenter Version 5.3 Installation Guide
- Contents
- Introduction
- Install and configure OMIVV
- Prerequisite checklist
- Download OpenManage Integration for VMware vCenter
- Deploy OMIVV OVF using vSphere Client (HTML-5)
- Generate a Certificate Signing Request (CSR)
- Upload HTTPS certificate
- Restore default HTTPS certificate
- Configure deployment mode
- Register vCenter server using a non-administrative account
- Register new vCenter server
- Configure OMIVV appliance
- Configure OMIVV appliance with two Network Interface Controllers (NICs)
- Change OMIVV appliance password
- Configure Network Time Protocol (NTP) and set local time zone
- Change hostname of OMIVV appliance
- Reboot OMIVV appliance
- Reset OMIVV appliance to factory settings
- Reconfigure OMIVV after upgrading registered vCenter version
- Recover OMIVV after un-registration
- Upgrade OMIVV appliance and repository location
- Configure OMIVV appliance using initial configuration wizard
- Accessing support content from the Dell EMC support site
- Related Documentation
- Contacting Dell

Typically, the network that you have configured as the default gateway does not require any manual route configuration
because the gateway is capable of providing the reachability. However, for networks where default gateway is not
configured (the Use this connection only for resources on its network check box is selected), a manual route
configuration may be required. Because the default gateway is not configured for this network to reach external
networks, manual routing configurations are required.
NOTE:
Incorrect routing configuration may abruptly stop the network interface from responding. Ensure to
configure the routing entries appropriately.
g. Click OK.
10. Click Save . To configure another NIC, repeat the tasks 6–10.
11. Go to the OpenManage Integration for VMware vCenter Virtual Appliance Setup utility, click Reboot Appliance. The
network configuration is complete only after restarting the OMIVV appliance.
After the appliance is successfully restarted, the NICs start working as configured. The status of NICs can be viewed by
logging in as readonly user and running the following commands: ifconfig, ping, and route -n.
Change OMIVV appliance password
You can change the OMIVV appliance password in the vSphere Client by using the console.
1. Open the OMIVV web console.
2. In the OpenManage Integration for VMware vCenter Virtual Appliance Setup utility, click Change Admin Password.
Complete the instructions on the screen to set the password.
3. In the Current Password text box, enter the current admin password.
4. Enter a new password in the New Password text box.
5. Retype the new password in the Confirm New Password text box.
32
Install and configure OMIVV