
Install Guide
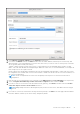
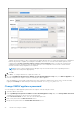
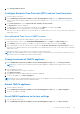

Table Of Contents
- OpenManage Integration for VMware vCenter Version 5.3 Installation Guide
- Contents
- Introduction
- Install and configure OMIVV
- Prerequisite checklist
- Download OpenManage Integration for VMware vCenter
- Deploy OMIVV OVF using vSphere Client (HTML-5)
- Generate a Certificate Signing Request (CSR)
- Upload HTTPS certificate
- Restore default HTTPS certificate
- Configure deployment mode
- Register vCenter server using a non-administrative account
- Register new vCenter server
- Configure OMIVV appliance
- Configure OMIVV appliance with two Network Interface Controllers (NICs)
- Change OMIVV appliance password
- Configure Network Time Protocol (NTP) and set local time zone
- Change hostname of OMIVV appliance
- Reboot OMIVV appliance
- Reset OMIVV appliance to factory settings
- Reconfigure OMIVV after upgrading registered vCenter version
- Recover OMIVV after un-registration
- Upgrade OMIVV appliance and repository location
- Configure OMIVV appliance using initial configuration wizard
- Accessing support content from the Dell EMC support site
- Related Documentation
- Contacting Dell

a. Select Manual or Automatic (DHCP) from the Method drop-down list.
b. If you select the Manual method, click Add, and then enter the valid IP address, Netmask (in the CIDR format), and
gateway details. It is recommended that you use the static IP in case if you want to control over the priority of the DNS
servers (primary and secondary DNS entries).
Typically, vSphere elements of data center such as vCenter and ESXi hosts are managed using hostname or FQDN.
iDRAC, CMC, and OME-Modular are managed using IP addresses. In this case, It is recommended that you configure the
DNS settings only for the vSphere network.
If both vSphere network and iDRAC management network are managed by using hostname or FQDN, DNS server must
be configured in such a manner that it resolves the hostname or FQDN for both the networks. For more information, see
the CentOS documentation.
NOTE:
The last configured DNS server becomes the primary DNS irrespective of which network the DNS is
configured for.
c. Enter the DNS server IP and domains to be searched for in the DNS Servers and Search Domains boxes respectively.
d. Select the Require IPV4 addressing for this connection to complete check box and click SAVE.
e. If you do not want to use this network as the default network (gateway), click Routes, and then select the Use this
connection only for resources on its network check box.
NOTE:
Adding multiple networks as default gateways may result in network issues, and OMIVV functions may get
affected.
f. If you want to reach to any external network using the known gateways, click Add on the same page, and then add the
network IP address, netmask (in the CIDR format), and gateway details.
Install and configure OMIVV
31