
Install Guide
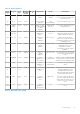


Table Of Contents
- OpenManage Integration for VMware vCenter Version 5.2 Installation Guide
- Introduction
- Install and configure OMIVV
- Prerequisite checklist
- Download OpenManage Integration for VMware vCenter
- Deploy OMIVV OVF using vSphere Client (HTML-5)
- Generate a Certificate Signing Request (CSR)
- Upload HTTPS certificate
- Restore default HTTPS certificate
- Configure deployment mode
- Register vCenter server using a non-administrative account
- Register new vCenter server
- Configure OMIVV appliance
- Configure OMIVV appliance with two Network Interface Controllers (NICs)
- Change OMIVV appliance password
- Configure Network Time Protocol (NTP) and set local time zone
- Change hostname of OMIVV appliance
- Reboot OMIVV appliance
- Reset OMIVV appliance to factory settings
- Reconfigure OMIVV after upgrading registered vCenter version
- Recover OMIVV after un-registration
- Upgrade OMIVV appliance and repository location
- Configure OMIVV appliance using initial configuration wizard
- Accessing documents from the Dell EMC support site
- Related Documentation
- Contacting Dell

○ Register
○ Unregister
○ Update
● Host
○ CIM
■ CIM Interaction
● Host.Config
○ Advanced settings
○ Change Settings
○ Connection
○ Maintenance
○ Network configuration
○ Query patch
○ Security profile and firewall
● Inventory
○ Add host to cluster
○ Add standalone host
○ Modify cluster
● Lifecycle Manager: General Privileges
○ Read
NOTE: The vSphere Lifecycle Manager General Privileges are applicable only for vCenter 7.0 and later.
● Host profile
○ Edit
○ View
● Permissions
○ Modify permission
○ Modify role
● Sessions
○ Validate session
● Task
○ Create
○ Update
NOTE:
If a vCenter server is registered using non-administrator user to access any OMIVV features, non-administrator user
must have Dell privileges. For more information about assigning Dell privileges, see Assign Dell privileges to existing role on
page 20.
Assign Dell privileges to existing role
If specific pages of OMIVV are accessed with no Dell privileges that are assigned to the logged-in user, the 2000000 error is
displayed.
You can edit an existing role to assign the Dell privileges.
1. Log in to the vSphere Client (HTML-5) with administrative rights.
2. In vSphere Client (HTML-5), expand Menu, click Administration → Roles.
3. From the Roles provider drop-down list, select a vCenter server.
4. From the Roles list, select Dell-Operational, and then click PRIVILEGES.
5. To assign the Dell privileges, click the edit icon [
].
The Edit Role page is displayed.
6. In the left pane, click Dell, and then select the following Dell privileges for the selected role, and then click NEXT:
● Dell.Configuration
● Dell.Deploy-Provisioning
● Dell.Inventory
● Dell.Monitoring
● Dell.Reporting
20
Install and configure OMIVV