
Users Guide

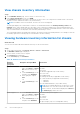
Table Of Contents
- OpenManage Integration for VMware vCenter Version 5.3 User's Guide
- Contents
- Introduction
- Log in to Dell EMC OMIVV administration console
- Register new vCenter server
- Register vCenter server using a non-administrative account
- Required privileges for non-administrator users
- Assign Dell privileges to existing role
- Update certificates for registered vCenter servers
- Modify vCenter login credentials
- Unregister OpenManage Integration for VMware vCenter
- Upload license to OMIVV Administration Console
- Manage the OMIVV appliance
- Access the appliance management
- Restart OMIVV appliance
- Upgrade OMIVV appliance and repository location
- OMIVV upgrade options
- Upgrade OMIVV appliance using RPM (using Internet)
- Upgrade OMIVV appliance using RPM (using Intranet)
- Upgrade OMIVV appliance using backup and restore
- Manage backup and restore
- Generate and download the troubleshooting bundle
- Set up HTTP proxy
- Set up Network Time Protocol (NTP) servers
- Configure deployment mode
- Extended monitoring
- Generate a Certificate Signing Request (CSR)
- Upload HTTPS certificate
- Restore default HTTPS certificate
- Set up global alerts
- About OMIVV VM console
- Open OMIVV VM console
- Configure OMIVV appliance
- Configure OMIVV appliance with two Network Interface Controllers (NICs)
- Change OMIVV appliance password
- Configure Network Time Protocol (NTP) and set local time zone
- Change hostname of OMIVV appliance
- Reboot OMIVV appliance
- Reset OMIVV appliance to factory settings
- Read-only user role
- Register new vCenter server
- Monitor hosts and chassis using dashboard
- Manage hosts using host credential profile
- Manage chassis using chassis credential profile
- Manage firmware and driver repositories using repository profile
- Capture baseline configuration using cluster profile
- Manage bare-metal servers
- Manage deployment profiles
- System profile and ISO profile deployment
- Compliance
- Manage OMIVV jobs
- Manage logs
- Manage OMIVV appliance settings
- Manage vCenter settings
- Chassis Management
- View Dell EMC chassis information
- View chassis inventory information
- Viewing hardware inventory information for chassis
- View firmware inventory information
- View management controller information
- View storage inventory information
- View warranty information
- View related host for chassis
- View related chassis information
- Manage PowerEdge MX chassis
- Update MX chassis firmware
- Host Management
- View OMIVV hosts
- Monitor single host
- Firmware update
- vSphere Lifecycle Manager overview
- Using OMIVV as a firmware add-on provider in vSphere Lifecycle Manager—User Interface
- Using OMIVV as a firmware add-on provider in vSphere Lifecycle Manager—vSphere Automation APIs
- Set up blink indicator light
- Configure System Lockdown Mode
- Security roles and permissions
- Frequently Asked Questions-FAQ
- Compliance
- iDRAC license type and description are displayed incorrectly for non-compliant vSphere hosts
- On running fix noncompliant vSphere hosts wizard, the status of a specific host is displayed as Unknown
- A server may show as non-compliant with CSIOR status, "Unknown"
- iDRAC license status is displayed as compliant on the management compliance page when the iDRAC IP is not reachable
- Drift Detection shows noncompliant for Modular servers that has PCIe card in the FX chassis
- Unable to view new iDRAC version details listed on vCenter hosts and clusters page
- Deployment
- Attempting to deploy ESXi on server fails
- OS deployment fails when NPAR is enabled on a target node and disabled in System Profile
- Auto discovered systems are displayed without model information in Deployment wizard
- During deployment, system profile apply fails due to iDRAC error
- Unable to deploy an OS on PowerEdge serves when the iDRAC does not populate the MAC address of the selected NIC
- After OS deployment, OMIVV failed to add ESXi host to vCenter or failed to add Host Profile or Enter Maintenance Mode is failed for host
- ESXi host is either disconnected or not responding state after successful OS deployment using OMIVV.
- Deployment job times out when network interface card (NIC) of OMIVV is not connected to the ESXi host network
- Deployment job fails in OMIVV
- Unable to apply System Profile that has PCIe card in the FX chassis
- NFS share is set up with ESXi ISO, but deployment fails with errors mounting share location
- Bare-metal deployment issues
- Firmware update
- Running firmware update may display an error message, The firmware repository file does not exist or is invalid.
- Why did system not enter maintenance mode when I performed one-to-many firmware update
- What should I do as firmware update failed
- Firmware level not updated when I have performed firmware update with Apply on Next reboot option and system was rebooted
- Chassis Management Controller (CMC) firmware update fails in FX2 chassis
- When upgrading or downgrading some iDRAC firmware versions using OMIVV, even when the firmware update is successful, OMIVV may indicate that the job is failed.
- Using OMIVV to update the Intel network card with firmware version of 13.5.2 is not supported
- Sometimes, inventory fails after firmware update
- Installation
- Upgrade
- The 2000002 error is displayed in all the pages of OMIVV after performing RPM upgrade or backup and restore from an earlier OMIVV version to a later OMIVV version
- Proactive HA initialization is not happening after performing backup and restore
- A server with Unknown status in the earlier version is not listed on the Bare-metal Servers page after backing up and restoring to a latest OMIVV version
- Non-compliant 11G PowerEdge servers are retained in OMIVV inventory after backup and restore
- Sometimes post RPM upgrade of OMIVV appliance, multiple entries in the logs are seen in vCenter Recent Tasks
- Dell EMC icon is not displayed after backup and restore from an earlier OMIVV version to a later OMIVV version
- OMIVV RPM upgrade fails when proxy is configured with domain user authentication
- After backup and restore of OMIVV, alarm settings are not restored
- Entering a Password in the Backup Now Screen Receives an Error Message
- Unable to launch vCenter from flex client after upgrading the OMIVV appliance
- Bare-metal discovery
- Certificate
- Registration
- Sometimes, OMIVV takes long time to complete vCenter un-registration
- After registration of vCenter, the Dell EMC logo of OMIVV is not displayed on the home page of VMware
- What should I do as vCenter registration failed
- I am not seeing OpenManage Integration icon in HTML-5 Client even if registration of plug-in to vCenter was successful
- Dell privileges that are assigned while registering the OMIVV appliance are not removed after unregistering OMIVV
- Proactive HA
- DNS
- Host credential profile
- When creating a host credential profile for the host having ESXi 6.5U1, the Service Tag of the host is not displayed on the Select Hosts page
- Performance during host credential profile test credentials is slow or unresponsive
- Host inventory or test connection fails due to invalid or unknown iDRAC IP.
- When I tried to use lockdown mode, it fails
- Network configuration
- System profile
- vCenter
- Others
- OMIVV instance is not removed from vCenter after resetting OMIVV appliance to factory settings
- Test connection and inventory fails in OMIVV after changing vCenter password
- OMIVV page displays invalid session, or time out exception, or two million errors in Firefox browser
- Warranty job is not running for certain hosts
- Configuring the System Lockdown mode at a cluster level sometimes displays a message "No hosts under the cluster has successful inventory"
- Available OMIVV appliance version displays wrong information when the available version is lesser than the current version
- Host still displayed under chassis even after removing host from vCenter tree
- Does OMIVV support VMware vCenter server appliance
- How do I force remove OMIVV appliance from vCenter
- In Administration Console, Update Repository Path is not set to default path after I reset appliance to factory settings
- Why does Administration Portal display unreachable update repository location
- Chassis global health still healthy when some of power supply status has changed to critical
- Processor version is displayed as “Not Applicable” in processor view in system overview page
- Does OMIVV support vCenter in linked mode
- What are required port settings for OMIVV
- Can OMIVV support ESXi with lockdown mode enabled
- Sometimes, test connection fails when using NFS share
- Compliance
- System specific attributes
- Additional information
- Customization attributes
- Component vs. baseline version comparison matrix
- Response codes

In vCenter linked mode environment with multiple vCenter servers, if the schedule for individual vCenter is different and you
select the All Registered vCenters option to update the inventory schedule, the inventory schedule settings page displays
the default schedule.
3. Select the inventory data retrieval day and time, and click APPLY.
NOTE: In vCenter linked mode environment with multiple vCenter servers, if you update the inventory schedule of All
Registered vCenters, the update overrides the individual vCenter inventory schedule settings.
Schedule warranty retrieval jobs
Prerequisites
1. To update authorization key, ensure that you have access to index catalog (https://downloads.dell.com/catalog/
CatalogIndex.gz).
2. To get warranty report, ensure that you have access to https://apigtwb2c.us.dell.com.
3. Ensure that the inventory is run successfully on hosts and chassis.
4. To use the warranty features of OMIVV, you must have an Internet connection. If your environment requires proxy to reach
Internet, ensure that you configure the proxy settings in the Admin portal.
About this task
Hardware warranty information is retrieved from Dell Online and displayed by OMIVV. Only the Service Tag is sent and not
stored by Dell Online.
In vCenter linked mode environment with multiple vCenter servers, the chassis warranty runs automatically with every vCenter
when the warranty for any vCenter is run. However, warranty does not automatically run if it is not added to chassis credential
profile.
NOTE:
The settings in this page are reset to default each time the configuration wizard is invoked. If you have previously
configured a warranty retrieval job, ensure that you replicate that schedule warranty retrieval job in this page before
completing the wizard functions so that the previous warranty retrieval is not overridden by the default settings.
Steps
1. On the OMIVV home page, click Settings > vCenter Settings > Data Retrieval Schedule > Warranty Retrieval.
2. Select the Enable Warranty Data Retrieval (Recommended) check box.
In vCenter linked mode environment with multiple vCenter servers, if the schedule for individual vCenter is different and you
select the All Registered vCenters option to update the warranty schedule, the warranty schedule settings page displays
the default schedule.
3. Select the warranty data retrieval day and time, and click APPLY.
NOTE:
In vCenter linked mode environment with multiple vCenter servers, if you update the warranty schedule of All
Registered vCenters, the update overrides the individual vCenter warranty schedule settings.
116 Manage vCenter settings