
Install Guide
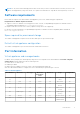
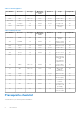
Table Of Contents
- OpenManage Integration for VMware vCenter Version 4.0 Web Client Installation Guide
- Introduction
- OpenManage Integration for VMware vCenter licensing
- Important notes for reference
- Hardware requirements
- Software requirements
- Port information
- Prerequisite checklist
- Installing, configuring, and upgrading OMIVV
- Deploying OMIVV OVF using vSphere web client
- Registering vCenter server by non-administrator user
- Registering OpenManage Integration for VMware vCenter and importing license file
- Upgrading registered vCenter
- Verifying installation
- Migrating from 3.x to 4.0
- Recovering OMIVV after unregistering earlier version of OMIVV
- Appliance configuration for VMware vCenter
- Accessing documents from the Dell EMC support site
- Related Documentation

a. Select URL if you want to download the OVF package from Internet.
b. Select the Local file and click Browse if you want to select the OVF package from your local system.
NOTE: The installation process can take between 10-30 minutes if the OVF package resides on a network share. For a
quick installation, Dell recommends that you host the OVF on a local drive.
7. Click Next.
The Review Details window is displayed with the following information:
● Product—The OVF template name is displayed.
● Version—The version of the OVF template is displayed.
● Vendor—The vendor name is displayed.
● Publisher—The publisher details are displayed.
● Download Size—The actual size of the OVF template in gigabytes is displayed.
● Size on Disk—Details of thick and thin provisioned details are displayed.
● Description—The comments are displayed here.
8. Click Next.
The Select Name and Folder window is displayed.
9. In the Select Name and Folder window, perform the following substeps:
a. In Name, enter the name of the template. The name can include up to 80 characters.
b. In the Select a folder or datacenter list, select a location for deploying the template.
10. Click Next.
The Select Storage window is displayed.
11. In the Select Storage window, perform the following substeps:
a. In the Select Virtual Disk Format drop-down list, select either of the following formats:
● Thick Provision (lazy Zeroed)
● Thick Provision (Eager zeroed
● Thin Provision
Dell recommends that you select, Thick Provision (Eager Zeroed).
b. In the VM Storage Policy drop-down list, select a policy.
12. Click Next.
The Setup Networks window is displayed that includes details about the source and destination networks.
13. In the Setup Networks window, click Next.
NOTE: Dell recommends that the OMIVV appliance and the vCenter server are located in the same network.
14. In the Ready to Complete window, review the selected options for the OVF deployment task and click Finish.
The deployment job runs and provides a completion status window where you can track the job progress.
Registering vCenter server by non-administrator user
You can register vCenter servers for the OMIVV appliance with vCenter administrator credentials or a non-administrator user
with the necessary privileges.
To enable a non-administrator user with the required privileges to register a vCenter server, perform the following steps:
1. To change the privileges selected for a role, add the role and select the required privileges for the role or modify an existing
role.
See VMware vSphere documentation for the steps required to create or modify a role and select privileges in the vSphere
web client. To select all the required privileges for the role, see the Required privileges for non-administrator users.
NOTE: The vCenter administrator should add or modify a role.
2. Assign a user to the newly created role after you define a role and select privileges for the role.
See VMware vSphere documentation for more information on assigning permissions in the vSphere web client.
NOTE: The vCenter administrator should assign permissions in the vSphere client.
A vCenter server non-administrator user with the required privileges can now register and/or unregister vCenter, modify
credentials, or update the certificate.
10
Introduction