
Install Guide

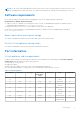
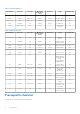
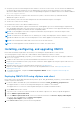
Table Of Contents
- OpenManage Integration for VMware vCenter Version 4.0.1 Web Client Installation Guide
- Introduction
- OpenManage Integration for VMware vCenter licensing
- Important notes for reference
- Hardware requirements
- Software requirements
- Port information
- Prerequisite checklist
- Installing, configuring, and upgrading OMIVV
- Deploying OMIVV OVF using vSphere web client
- Registering vCenter server by non-administrator user
- Registering OpenManage Integration for VMware vCenter and importing license file
- Upgrading registered vCenter
- Verifying installation
- Upgrading OMIVV from existing version to current version
- Migrating from 3.x to 4.0.1
- Recovering OMIVV after unregistering earlier version of OMIVV
- Appliance configuration for VMware vCenter
- Accessing documents from the Dell EMC support site
- Related Documentation

● Verify that you have user name and password for OMIVV to access the vCenter server. The user can have an administrator
role that has all necessary permissions or a non-administrator user with the necessary privileges. For more information
about the available OMIVV roles within vCenter, see OpenManage Integration for VMware vCenter User’s Guide available at
Dell.com/support/manuals.
● Check that you have the root password for the ESXi host systems, or the Active Directory credentials that has
administrative rights on the host.
● Check whether you have the user name and password associated with iDRAC Express or Enterprise.
● Check if the vCenter server is running.
● Determine the location of the OMIVV installation directory.
● Check to ensure that VMware vSphere environment meet virtual appliance, port access, and listening port requirements.
Also, install Adobe Flash Player on a client system, if necessary. For more information on the supported Flash Player version,
see OpenManage Integration for VMware vCenter Compatibility Matrix.
NOTE: The virtual appliance functions as a regular virtual machine; any interruptions or shut downs impact overall
functionality of the virtual appliance.
NOTE: The OMIVV shows the VMware tools as, Running (Out-of-date) when deployed on ESXi 5.5 and later. You can
upgrade the VMware tools after a successful deployment of the OMIVV appliance or anytime later, if necessary.
NOTE: Dell recommends that OMIVV and vCenter server are on the same network.
NOTE: The OMIVV appliance network should have access to iDRAC, host, and vCenter.
Installing, configuring, and upgrading OMIVV
Ensure that the hardware requirements are met and you are running the required VMware vCenter software.
The following high-level steps outline the overall installation and configuration procedure for OMIVV:
1. Download the Dell_OpenManage_Integration_<version number>.<build number>.zip file from the Dell support website at
Dell.com/support.
2. Navigate to the location where you have downloaded the file, and extract its contents.
3. Deploy the Open Virtualization Format (OVF) file that contains the OMIVV appliance by using the vSphere web client. See
Deploying the OMIVV OVF.
4. Upload the license file. For more information about licensing, see Uploading license.
5. Register the OMIVV appliance with the vCenter server by using Administration Console. See Registering OMIVV and
importing the license file.
6. To configure the appliance, complete the Initial Configuration Wizard. See the Configuration tasks through the
configuration wizard.
Deploying OMIVV OVF using vSphere web client
Ensure that you have downloaded and extracted the product .zip file, Dell_OpenManage_Integration_<version number>.<build
number>.zip from the dell website.
1. Locate the OMIVV virtual disk that you downloaded and extracted and run Dell_OpenManage_Integration.exe.
The supported client OS version for extracting and running the exe is Windows 7 SP1 and later.
The supported server OS version for extracting and running the exe is Windows 2008 R2 and later.
2. Accept EULA, and save the .OVF file.
3. Copy or move the .OVF file to a location accessible to the VMware vSphere host to which you upload the appliance.
4. Start the VMware vSphere Web Client.
5. From the VMware vSphere Web Client, select a host, and in the main menu click Actions > Deploy OVF Template.
You can also right-click Host and select Deploy OVF Template.
The Deploy OVF Template wizard is displayed.
6. In the Select Source window, perform the following subtasks:
Introduction
9