OpenManage Integration for VMware vCenter Version 4.1 Web Client Installation Guide August 2017 Rev.
Notes, cautions, and warnings NOTE: A NOTE indicates important information that helps you make better use of your product. CAUTION: A CAUTION indicates either potential damage to hardware or loss of data and tells you how to avoid the problem. WARNING: A WARNING indicates a potential for property damage, personal injury, or death. Copyright © 2017 Dell Inc. or its subsidiaries. All rights reserved. Dell, EMC, and other trademarks are trademarks of Dell Inc. or its subsidiaries.
Contents Chapter 1: Introduction................................................................................................................. 4 OpenManage Integration for VMware vCenter licensing.......................................................................................... 4 License requirements for hosts and vCenter servers...........................................................................................4 Buying and uploading software license........................................
1 Introduction This guide provides step-by-step instructions for installing and configuring OpenManage Integration for VMware vCenter (OMIVV) for use with PowerEdge servers. After the OMIVV installation, for information about all aspects of administration including—inventory management, monitoring and alerting, firmware updates, and warranty management; see OpenManage Integration for VMware vCenter User's Guide available at Dell.com/support/manuals.
Buying and uploading software license You are running a trial license until you upgrade to a full product version. Use the Buy License link from the product to navigate to the Dell website and buy a license. After you buy it, upload it using the Administration Console. NOTE: The Buy License option is displayed only if you are using a trial license. 1. In the OpenManage Integration for VMware vCenter, perform one of the following tasks: ● In the Licensing tab, next to Software License, click Buy License.
Enforcement Appliance updates The appliance does not allow updates to newer versions when all licenses are expired. Obtain and upload a new license before attempting to upgrade the appliance. Evaluation License When an evaluation license expires, several key areas cease to work, and an error message is displayed.
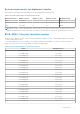
System requirements for deployment modes Ensure that the following system requirements for the desired deployment modes are met: Table 1.
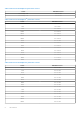
Table 2. BIOS for PowerEdge 11 th generation servers Server Minimum version PowerEdge T610 6.1.0 or later PowerEdge T710 6.1.0 or later Table 3. BIOS for PowerEdge 12 th generation servers Server Minimum version T320 1.0.1 or later T420 1.0.1 or later T620 1.2.6 or later M420 1.2.4 or later M520 1.2.6 or later M620 1.2.6 or later M820 1.2.6 or later R220 1.0.3 or later R320 1.2.4 or later R420 1.2.4 or later R520 1.2.4 or later R620 1.2.6 or later R720 1.2.
Table 4. BIOS for PowerEdge 13 th generation servers Server Minimum version FC430 1.0.0 or later FC630 1.0.0 or later FC830 1.0.0 or later Table 5. BIOS for PowerEdge 14 th generation servers Server Minimum Version R940 1.0.0 or later R740 1.0.0 or later R740xd 1.0.0 or later R640 1.0.0 or later C6420 1.0.0 or later Table 6. iDRAC and Lifecycle Controller for deployment Generation Version iDRAC Lifecycle Controller PowerEdge 11th generation servers 3.35 for Modular, 1.
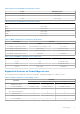
Table 8.
● Supports vCenter 5.5 and later ● Requires web client services from vCenter (vSphere Desktop client is not supported) For specific software requirements, you can also see OpenManage Integration for VMware vCenter Compatibility Matrix available at Dell.com/support/manuals. OpenManage Integration for VMware vCenter requirements Supported ESXi versions on managed hosts The following table provides information about the supported ESXi versions on managed hosts: Table 10.
NOTE: For more information about registering a vCenter server, see OpenManage Integration for VMware vCenter Version 4.1 Web Client Install Guide available at Dell.com/support/manuals. The OpenManage Integration for VMware vCenter version 4.
Table 13.
NOTE: The OMIVV appliance network should have access to iDRAC, host, and vCenter. Installing, configuring, and upgrading OMIVV Ensure that the hardware requirements are met and you are running the required VMware vCenter software. The following high-level steps outline the overall installation and configuration procedure for OMIVV: 1. Download the DellEMC_OpenManage_Integration_..zip file from the Dell support website at Dell.com/support. 2.
The Select Storage window is displayed. 11. In the Select Storage window, perform the following substeps: a. In the Select Virtual Disk Format drop-down list, select either of the following formats: ● Thick Provision (lazy Zeroed) ● Thick Provision (Eager zeroed ● Thin Provision It is recommended that you select, Thick Provision (Eager Zeroed). b. In the VM Storage Policy drop-down list, select a policy. 12. Click Next.
● Global ○ Cancel task ○ Log event ○ Settings NOTE: Assign the following health update privileges, if you are using VMware vCenter 6.5 or upgrading to vCenter 6.5 or later: ● Health Update Provider ○ Register ○ Unregister ○ Update ● Host ○ CIM ■ CIM Interaction ○ Configuration ■ Advanced settings ■ Connection ■ Maintenance ■ Query patch ■ Security profile and firewall NOTE: Assign the following privileges, if you are using VMware vCenter 6.5 or upgrading to vCenter 6.5 or later: ■ ● ● ● ● Host.
NOTE: Ensure that you are logged in as a user with administrator privileges. 1. Log in to the vSphere web client with administrative rights. 2. Browse to Administration → Roles in the vSphere web client. 3. Select a vCenter server system from the Roles provider drop-down list. 4. Select the role from the Roles list, and click the icon. 5. Select the following Dell privileges for the selected role and click OK: ● ● ● ● ● Dell.Configuration Dell.Deploy-Provisioning Dell.Inventory Dell.Monitoring Dell.
7. In the Date and Time tab, select the Synchronize date and time over the network. The NTP Servers box is displayed. 8. Add valid NTP server details to which your vCenter is synchronized with. 9. Click Time Zone and select the applicable time zone, and click OK. 10. To configure static IP to the OMIVV appliance, click Network Configuration, or skip to step 17. 11. Select Auto eth0, and then click Edit. 12. Select the IPV4 Settings tab, and select Manual in the Method drop-down. 13.
Figure 2. Administration Console 19. In the Administration Console login window, enter the password, and then click Login. Figure 3. vCenter registration window from Administration Console 20. In the vCenter Registration window, click Register a New vCenter Server. 21. In the Register a New vCenter Server window, perform the following substeps: a. Under vCenter Name, in the vCenter Server IP or Hostname text box, enter the server IP or host name, and then in the Description text box, enter a description.
Enter the username as domain\user or domain/user or user@domain. OMIVV uses the Admin user account or the user with necessary privileges for vCenter administration. c. In Password, enter the password. d. In Verify Password, enter the password again. 22. Click Register. NOTE: OpenManage Integration for VMware vCenter currently supports up to 1000 hosts for large deployment mode with a single vCenter instance or multiple vCenter servers by using the linked mode. 23.
1. Assign extra privileges to non-administrator users, if necessary. See Required privileges for non-administrator users on page 15. For example, when you upgrade from vCenter 6.0 to vCenter 6.5, assign the extra privileges. 2. Reboot the registered OMIVV appliance. ● For administrator users: 1. Reboot the registered OMIVV appliance. Verifying installation The following steps verify that the OMIVV installation is successful: 1. Close any vSphere client windows, and start a new vSphere web client. 2.
For more information about licensing, see OpenManage Integration for VMware vCenter Quick Installation Guide for vSphere Web Client Version 4.1. 8. Verify the appliance. For more information about appliance verification, see the OpenManage Integration for VMware vCenter Quick Installation Guide for vSphere Web Client Version 4.1 to ensure that the database migration is successful. 9. Run the Inventory on all the hosts.
2 Appliance configuration for VMware vCenter After you complete the basic installation of OMIVV and registration of the vCenters, the Initial Configuration Wizard is displayed when you click the OMIVV icon. You can proceed to configure the appliance by using one of the following methods: ● Configuring the appliance through the Initial Configuration Wizard. ● Configuring the appliance through the Settings tab in OMIVV.
Select a vCenter that is not configured yet or if you have added a vCenter to your environment. The vCenter selection page allows you to select one or more vCenters to configure settings. 3. To proceed with the Connection Profile Description dialog box, click Next. NOTE: If you have multiple vCenter servers that are part of the same single sign-on (SSO), and if you choose to configure a single vCenter server, repeat steps 1 through 3 until you configure each vCenter.
Host user name requirements: ○ Between 1 and 64 characters long ○ No nonprintable characters ○ No Invalid characters, such as " / \ [ ] : ; | = , + * ? < > @ Host domain requirements: ○ Between 1 and 64 characters long ○ First character must be alphabetical. ○ Cannot contain a space. ○ No Invalid characters, such as " / \ [ ] : ; | = , + * ? < > @ b. In Active Directory Password, type the password. The password is limited to 127 characters. c. In Verify Password, type the password again. d.
Scheduling inventory jobs You can configure inventory schedule by using the configuration wizard or OpenManage Integration under the OpenManage Integration > Manage > Settings tab. NOTE: To ensure that OMIVV continues to display updated information, it is recommended that you schedule a periodic inventory job. The inventory job consumes minimal resources and does not degrade host performance. NOTE: The chassis gets discovered automatically after the inventory for all hosts is run.
NOTE: OMIVV supports SNMP v1 and v2 alerts for 12th generation hosts and later and supports only SNMP v1 alerts for hosts earlier than 12th generation. 1.
Configuring warranty expiration notification settings 1. In OpenManage Integration for VMware vCenter, on the Manage > Settings tab, under Appliance Settings, click Warranty Expiration Notification. 2. Expand Warranty Expiration Notification to view the following: ● Warranty Expiration Notification—whether the setting is enabled or disabled ● Warning—number of days for the first warning setting ● Critical—number of days for the critical warning setting 3.
1. In the OpenManage Integration for VMware vCenter, on the Manage → Settings tab, under Appliance Settings, at the right side of Latest Version Notification, click the By default, the latest version notification is disabled. icon. 2. In the Latest Version Notification and Retrieval Schedule dialog box, perform the following actions: a. If you want to enable latest version notification, select the Enable Latest Version notification check box. b.
https://:1311 3. To apply the OMSA URL to all vCenter servers, select Apply these settings to all vCenters. NOTE: If you do not select the check box, the OMSA URL is applied only to one vCenter. 4. To verify that the OMSA URL link that you provided works, navigate to the Summary tab of the host and check that the OMSA console link is live within the Dell EMC Host Information section.
3. To edit the data retrieval schedules, perform the following steps: a. Under Inventory/Warranty Data, select the Enable Inventory/Warranty Data Retrieval check box. b. Under Inventory/Warranty Data Retrieval Schedule, select the days of the week for your job. c. In the Inventory/Warranty Data Retrieval Time text box, type the local time for this job. You might need to consider the time difference between job configuration and job implementation. d.
3 Accessing documents from the Dell EMC support site You can access the required documents in one of the following ways: ● Using the following links: ○ For Dell EMC Enterprise Systems Management, Dell EMC Remote Enterprise Systems Management, and Dell EMC Virtualization Solutions documents — www.dell.com/esmmanuals ○ For Dell EMC OpenManage documents — www.dell.com/openmanagemanuals ○ For iDRAC documents — www.dell.
4 Related Documentation In addition to this guide, you can access the other guides available at Dell.com/support. Click Choose from all products, then click Software and Security > Virtualization Solutions. Click OpenManage Integration for VMware vCenter 4.1 to access the following documents: ● OpenManage Integration for VMware vCenter Version 4.1 Web Client User's Guide ● OpenManage Integration for VMware vCenter Version 4.1 Release Notes ● OpenManage Integration for VMware vCenter Version 4.