
Setup Guide


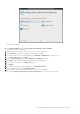
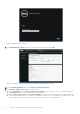
Table Of Contents
- OpenManage Integration for VMware vCenter Quick Install Guide for vSphere Client Version 3.1
- Installing OpenManage Integration for VMware vCenter
- Installation introduction
- Prerequisites
- Upgrading OpenManage Integration Plugin from 3.0 version to the current version
- Migration Path to migrate from 2.x to 3.1
- Recover OpenManage Integration for VMware vCenter if the older plug-in is unregistered
- Installation introduction
- Configuring OpenManage Integration for VMware vCenter
- Configuration Wizard welcome page
- Creating a new Connection Profile [Wizard]
- Configuring Events And Alarms [Wizard]
- Setting Up A Proxy Server [Wizard]
- Scheduling Inventory Jobs [Wizard]
- Running A Warranty Retrieval Job [Wizard]
- Configuring the Deployment Credentials [Wizard]
- Setting The Default Firmware Update Repository [Wizard]
- Enabling The OMSA Link [Wizard]
- Configuring Dell iDRAC Auto-Discovery
- Configuring NFS Shares
- Licensing in OpenManage Integration for VMware vCenter
- More Configuration Information
- Related documentation and resources

Figure 2. Administration Console
19. In the Administration Console login window, enter the password, and then click Login.
Figure 3. vCenter Registration Window from within the Administration Console
20. In the vCenter Registration window, click Register a new vCenter Server.
21. In the Register a New vCenter window, do the following:
a. Under vCenter Name, in the vCenter Server IP or Hostname text box, enter the server IP or hostname and then in
the Description text box, enter the description, which is optional.
b. Under vCenter User Account, in the vCenter User Name text box, enter the Admin user name or the user name with
the necessary privileges. Enter the username as domain\user or domain/user or user@domain. The Admin user account
or the user name with the necessary privileges is used by the OMIVV for vCenter administration.
10
Installing OpenManage Integration for VMware vCenter