OpenManage Integration for VMware vCenter Quick Install Guide for vSphere Client Version 3.1 January 2016 Rev.
Notes, Cautions, and Warnings NOTE: A NOTE indicates important information that helps you make better use of your computer. CAUTION: A CAUTION indicates either potential damage to hardware or loss of data and tells you how to avoid the problem. NOTE: A WARNING indicates a potential for property damage, personal injury, or death. Copyright © 2016 Dell Inc. All rights reserved. This product is protected by U.S. and international copyright and intellectual property laws.
Contents Chapter 1: Installing OpenManage Integration for VMware vCenter............................................... 4 Installation introduction......................................................................................................................................................4 Prerequisites...................................................................................................................................................................
1 Installing OpenManage Integration for VMware vCenter Topics: • • • • Installation introduction Upgrading OpenManage Integration Plugin from 3.0 version to the current version Migration Path to migrate from 2.x to 3.1 Recover OpenManage Integration for VMware vCenter if the older plug-in is unregistered Installation introduction This guide provides step-by-step instructions for installing and configuring the OpenManage Integration for VMware vCenter (OMIVV).
Hardware Requirements Following are the hardware requirements for OMIVV: ● Supported servers and minimum BIOS requirements ● Supported iDRAC versions (both deployment and management) ● OMSA support for older servers and ESXi version support (both deployment and management). For more information, see OpenManage Integration for VMware vCenter Compatibility Matrix available at dell.com/support/manuals.
. In the Source window, use the Browse button to locate the OVF package. The location can be a local drive, network drive, CD/DVD, or from the Internet. The OMIVV file size is approximately 1.5 GB. NOTE: The install can take 10-30 minutes if the OVF package resides on a network share. For the quickest installation, it is recommended that you host the OVF on a local drive. 7. Click Next. 8. In the OVF Template Details window, review the information presented. 9. Click Next. 10.
NOTE: The vCenter administrator should assign permissions in the vSphere client. 3. Register a vCenter server in the administration console by using a user with necessary privileges. See Registering a vCenter server by using a user with necessary privileges on page 6. 4. Associate the Dell privileges to the role created or modified in step 1 for performing the OMIVV operations. See Assigning Dell privileges to the role on page 8.
Assigning Dell privileges to the role You can edit an existing role to assign the Dell privileges. NOTE: Ensure that you are logged in as a user with Administrator privileges. To assign the Dell privileges to an existing role, perform the following: 1. Log in to the vSphere client with administrative rights. 2. On the vSphere client Home page, click Roles. 3. Right-click the role to edit and select Edit Role. 4.
Figure 1. Console tab 7. In the Date and Time tab, select Synchronize date and time over the network. The NTP Servers box is displayed. 8. Add valid NTP server details to which your vCenter is synchronized with. 9. Click Time Zone, and select the applicable time zone and click OK. 10. To configure static IP to the OMIVV appliance, click Network Configuration or, skip to step 17. 11. Select Auto eth0, and then click Edit. 12. Select the IPV4 Settings tab and select Manual in the Method drop-down. 13.
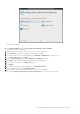
Figure 2. Administration Console 19. In the Administration Console login window, enter the password, and then click Login. Figure 3. vCenter Registration Window from within the Administration Console 20. In the vCenter Registration window, click Register a new vCenter Server. 21. In the Register a New vCenter window, do the following: a.
NOTE: One instance of OMIVV can support up to 10 vCenters which are part of the same vCenter SSO. Multiple independent instances of vCenters are not currently supported. NOTE: Registering OMIVV using Fully Qualified Domain Name (FQDN) is highly recommended. For FQDN based registrations, the host name of the vCenter should be properly resolvable by the DNS server. c. In the Password text box, enter the password. d. In the Verify Password text box, enter the password again. 22. Click Register. 23.
Upgrading OpenManage Integration Plugin from 3.0 version to the current version To upgrade OpenManage Integration plug-in from version 3.0 to the current version, perform the following steps: 1. Open a web browser and enter the Administration Console URL displayed in the vSphere vCenter Console tab for the virtual machine you want to configure. You can also use the link displayed on the Help and Support page in the Dell Management Console.
If the IP address of the new OpenManage Integration version 3.1 appliance has changed from that of the old appliance, the trap destination for the SNMP traps must be configured to point to the new appliance. For 12th generation and higher generation servers, this is fixed by running the Inventory on these hosts. For hosts earlier than 12th generation that were compliant with earlier versions, this IP change shows up as noncompliant and requires you to configure OMSA.
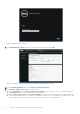
2 Configuring OpenManage Integration for VMware vCenter After you do the basic installation of the OMIVV, it should be configured. This is typically done using the Configuration Wizard, but you can also do it using the Settings page options in the Dell Management Center. The user interface in both the pane is similar except in the wizard, you Save and Continue, whereas in the Settings options you click Apply. This section tells you how to configure using the wizard.
To create a new connection profile using the wizard, perform the following steps: 1. From the Connection Profiles tab, click Create New. 2. In the Profile Name and Description panel, enter the profile name, and a description that is optional that are used to help manage custom connection profiles, and then click Next. 3. In the Associated Hosts section, select the hosts to be associated with the Connection Profile, and then click Next. 4.
NOTE: Restoring the OMIVV appliance backup does not restore all the Alarm settings. However, in the OMIVV GUI, the Alarms and Events field displays the restored settings. To resolve this issue, in the OMIVV GUI, in the Manage > Settings tab, manually change the Events and Alarms settings. Setting Up A Proxy Server [Wizard] Set the proxy server in the Configuration Wizard or later using the Dell Management Center, Settings > Proxy page. To set up a proxy server: 1.
The time you enter is your local time. Therefore, if you want to run the inventory at the virtual appliance time zone, calculate the time difference between your local and virtual appliance time zone, and then enter the time appropriately. 3. To apply the changes and continue, click Save and Continue. NOTE: OMIVV connects to internet to fetch the warranty information of your hosts. Depending on your network settings, you might have to configure proxy for the warranty job to run successfully.
NOTE: The @ character is not supported for use in shared network folder user names/passwords. c. To validate your entries click Begin Test. 3. To save this selection and continue the Configuration Wizard, click Save and Continue. Enabling The OMSA Link [Wizard] To launch OMSA within the OMIVV virtual appliance, the OMSA Web Server must be installed and configured. See Dell OpenManage Server Administrator Installation Guide for instructions on how to install and configure the Web Server.
This allows the virtual appliance full read and write access to the share, but limits all other users to read only. 2. Start nfs services: service portmap start service nfs start service nfslock status NOTE: The steps above may vary depending on the Linux distribution in use. 3.
3 Licensing in OpenManage Integration for VMware vCenter This chapter provides details about licensing in OMIVV. There are no new licensing changes for 3.1. NOTE: The Licensing for OMIVV does not alter the number of vCenter connection licenses. The maximum number of vCenter licenses is 10. If you want to register multiple vCenters, all vCenters should be part of same SSO. Separate instances of vCenters are not supported in this OMIVV release.
1. License expiring soon: Starting within 30 days of a license expiration, a message is displayed informing how many days are remaining for that license. 2. License has expired and is in a grace period: After a license expires, it will enter a 90 day grace period. 3. All Licenses have expired: If all of the licenses have expired, a message appears within the integration.
Replacement of Licenses If there is a problem with your order and you receive a replacement license from Dell, the replacement license contains the same entitlement ID of the previous license. When uploading a replacement license, if a license was already uploaded with the same entitlement ID it will be replaced. Enforcement Appliance Updates The appliance will not allow updates to newer versions when all licenses are expired.
4 More Configuration Information For a complete guide on OMIVV configuration, management, and deployment options, see OpenManage Integration for VMware vCenter User's Guide available at Dell.com/support/manuals.
5 Related documentation and resources In addition to this guide, you can access the other guides available at dell.com/support/manuals. On the Manuals page, click View products under the Browse for a product category. In the Select a product section, click Software and Security > Virtualization Solutions. Click OpenManage Integration for VMware vCenter 3.