
Install Guide
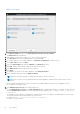
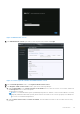
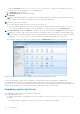

Table Of Contents
- OpenManage Integration for VMware vCenter Version 4.3 Web Client Installation Guide
- Introduction
- OpenManage Integration for VMware vCenter licensing
- Important notes for reference
- Hardware requirements
- Software requirements
- Port information
- Prerequisite checklist
- Installing, configuring, and upgrading OMIVV
- Downloading OpenManage Integration for VMware vCenter
- Deploying OMIVV OVF using vSphere web client
- Generating Certificate Signing Request
- Uploading HTTPS certificate
- Registering vCenter Server by non-administrator user
- Registering OpenManage Integration for VMware vCenter and importing license file
- Upgrading registered vCenter
- Verifying installation
- Updating virtual appliance repository location and virtual appliance
- Upgrading OMIVV from existing version to current version
- Updating appliance through backup and restore
- Recovering OMIVV after unregistering earlier version of OMIVV
- Appliance configuration for VMware vCenter
- Accessing documents from the Dell EMC support site
- Related Documentation

2. Select one vCenter or all registered vCenters from the vCenters drop-down list.
Select a vCenter that is not configured yet or if you have added a vCenter to your environment. The vCenter selection page
allows you to select one or more vCenters to configure settings.
3. To proceed with the Connection Profile Description dialog box, click Next.
NOTE: If you have multiple vCenter servers that are part of the same single sign-on (SSO) registered with the same
OMIVV appliance, and if you choose to configure a single vCenter server, repeat steps 1 through 3 until you configure
each vCenter.
Creating connection profile
Before using the Active Directory credentials with a connection profile, ensure that:
● The Active Directory user’s account exist in Active Directory.
● The iDRAC and host are configured for Active Directory based authentication.
A connection profile stores the iDRAC and host credentials that OMIVV uses to communicate with the Dell EMC servers. Each
Dell EMC server must be associated with a connection profile to be managed by OMIVV. You might assign multiple servers
to a single connection profile. You can create a connection profile using the configuration wizard or from the OpenManage
Integration for VMware vCenter > Settings tab. You can log in to iDRAC and the host using the Active Directory credentials.
NOTE: The Active Directory credential can be either same or separate for both iDRAC and the host.
NOTE: You cannot create a connection profile if the number of added hosts exceeds the license limit for creating a
connection profile.
NOTE: An MX chassis host can be managed using a single unified chassis management IP. To manage an MX chassis using
a chassis profile, see Creating chassis profile. Dell EMC recommends managing an MX chassis hosts with an iDRAC IP to get
complete OMIVV functions.
1. In the Connection Profile Description dialog box, click Next.
2. In the Connection Profile Name and Credentials dialog box, enter the connection Profile Name and connection profile
Description, which is optional.
3. In the Connection Profile Name and Credentials dialog box, under iDRAC Credentials, do either of the following
actions, depending on configuring iDRAC with or without Active Directory:
NOTE:
The iDRAC account requires administrative privileges for updating firmware, applying hardware profiles, applying
system profiles in 14th Gen servers, and deploying hypervisor.
● The iDRAC IPs that are already configured and enabled for Active Directory on which you want to use Active Directory,
select Use Active Directory; otherwise scroll down to configure the iDRAC credentials.
a. In Active Directory User Name, type the username. Type the username in one of these formats: domain\username
or username@domain. The username is limited to 256.
b. In Active Directory Password, type the password. The password is limited to 127 characters.
c. In Verify Password, type the password again.
d. Depending on your requirement, perform one of the following actions:
○ To download and store the iDRAC certificate and validate it during all future connections, select Enable
Certificate Check.
○ To not store and perform the iDRAC certificate check during all future connections, clear Enable Certificate
Check.
● To configure the iDRAC credentials without Active Directory, perform the following tasks:
a. In User Name, type the username. The username is limited to 16 characters. See the iDRAC Documentation for
information about username restrictions for the version of iDRAC that you are using.
b. In Password, type the password. The password is limited to 20 characters.
c. In Verify Password, type the password again.
d. Perform one of the following actions:
○ To download and store the iDRAC certificate, and validate it during all future connections, select Enable
Certificate Check.
○ To not store and perform the iDRAC certificate check during all future connections, clear Enable Certificate
Check.
4. In Host Root, perform one of the following steps:
Appliance configuration for VMware vCenter
29