
Setup Guide

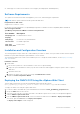
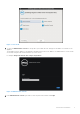
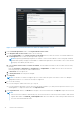
Table Of Contents
- OpenManage Integration for VMware vCenter Quick Installation Guide for vSphere Web Client Version 3.1
- Quick Start Installation
- Installation Introduction
- Prerequisites
- Hardware Requirements
- Software Requirements
- Installation and Configuration Overview
- Deploying the OMIVV OVF Using the vSphere Web Client
- Registering a vCenter server by using a user with necessary privileges
- Registering OpenManage Integration for VMware vCenter and Importing The License File
- Installation Verification
- Upgrading OpenManage Integration Plugin from 3.0 version to the current version
- Migration Path to migrate from 2.x to 3.1
- Recover OpenManage Integration for VMware vCenter if the older plug-in is unregistered
- Understanding How to Configure or Edit the OpenManage Integration for VMware vCenter
- Additional Configuration Settings
- Licensing in OpenManage Integration for VMware vCenter
- Related documentation and resources

Figure 1. Console tab
5. To open the Administration Console for the product, open a Web browser and type the IP address or hostname of the
appliance.
The IP address is the IP address of the appliance VM and not the ESXi host IP address. The Administration Console can be
accessed by using the URL mentioned at the top of the console.
For example: https://10.210.126.120 or https://myesxihost
Figure 2. Administration Console
6. In the Administration Console login window, enter the password, and then click Login.
Quick Start Installation
9