
Setup Guide

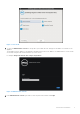
Table Of Contents
- OpenManage Integration for VMware vCenter Quick Installation Guide for vSphere Web Client Version 3.1
- Quick Start Installation
- Installation Introduction
- Prerequisites
- Hardware Requirements
- Software Requirements
- Installation and Configuration Overview
- Deploying the OMIVV OVF Using the vSphere Web Client
- Registering a vCenter server by using a user with necessary privileges
- Registering OpenManage Integration for VMware vCenter and Importing The License File
- Installation Verification
- Upgrading OpenManage Integration Plugin from 3.0 version to the current version
- Migration Path to migrate from 2.x to 3.1
- Recover OpenManage Integration for VMware vCenter if the older plug-in is unregistered
- Understanding How to Configure or Edit the OpenManage Integration for VMware vCenter
- Additional Configuration Settings
- Licensing in OpenManage Integration for VMware vCenter
- Related documentation and resources

● OMSA support for older servers and ESXi version support (both deployment and management)
Software Requirements
The vSphere environment must fulfill virtual appliance, port access, and listening port requirements.
NOTE: VMware vSphere has both a desktop client and Web client.
Requirements for Web Client
Supported for vCenter 5.5 or later.
For specific software requirements, see OpenManage Integration for VMware vCenter Compatibility Matrix available at
dell.com/support/manuals.
OpenManage Integration for VMware vCenter Port Requirements
Port number
Description
443 (https) and
80 (http)
For Administration Console
4433 (https) For auto discovery and handshake
162 and 11620 For SNMP trap listener
2049, 4001,
4002, 4003, 4004
For NFS share
Installation and Configuration Overview
The following high-level steps outline the overall installation procedure for OMIVV. These procedures assume that the required
hardware is in place and running the required VMware vCenter software.
The following information is an outline of the installation process. To begin the actual installation, see the Deploy OVF Using
Web Client section.
Installation Overview
1. Install OMIVV.
a. Be sure that systems are connected and the vCenter server is up and running.
b. Deploy the Open Virtualization Format (OVF) file that contains the OMIVV appliance using the vSphere client or vSphere
Web client.
c. Upload the license file.
d. Register the OMIVV with vCenter server using the Administration Console.
2. Complete the Initial Configuration Wizard.
Deploying the OMIVV OVF Using the vSphere Web Client
This procedure assumes that you have downloaded and extracted the product zip file
(Dell_OpenManage_Integration_<version number>.<build number>.zip) from the Dell website.
To deploy the OMIVV OVF using the vSphere Web Client:
1. Locate the OMIVV virtual disk that you downloaded and extracted and run Dell_OpenManage_Integration.exe.
2. Accept the EULA and save the OVF file.
3. Copy or move the OVF file to a location accessible to the VMware vSphere host to which you will upload the appliance.
4. Start the VMware vSphere Web Client.
5. From the VMware vSphere Web Client, select a host and in the main menu click Actions > Deploy OVF Template.
You can also right-click Host and select Deploy OVF Template.
The Deploy OVF Template wizard is displayed.
Quick Start Installation
5