
Setup Guide
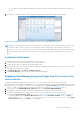
Table Of Contents
- OpenManage Integration for VMware vCenter Quick Installation Guide for vSphere Web Client Version 3.1
- Quick Start Installation
- Installation Introduction
- Prerequisites
- Hardware Requirements
- Software Requirements
- Installation and Configuration Overview
- Deploying the OMIVV OVF Using the vSphere Web Client
- Registering a vCenter server by using a user with necessary privileges
- Registering OpenManage Integration for VMware vCenter and Importing The License File
- Installation Verification
- Upgrading OpenManage Integration Plugin from 3.0 version to the current version
- Migration Path to migrate from 2.x to 3.1
- Recover OpenManage Integration for VMware vCenter if the older plug-in is unregistered
- Understanding How to Configure or Edit the OpenManage Integration for VMware vCenter
- Additional Configuration Settings
- Licensing in OpenManage Integration for VMware vCenter
- Related documentation and resources

1. In the Initial Configuration Wizard, under Event Posting Levels, select one of the following:
● Do not post any events — Block hardware events.
● Post All Events — Post all hardware events.
● Post only Critical and Warning Events — Post only critical or warning level hardware events.
● Post only Virtualization-Related Critical and Warning Events — Post only virtualization-related critical and warning
events; this is the default event posting level.
2. To enable all hardware alarms and events, select the Enable Alarms for Dell Hosts check box.
NOTE: Dell hosts that have alarms enabled respond to some specific critical events by entering maintenance mode.
3. A dialog box Enabling Dell Alarm Warning is displayed, click Continue to accept the change, or click Cancel.
NOTE: You must complete this step only if Enable Alarms For Dell Hosts is selected.
NOTE: After restoring the appliance the Events and Alarms settings are not enabled even if the Graphic User
Interface shows it as enabled. You must enable the Events and Alarms settings again from the Settings page.
4. Click Apply.
Creating A Chassis Profile
OMIVV can monitor all Dell Chassis associated with the Dell servers that are managed by OMIVV. Chassis profile is required to
monitor the chassis. A chassis credential profile can be created to associate with a single or multiple chassis. The chassis profile
is created using the following steps:
1. In the OpenManage Integration for VMware vCenter, select Manage > Profiles > Credential Profiles > Chassis
Profile.
2. In the Chassis Profiles page, click the Plus (+) icon to create a New Chassis Profile.
3. In the Chassis Profile Wizard page, do the following:
a. In the Profile Name text box, enter the profile name.
b. In the Description text box, enter an optional description.
4. Under Credentials do the following:
a. In the User Name text box, type the user name with administrative rights, which is typically used to log on to the
Chassis Management Controller.
b. In the Password text box, type the password for the corresponding user name.
c. In the Verify Password text box, enter the same password you have entered in the Password text box. The passwords
must match.
NOTE:
The credentials can be a local or active directory credentials. Before using the Active Directory credentials
with a Chassis Profile, the Active Directory user’s account must exist in Active Directory and the Chassis Management
Controller must be configured for Active Directory based authentication.
5. Click Next.
The Select Chassis page is displayed, which shows all the available chassis.
NOTE:
Chassis are discovered and available to be associated with the Chassis Profile only after the successful inventory
run of any modular host present under that chassis.
6. To select either an individual chassis or multiple chassis, select the corresponding check boxes next to the IP/Host Name
column.
If the selected chassis is already a part of another profile, a warning message is displayed, stating that the selected chassis is
associated with a profile.
For example, you have a profile Test associated with Chassis A. If you create another profile Test 1 and try to associate
Chassis A to Test 1, a warning message is displayed.
7. Click OK.
The Associated Chassis page is displayed.
8. Select the chassis and click the Test Connection Icon to test the chassis connectivity, which verifies the credentials and
the result is displayed in the Test Result column as Pass or Fail.
9. Click Finish to complete the profile.
18
Understanding How to Configure or Edit the OpenManage Integration for VMware vCenter