
Setup Guide


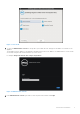
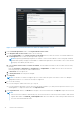
Table Of Contents
- OpenManage Integration for VMware vCenter Quick Installation Guide for vSphere Web Client Version 3.1
- Quick Start Installation
- Installation Introduction
- Prerequisites
- Hardware Requirements
- Software Requirements
- Installation and Configuration Overview
- Deploying the OMIVV OVF Using the vSphere Web Client
- Registering a vCenter server by using a user with necessary privileges
- Registering OpenManage Integration for VMware vCenter and Importing The License File
- Installation Verification
- Upgrading OpenManage Integration Plugin from 3.0 version to the current version
- Migration Path to migrate from 2.x to 3.1
- Recover OpenManage Integration for VMware vCenter if the older plug-in is unregistered
- Understanding How to Configure or Edit the OpenManage Integration for VMware vCenter
- Additional Configuration Settings
- Licensing in OpenManage Integration for VMware vCenter
- Related documentation and resources

Figure 3. vCenter Registration Window from within the Administration Console
7. In the vCenter Registration window, click Register New vCenter Server.
8. In the Register New vCenter Server window, do the following:
a. Under vCenter Name, in the vCenter Server IP or Hostname text box, enter the server IP or hostname and then in
the Description text box, enter the description that is optional.
NOTE:
Registering OpenManage Integration for VMware vCenter with the VMware vCenter using Fully Qualified
Domain Name (FQDN) is highly recommended. For FQDN based registrations, the hostname of the vCenter should
be properly resolvable by the DNS server.
b. Under vCenter User Account, in vCenter User Name, enter the Admin user name or the user name with necessary
privileges.
Enter the username as domain\user or domain/user or user@domain. The Admin user account or the user with
necessary privileges is used by the OMIVV administration.
c. In Password, enter the password.
d. In Verify Password, enter the password again.
9. Click Register.
NOTE:
One instance of OMIVV can support upto 10 vCenters which are a part of the same vCenter SSO. Multiple
independent instances of vCenters are currently not supported.
10. Do one of the following:
● If you are using the OMIVV trial version, go to step 12.
● If you are using the full product version, the license file will be e-mailed to you, and you must import this license to your
virtual appliance. To import the license file, click Upload License.
11. In the Upload License window, click Browse to navigate to the license file and then click Upload to import the license file.
NOTE:
● If the license file is modified or edited in any way, the license file will not work and you must send an e-mail with the
original order number to download_software@dell.com. The license XML file is used in this procedure and it does
not come with a hard coded file name.
10 Quick Start Installation