OpenManage Integration for VMware vCenter Quick Installation Guide for vSphere Web Client Version 3.1 January 2016 Rev.
Notes, Cautions, and Warnings NOTE: A NOTE indicates important information that helps you make better use of your computer. CAUTION: A CAUTION indicates either potential damage to hardware or loss of data and tells you how to avoid the problem. NOTE: A WARNING indicates a potential for property damage, personal injury, or death. Copyright © 2016 Dell Inc. All rights reserved. This product is protected by U.S. and international copyright and intellectual property laws.
Contents Chapter 1: Quick Start Installation................................................................................................ 4 Installation Introduction......................................................................................................................................................4 Prerequisites.........................................................................................................................................................................
1 Quick Start Installation Topics: • • Installation Introduction Prerequisites Installation Introduction This guide provides step-by-step instructions for the installation and configuration of OpenManage Integration for VMware vCenter (OMIVV) on Dell servers.
● OMSA support for older servers and ESXi version support (both deployment and management) Software Requirements The vSphere environment must fulfill virtual appliance, port access, and listening port requirements. NOTE: VMware vSphere has both a desktop client and Web client. Requirements for Web Client Supported for vCenter 5.5 or later. For specific software requirements, see OpenManage Integration for VMware vCenter Compatibility Matrix available at dell.com/support/manuals.
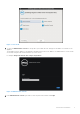
. In the Select Source window, do the following: a. URL: If you want to download the OVF package from internet, select URL. b. Local file: If you want to select the OVF package from your local system, select the Local file and click Browse. NOTE: The installation can take between 10 to 30 minutes, if the OVF package resides on a network share. For a quick installation, it is recommended that you host the OVF on a local drive. 7. Click Next. The Review Details window is displayed. 8.
Defining privileges To enable a user with the required privileges to register a vCenter server, select the following privileges: ● Alarms ○ Create alarm ○ Modify alarm ○ Remove alarm ● Extension ○ Register extension ○ Unregister extension ○ Update extension ● Global ○ Cancel task ○ Log event ○ Settings ● Host ○ CIM ■ CIM Interaction ○ Configuration ■ Advanced settings ■ Connection ■ Maintenance ■ Query patch ■ Security profile and firewall ○ Inventory ■ Add host to cluster ■ Add standalone host ● Host profi
1. Log in to the vSphere Web client with administrative rights. 2. Browse to Administration → Role Manager in vSphere Web client. 3. Select a vCenter server system from the drop-down menu. 4. Select a role and click Edit role action. 5. Select the following privileges for Dell Infrastructure Deployment Role, Dell Operational Role, and click OK. ● Dell ○ Dell.Configuration ○ Dell.Deploy-Provisioning ○ Dell.Inventory ○ Dell.Monitoring ○ Dell.
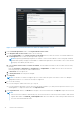
Figure 1. Console tab 5. To open the Administration Console for the product, open a Web browser and type the IP address or hostname of the appliance. The IP address is the IP address of the appliance VM and not the ESXi host IP address. The Administration Console can be accessed by using the URL mentioned at the top of the console. For example: https://10.210.126.120 or https://myesxihost Figure 2. Administration Console 6.
Figure 3. vCenter Registration Window from within the Administration Console 7. In the vCenter Registration window, click Register New vCenter Server. 8. In the Register New vCenter Server window, do the following: a. Under vCenter Name, in the vCenter Server IP or Hostname text box, enter the server IP or hostname and then in the Description text box, enter the description that is optional.
● You cannot use an individual license XML file to upload, instead use the license XML file included in a compressed file. 12. After OMIVV is registered, OMIVV is shown under the Administration category of the Web Client home page. Figure 4. The OpenManage Integration for VMware vCenter Successfully Added to vCenter NOTE: For all vCenter operations, OMIVV uses the privileges of a registered user and not the privileges of a logged-in user.
● If there is no internet connectivity, download all the files and folders from the http://linux.dell.com/repo/ hardware/vcenter-plugin-x64/latest/ path and copy them to an HTTP share. In the Appliance Management window, in the APPLIANCE UPDATE section, click Edit, and then in the Update Repository Path text box, update the path to the offline HTTP share, and click Apply. 5.
versions, this IP change shows up as non-complaint and requires you to configure OMSA. For more information on fixing the host compliance, see Running the Fix Non-Compliant VSphere hosts Wizard in the OpenManage Integration for VMware vCenter Version 3.1 User Guide available at dell.com/support/manuals.
2 Understanding How to Configure or Edit the OpenManage Integration for VMware vCenter After you complete the basic installation of the OMIVV, the Initial Configuration Wizard is displayed when you click the OMIVV icon. Use the Initial Configuration Wizard to configure the Settings on first launch. For subsequent instances use the Settings page. From the Initial Configuration Wizard you can create a connection profile, edit the settings of warranty, inventory, events and alarms.
● all available vCenters 1. In the Initial Configuration Wizard, click Next in the Welcome screen. 2. Select one vCenter or all vCenters from the vCenters drop-down list. Select an individual vCenter for those not configured yet or if you have added a new vCenter to your environment. The vCenter selection page allows you to select one or more vCenters to configure settings. 3. Click Next to proceed to the Connection Profile description page.
○ Perform one of the following actions: ■ To download and store the iDRAC certificate and validate it during all future connections, select Enable Certificate Check. ■ To not store and perform the iDRAC certificate check during all future connections, clear Enable Certificate Check. 4.
NOTE: For servers that do not have either an iDRAC Express or Enterprise card, the iDRAC test connection result states Not Applicable for this system. Scheduling Inventory Jobs [Wizard] You can configure inventory schedule using the Configuration Wizard or OpenManage Integration under OpenManage Integration > Manage > Settings. NOTE: To make sure that the OMIVV continues to display updated information, it is recommended that you schedule a periodic inventory job.
1. In the Initial Configuration Wizard, under Event Posting Levels, select one of the following: ● ● ● ● Do not post any events — Block hardware events. Post All Events — Post all hardware events. Post only Critical and Warning Events — Post only critical or warning level hardware events. Post only Virtualization-Related Critical and Warning Events — Post only virtualization-related critical and warning events; this is the default event posting level. 2.
NOTE: You can also add or remove a chassis by clicking the Plus Icon displayed on the top left corner of the Associated Chassis page.
3 Additional Configuration Settings The following configuration settings are optional. However, it can be used for monitoring the hosts in your VMware vCenter using the plug-in. ● Warranty Expiration Notification ● Firmware Update Repository ● OMSA Web Server URL Topics: • • • Warranty Expiration Notification Firmware Update Repository OMSA Web Server URL Warranty Expiration Notification Viewing Warranty Expiration Notification Settings 1. In the OMIVV, click Manage > Settings tab. 2.
NOTE: OMIVV connects to the Internet to get the catalog and firmware packages applicable for your hosts. Depending on your network settings, configure proxy for the firmware update task to run successfully from Dell online. ● Shared Network Folder — Created with Dell Repository Manager. These local repositories should be located on CIFS or NFS file share. Setting Up the Firmware Update Repository You can configure the firmware update repository on the OMIVV in the Settings tab. 1.
4 Licensing in OpenManage Integration for VMware vCenter This chapter provides details about licensing in OMIVV. There are no new licensing changes for 3.1. NOTE: The Licensing for OMIVV does not alter the number of vCenter connection licenses. The maximum number of vCenter licenses is 10. If you want to register multiple vCenters, all vCenters should be part of same SSO. Separate instances of vCenters are not supported in this OMIVV release.
Options After Uploading Licenses License file for new purchases When purchasing a new license, an email is sent from Dell containing the new license file. The license should arrive in a .xml format. If the license is in a zip format, extract the license xml file from the zip file before uploading. Stacking licenses Starting from OMIVV version 2.1, OMIVV has the ability to stack multiple standard licenses to increase the number of supported hosts to the sum of the hosts in the uploaded licenses.
5 Related documentation and resources In addition to this guide, you can access the other guides available at dell.com/support/manuals. On the Manuals page, click View products under the Browse for a product category. In the Select a product section, click Software and Security > Virtualization Solutions. Click OpenManage Integration for VMware vCenter 3.