
Install Guide
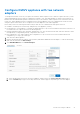
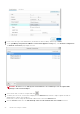
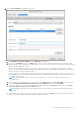

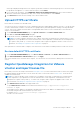
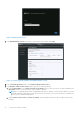
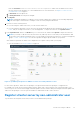

Table Of Contents
- OpenManage Integration for VMware vCenter Version 5.0 Installation Guide
- Introduction
- Install and configure OMIVV
- Download OpenManage Integration for VMware vCenter
- Deploy OMIVV OVF using vSphere Client (HTML-5)
- Configure OMIVV appliance
- Set up Network Time Protocol servers
- Configure OMIVV appliance with two network adapters
- Generate a Certificate Signing Request (CSR)
- Upload HTTPS certificate
- Register OpenManage Integration for VMware vCenter and import license file
- Register vCenter server by non-administrator user
- Reconfigure OMIVV after upgrading registered vCenter version
- Verify installation
- Manage backup and restore
- Update OMIVV appliance and repository location
- Upgrade OMIVV appliance using RPM
- Upgrade OMIVV appliance using backup and restore
- Unregister OpenManage Integration for VMware vCenter
- Recover OMIVV after un-registration
- Configure appliance for VMware vCenter
- Accessing documents from the Dell EMC support site
- Related Documentation

Reconfigure OMIVV after upgrading registered
vCenter version
After upgrading a registered vCenter, perform the following tasks:
● For non-administrator users:
1. Assign extra privileges to non-administrator users, if necessary. See Required privileges for non-administrator users on
page 28.
For example, when you upgrade from vCenter 6.0 to vCenter 6.5, assign the extra privileges.
2. Reboot the registered OMIVV appliance.
● For administrator users:
1. Reboot the registered OMIVV appliance.
Verify installation
The following steps verify that the OMIVV installation is successful:
1. Close any vSphere client windows, and start a new vSphere Client (HTML-5).
2. Ensure that vCenter can communicate with OMIVV by attempting a PING command from the vCenter server to the virtual
appliance IP address or hostname.
3. In vSphere Client, expand Menu, click Administration > Solutions > Client Plug-ins.
For more information about the access restrictions for Plug-In Management or Client Plug-Ins page, see VMware
documentation.
4. On the Client Plug-Ins page, verify the version, and ensure that OMIVV is installed and enabled.
If OMIVV is not enabled, wait for sometime and then log out and log in from vCenter.
5. To confirm that the OMIVV icon appears inside vSphere client (HTML-5), in vSphere Client, expand Menu.
The OpenManage Integration icon is displayed.
Manage backup and restore
By using the Administrator Console, you can perform backup and restore related tasks.
● Configure backup and restore
● Schedule automatic backups
● Perform an immediate backup
● Restore the database from backup
● Reset backup and restore settings on page 32
In OpenManage Integration for VMware vCenter, perform the following steps to access the BACKUP AND RESTORE
SETTINGS page through the Administration Console:
1. Go to https:\\<ApplianceIP|hostname>.
2. In the Login dialog box, type the password.
3. In the left pane, click BACKUP AND RESTORE.
Configure backup and restore
The backup and restore function backs up the OMIVV database to a remote location (NFS and CIFS) from which it can be
restored later. The profiles, configuration, and host information are in the backup. Dell EMC recommends you to schedule
automatic backups to guard against data loss.
NOTE: The NTP settings are not saved and restored.
1. On the BACKUP AND RESTORE SETTINGS page, click Edit.
2. On the highlighted SETTINGS AND DETAILS area, do the following:
a. In Backup Location, type the path of the backup files.
30
Install and configure OMIVV