
Install Guide
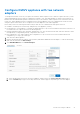
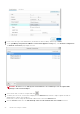
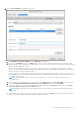

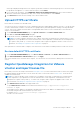
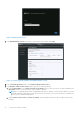
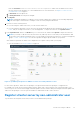

Table Of Contents
- OpenManage Integration for VMware vCenter Version 5.0 Installation Guide
- Introduction
- Install and configure OMIVV
- Download OpenManage Integration for VMware vCenter
- Deploy OMIVV OVF using vSphere Client (HTML-5)
- Configure OMIVV appliance
- Set up Network Time Protocol servers
- Configure OMIVV appliance with two network adapters
- Generate a Certificate Signing Request (CSR)
- Upload HTTPS certificate
- Register OpenManage Integration for VMware vCenter and import license file
- Register vCenter server by non-administrator user
- Reconfigure OMIVV after upgrading registered vCenter version
- Verify installation
- Manage backup and restore
- Update OMIVV appliance and repository location
- Upgrade OMIVV appliance using RPM
- Upgrade OMIVV appliance using backup and restore
- Unregister OpenManage Integration for VMware vCenter
- Recover OMIVV after un-registration
- Configure appliance for VMware vCenter
- Accessing documents from the Dell EMC support site
- Related Documentation

A message is displayed stating that if a new request is generated, certificates created using the previous CSR can no longer
be uploaded to the appliance. To continue with the request, click Continue.
2. If you continue with the request, in the GENERATE CERTIFICATE SIGNING REQUEST dialog box, enter information
about the common name, organization, locality, state, country, and email address. Click Continue.
3. Click Download, and then save the resulting CSR to an accessible location.
Upload HTTPS certificate
Ensure that the certificate uses the PEM format.
You can use the HTTPS certificates for secure communication between OMIVV appliance and host systems. To set up this type
of secure communication, send the CSR certificate to a signing authority, and then upload the resulting CSR using the admin
console. There is also a default certificate that is self-signed and can be used for secure communication—this certificate is
unique to every installation.
1. On the APPLIANCE MANAGEMENT page, click Upload Certificate in the HTTPS CERTIFICATES area.
2. Click OK in the UPLOAD CERTIFICATE dialog box.
3. To upload the certificate, click Browse, and then click Upload.
NOTE: If you want to upload a customized CSR to OMIVV, ensure that you upload the new certificate before vCenter
registration. If you upload the new custom certificate after vCenter registration, communication errors are displayed on
the vSphere Client (HTML-5). To fix this issue, unregister, and re-register the appliance with the vCenter. For more
information, see Manage un-registration and re-registration on page 35 .
After upload HTTPs certificate task is complete, close the browser session and access admin portal in a new browser session.
Restore default HTTPS certificate
1. On the APPLIANCE MANAGEMENT page, click Restore Default Certificate in the HTTPS CERTIFICATES area.
2. In the RESTORE DEFAULT CERTIFICATE dialog box, click Apply.
After restore default HTTPs certificate task is complete, close the browser session and access admin portal in a new browser
session.
Register OpenManage Integration for VMware
vCenter and import license file
Ensure that your licenses are ready for download at Dell Digital Locker. If you have ordered more than one license, they might
be shipped separately at different times. You can check the status of other license items at Order Status. The license file is
available as an .XML format.
NOTE:
If you want to upload a custom certificate for your appliance, ensure that you upload the new certificate before
vCenter registration. If you upload the new custom certificate after vCenter registration, communication errors are
displayed in the vSphere Client (HTML-5). To fix this issue, unregister, and re-register the appliance with vCenter. For
more information, see Manage un-registration and re-registration on page 35.
1. Open Administration Console from a supported browser.
To open Administration Console, start a web browser and enter https://<ApplianceIP or Appliance
hostname or FQDN>.
The IP address is the IP address of the appliance VM and not the ESXi host IP address. The Administration Console can be
accessed by using the URL mentioned at the top of the console.
For example: Https://10.210.126.120 or Https://myesxihost
The URL is not case-sensitive.
Install and configure OMIVV
25