
Install Guide


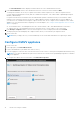
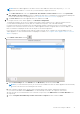
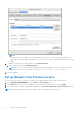
Table Of Contents
- OpenManage Integration for VMware vCenter Version 5.0 Installation Guide
- Introduction
- Install and configure OMIVV
- Download OpenManage Integration for VMware vCenter
- Deploy OMIVV OVF using vSphere Client (HTML-5)
- Configure OMIVV appliance
- Set up Network Time Protocol servers
- Configure OMIVV appliance with two network adapters
- Generate a Certificate Signing Request (CSR)
- Upload HTTPS certificate
- Register OpenManage Integration for VMware vCenter and import license file
- Register vCenter server by non-administrator user
- Reconfigure OMIVV after upgrading registered vCenter version
- Verify installation
- Manage backup and restore
- Update OMIVV appliance and repository location
- Upgrade OMIVV appliance using RPM
- Upgrade OMIVV appliance using backup and restore
- Unregister OpenManage Integration for VMware vCenter
- Recover OMIVV after un-registration
- Configure appliance for VMware vCenter
- Accessing documents from the Dell EMC support site
- Related Documentation

Install and configure OMIVV
Ensure that the hardware requirements are met and you are running the required VMware vCenter.
The following high-level steps outline the overall installation and configuration procedure for OMIVV:
1. Download the DellEMC_OpenManage_Integration_<version number>.<build number>.zip file from the Dell support website
at Dell.com/support. For more information about downloading OMIVV, see Download OpenManage Integration for
VMware vCenter on page 16.
2. Navigate to the location where you have downloaded the file and extract its contents.
3. Deploy the Open Virtualization Format (OVF) file that contains the OMIVV appliance by using the vSphere Client (HTML-5).
See Deploying the OMIVV OVF.
4. After you deploy an OVF, set the time zone, current date, and time.
5. Upload the license file. For more information about licensing, see Upload license to Administration Portal on page 6.
6. Set the deployment mode as per the requirement. For more information, see Configure deployment mode on page 7.
7. Register the OMIVV appliance with the vCenter server by using Administration Console. See Registering OMIVV and
importing the license file.
8. To configure the appliance, complete the Initial Configuration Wizard. See Configuration tasks through the configuration
wizard.
Topics:
• Download OpenManage Integration for VMware vCenter
• Deploy OMIVV OVF using vSphere Client (HTML-5)
• Configure OMIVV appliance
• Set up Network Time Protocol servers
• Configure OMIVV appliance with two network adapters
• Generate a Certificate Signing Request (CSR)
• Upload HTTPS certificate
• Register OpenManage Integration for VMware vCenter and import license file
• Register vCenter server by non-administrator user
• Reconfigure OMIVV after upgrading registered vCenter version
• Verify installation
• Manage backup and restore
• Update OMIVV appliance and repository location
• Upgrade OMIVV appliance using RPM
• Upgrade OMIVV appliance using backup and restore
• Unregister OpenManage Integration for VMware vCenter
•
Recover OMIVV after un-registration
Download OpenManage Integration for VMware
vCenter
Do keep the Service Tag of your Dell EMC PowerEdge server handy. It is recommended that you use the Service Tag to access
all support on the Dell Support Website. This ensures that you download the appropriate version of the software for your
platform.
To download OMIVV:
1. Go to https://www.dell.com/support.
2. Perform one of the following actions:
● Enter the Service Tag of your Dell EMC PowerEdge server, and then select search.
● Select Browse all products > Servers > PowerEdge.
2
16 Install and configure OMIVV