OpenManage Integration for VMware vCenter Version 5.0 Installation Guide September 2019 Rev.
Notes, cautions, and warnings NOTE: A NOTE indicates important information that helps you make better use of your product. CAUTION: A CAUTION indicates either potential damage to hardware or loss of data and tells you how to avoid the problem. WARNING: A WARNING indicates a potential for property damage, personal injury, or death. © 2010 - 2019 Dell Inc. or its subsidiaries. All rights reserved. Dell, EMC, and other trademarks are trademarks of Dell Inc. or its subsidiaries.
Contents Chapter 1: Introduction................................................................................................................. 5 OpenManage Integration for VMware vCenter licensing.......................................................................................... 5 Buy software license.....................................................................................................................................................5 Options after uploading licenses.................
Recover OMIVV after unregistering earlier version of OMIVV........................................................................ 34 Manage un-registration and re-registration..........................................................................................................35 Chapter 3: Configure appliance for VMware vCenter................................................................... 36 Configuration tasks using initial configuration wizard ....................................................
1 Introduction This guide provides step-by-step instructions for installing and configuring OpenManage Integration for VMware vCenter (OMIVV) for use with PowerEdge servers. After the OMIVV installation, for more information about all aspects of administration including—inventory management, monitoring and alerting, firmware updates, and warranty management, see OpenManage Integration for VMware vCenter User's Guide available at Dell.com/support/manuals.
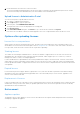
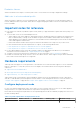
2. Download and save the license file to a known location. The license file might be packaged inside a .zip file. Ensure that you unzip the .zip file and upload only the license .xml file. The license file is likely to be named based on your order number, such as 123456789.xml. Upload license to Administration Portal You can use this option to upload OMIVV host license. 1. Go to https://. 2. In the Login dialog box, type the password. 3. In the left pane, click VCENTER REGISTRATION.
Evaluation License When an evaluation license expires, several key areas cease to work, and an error message is displayed accordingly. Add hosts to a host credential profile When you attempt to add a host to a host credential profile, if the number of licensed hosts exceeds beyond the number of licenses, adding extra hosts is prevented. OMIVV does not support managing the number of hosts more than number of host license is available. Important notes for reference ● From OMIVV 5.
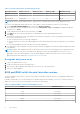
Table 1. System requirements for deployment modes Deployment modes Number of hosts Number of CPUs Memory (GB) Minimum Storage Medium Up to 500 4 16 95 GB Large Up to 1,000 8 32 95 GB X Large mode Up to 2,000 12 32 95 GB NOTE: MX chassis firmware update feature is supported only on medium, large, and extra large deployment modes. You can select an appropriate deployment mode to scale OMIVV to match the number of nodes in your environment. 1.
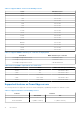
Table 2. Supported BIOS version for PowerEdge servers Server Minimum version M820 1.2.6 or later R220 1.0.3 or later R320 1.2.4 or later R420 1.2.4 or later R520 1.2.4 or later R620 1.2.6 or later R720 1.2.6 or later R720xd 1.2.6 or later R820 1.7.2 or later R920 1.1.0 or later R630 1.0.4 or later R730 1.0.4 or later R730xd 1.0.4 or later R430 1.0.4 or later R530 1.0.2 or later R830 1.0.2 or later R930 1.0.2 or later R230 1.0.2 or later R330 1.0.2 or later T630 1.0.
Table 2. Supported BIOS version for PowerEdge servers Server Minimum version R440 1.0.0 or later M640 1.0.0 or later T140 1.0.0 or later T340 1.0.0 or later T640 1.0.0 or later T440 1.0.0 or later R540 1.0.0 or later FC640 1.0.0 or later R6415 1.0.0 or later R7425 1.0.0 or later R7415 1.0.0 or later MX740C 1.0.0 or later MX840C 1.0.0 or later R6515 1.0.3 or later R7515 1.0.3 or later R6525 1.0.0 or later Table 3.
Table 5.
Table 6. Supported features on modular infrastructure Features M1000e VRTX FX2s MX Health Reporting Y Y Y Y Multi-chassis management group relationship information N N N Y Firmware Update N N N Y Storage space required for provisioned storage The OMIVV virtual appliance requires at least 95 GB of disk space for provisioned storage. Default virtual appliance configuration The OMIVV virtual appliance is provisioned with 8 GB of RAM and two virtual CPU (Small Deployment Mode).
Table 8. Supported vCenter server versions vCenter version Client support 6.5 U2 Y 6.5 U3 Y 6.7 Y 6.7 U1 Y 6.7 U2 Y 6.7 U3 Y The OpenManage Integration for VMware vCenter version 5.0 supports VMware vRealize Operations Manager (vROPS) version 2.0. The OMIVV 5.0 appliance supports CentOS 7.6.1810. Port information This section lists all the port requirements to configure your virtual appliance and managed nodes. Table 9.
Table 9. Virtual appliance Port Numbe r Protocols Port Type Maximum Encryption Level Direction Destination Usage Description and operating system deployment flows. 4001 to NFS UDP /TCP None In/Out OMIVV appliance to NFS Public Share These ports must be kept open to run the statd, quotd, lockd, and mountd services by the V2 and V3 protocols of the NFS server.
Table 11. Managed nodes (iDRAC or CMC or OME-Modular) Port Numbe r Protocols Port Type Maximum Encryptio n Level Direction Destination Usage Description 4001 to NFS UDP None In/Out iDRAC to/ from OMIVV Public Share For iDRAC to access NFS public share that is exposed by OMIVV appliance. This is used for operating system deployment and firmware update. 4004 To access the iDRAC configurations from the OMIVV. Used in deployment flow.
2 Install and configure OMIVV Ensure that the hardware requirements are met and you are running the required VMware vCenter. The following high-level steps outline the overall installation and configuration procedure for OMIVV: 1. Download the DellEMC_OpenManage_Integration_..zip file from the Dell support website at Dell.com/support. For more information about downloading OMIVV, see Download OpenManage Integration for VMware vCenter on page 16. 2.
3. Select the appropriate model of your PowerEdge server. 4. On the support page of your server, select Drivers & downloads. 5. From the Operating System list, select the appropriate version of VMware ESXi. 6. From the Category list, select Systems Management. The supported version of OMIVV is displayed. 7. Click Download or select the check box to add the software to your download list. Deploy OMIVV OVF using vSphere Client (HTML-5) Ensure that you have downloaded and unzipped the product .
The Select Networks window displays information about the source and destination networks. 11. In the Select Networks window, select destination network for each source network and click Next. To manage the Dell EMC servers in your vSphere environment, OMIVV requires access to both the vSphere network (vCenter and ESXi management network) and out-of-band network (iDRAC, CMC, and Dell EMC OpenManage Enterprise Modular (OME-Modular).
NOTE: When the OMIVV appliance is not able to retrieve an IP address from the network (DHCP), 0.0.0.0 is displayed as the IP address. To resolve this, you must manually configure the static IP. a. On the Date and Time tab, select the Synchronize date and time over the network check box. The Synchronize date and time over the network check box is enabled only after NTP is configured successfully using the Admin portal.
NOTE: Sometimes, after you configure the OMIVV appliance with a static IP, the OMIVV terminal utility page does not immediately refresh and display the updated IP. To resolve this issue, exit the OMIVV terminal utility, and then log in again. 8. To change the hostname of the OMIVV appliance, click Change Hostname. a. Enter a valid hostname, and click Update hostname. NOTE: If any vCenter servers are already registered with the OMIVV appliance, unregister and re-register all the vCenter instances.
Configure OMIVV appliance with two network adapters To manage the Dell EMC servers in your vSphere environment, OMIVV requires access to both the vSphere network (vCenter and ESXi management network) and out-of-band network (iDRAC, CMC, and OME-Modular). If vSphere network and out-ofband network are maintained as separate isolated network in your environment, OMIVV requires access for both the networks. In this case, OMIVV appliance must be configured with two network adapters.
4. Power on the VM. Log in as an administrator (the default user name is Admin), and then press Enter. 5. On the OpenManage Integration for VMware vCenter Virtual Appliance Setup utility, select Network Configuration. The Network Connections page displays two NICs. WARNING: Do not use "+" to add any new network interface. It is mandatory to use the vSphere Edit Settings to add a network adapter. 6. Select the NIC that you want to configure and click . 7.
9. Click the IPv4 Settings tab and do the following: a. Select Manual or Automatic (DHCP) from the Method drop-down list. b. If you select the Manual method, click Add, and then enter the valid IP address, Netmask (in the CIDR format), and gateway details. It is recommended to use the static IP in case if you want to control over the priority of the DNS servers (primary and secondary DNS entries). Typically, vSphere elements of data center such as vCenter and ESXi hosts are managed using hostname or FQDN.
Typically, the network that you have configured as the default gateway does not require any manual route configuration because the gateway is capable of providing the reachability. However, for networks where default gateway is not configured (the Use this connection only for resources on its network check box is selected), a manual route configuration may be required. Because the default gateway is not configured for this network to reach external networks, manual routing configurations are required.
A message is displayed stating that if a new request is generated, certificates created using the previous CSR can no longer be uploaded to the appliance. To continue with the request, click Continue. 2. If you continue with the request, in the GENERATE CERTIFICATE SIGNING REQUEST dialog box, enter information about the common name, organization, locality, state, country, and email address. Click Continue. 3. Click Download, and then save the resulting CSR to an accessible location.
Figure 1. Administration Console 2. In the Administration Console login window, enter the password, and then click Login. Figure 2. vCenter registration window from Administration Console 3. In the vCenter Registration window, click Register a New vCenter Server. 4. In the Register a New vCenter Server window, perform the following substeps: a. Under vCenter Name, in the vCenter Server IP or Hostname text box, enter the server IP or FQDN, and then in the Description text box, enter a description.
Enter the username as domain\user or domain/user or user@domain. OMIVV uses the Admin user account or the user with necessary privileges for vCenter administration. For more information, see Register vCenter server by non-administrator user on page 27. c. In Password, enter the password. d. In Verify Password, enter the password again. 5. Click Register.
You can register vCenter servers for the OMIVV appliance with vCenter administrator credentials or a non-administrator user with the Dell privileges. To enable a non-administrator user with the required privileges to register a vCenter server, perform the following steps: 1. Create a role or modify existing role with a required privileges for the role. For more information about the list of privileges required for the role, see Required privileges for non-administrator users.
● ● ● ● - Advanced settings - Connection - Maintenance - Network configuration - Query patch - Security profile and firewall ○ Inventory ■ Add host to cluster ■ Add standalone host ■ Modify cluster NOTE: If you are using vCenter 6.5 or upgrading to vCenter 6.
Reconfigure OMIVV after upgrading registered vCenter version After upgrading a registered vCenter, perform the following tasks: ● For non-administrator users: 1. Assign extra privileges to non-administrator users, if necessary. See Required privileges for non-administrator users on page 28. For example, when you upgrade from vCenter 6.0 to vCenter 6.5, assign the extra privileges. 2. Reboot the registered OMIVV appliance. ● For administrator users: 1. Reboot the registered OMIVV appliance.
b. In Username, enter the user name. c. In Password, enter the password. The % sign is not supported at the end of the password. d. In Enter the password used to encrypt backups, type the encrypted password in the box. The encryption password can contain alphanumeric characters and special characters, such as, “!, @, #, $, %, and *”. e. In Verify Password, retype the encrypted password. 3. To save these settings, click Apply. 4. Configure the backup schedule. See Scheduling automatic backups.
Reset backup and restore settings Using reset settings feature, you can reset settings to the unconfigured state. 1. On the BACKUP AND RESTORE SETTINGS page, click Reset Settings. 2. In the Reset Settings dialog box, click Apply. The appliance is restarted. Update OMIVV appliance and repository location ● To ensure that all data is protected, perform a backup of the OMIVV database before updating the OMIVV appliance. See Manage backup and restore on page 30.
If the path is different, in the Appliance Management window, in the APPLIANCE UPDATE area, click Edit to update the path to https://linux.dell.com/repo/hardware/vcenter-plugin-x64/latest/ in the Update Repository Path text box, and click Apply. 3. Compare the available OMIVV appliance version and current OMIVV appliance version. 4. To apply the update to the OMIVV appliance, under Appliance Settings, click Update Virtual Appliance. 5. In the UPDATE APPLIANCE dialog box, click Update.
If you upgrade from an earlier version of OMIVV to the available version, all the scheduled job continues to run. NOTE: If the identity (IP or FQDN) of the new OMIVV version Y is changed from the OMIVV version X, configure the trap destination for the SNMP traps to point to the new appliance. For 12G and later servers, the identity change is fixed by running the inventory on these hosts.
NOTE: Dell EMC recommends retaining the identity (IP or FQDN) of the earlier OMIVV appliance for the new OMIVV appliance. NOTE: If the IP address for the new appliance is different from the IP address of the older appliance the Proactive HA feature may not work properly. In such a scenario, disable and enable the PHA for each clusters where Dell host is present. Perform the tasks from 3–9 listed in Upgrade OMIVV appliance using backup and restore on page 33.
3 Configure appliance for VMware vCenter You can configure the OMIVV appliance by using any one of the following methods: ● Using the Initial Configuration Wizard. After you complete the basic installation of OMIVV and registration of the vCenters, the Initial Configuration Wizard is displayed automatically for the first time, when you launch OMIVV in vCenter.
4. On the Configure Additional Settings page, do the following: a. Schedule inventory jobs. For more information about scheduling the inventory job, see Schedule inventory job on page 38. b. Schedule warranty retrieval job. For more information about scheduling the warranty retrieval job, see Schedule warranty retrieval jobs on page 39. If you want to modify the inventory job schedule, go to Settings > vCenter Settings > Data Retrieval Schedule > Inventory Retrievalor Jobs > Inventory.
○ Enter the user name in the Active Directory User Name box. Enter the user name in one of the formats such as domain\username or username@domain. The user name is limited to 256 characters. See the Microsoft Active Directory Documentation for user name restrictions. ○ Enter password. The AD credential can be either same or separate for both the iDRAC and hosts. ○ To download and store the iDRAC certificate and validate it during all the future connections, select the Enable Certificate Check check box. d.
NOTE: The chassis is managed in OMIVV context. There is no context of vCenter in chassis management. After scheduled host inventory is complete, the chassis inventory is triggered for all the chassis that are managed using OMIVV. NOTE: The settings in this page are reset to default each time the configuration wizard is invoked.
The alarms for all hosts and its chassis are enabled. 4. Select any one of the following event posting levels: ● Do not post any events—Do not forward any events or alerts into its associated vCenters. ● Post all Events—Post all the events including informational events, and events received from the managed hosts and chassis into its associated vCenters. Dell EMC recommends selecting the Post all Events option as an event posting level.
Configure deployment credentials OMIVV acts as a provisioning server. The deployment credentials enable you to communicate with iDRAC that uses the OMIVV plugin as a provisioning server in the auto discovery process. The deployment credentials enable you to set up iDRAC credentials to communicate securely with a bare-metal server that is discovered using auto discovery until the OS deployment is complete.
4 Accessing documents from the Dell EMC support site You can access the required documents using the following links: ● For Dell EMC Enterprise Systems Management documents — www.dell.com/SoftwareSecurityManuals ● For Dell EMC OpenManage documents — www.dell.com/OpenManageManuals ● For Dell EMC Remote Enterprise Systems Management documents — www.dell.com/esmmanuals ● For iDRAC documents — www.dell.com/idracmanuals ● For Dell EMC OpenManage Connections Enterprise Systems Management documents — www.dell.
5 Related Documentation In addition to this guide, you can access the other guides available at www.dell.com/support/. Click Browse all products, then click Software > Virtualization Solutions. Click OpenManage Integration for VMware vCenter 5.0 to access the following documents: ● OpenManage Integration for VMware vCenter Version 5.0 User's Guide ● OpenManage Integration for VMware vCenter Version 5.0 Release Notes ● OpenManage Integration for VMware vCenter Version 5.