
Setup Guide


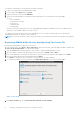
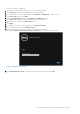

Table Of Contents
- OpenManage Integration for VMware vCenter Quick Install Guide for vSphere Desktop Client Version 3.2
- Installing OpenManage Integration for VMware vCenter
- Installation introduction
- Prerequisites
- Hardware Requirements
- Software Requirements
- Installation and Configuration Overview
- Deploying the OMIVV OVF Using the vSphere Client
- Registering a vCenter server by using a user with necessary privileges
- Registering OMIVV within vCenter And Importing The License File
- Installation Verification
- Upgrading OMIVV from existing version to current version
- Migrating from 2.x to 3.2
- Recovering OMIVV after unregistering earlier version of OMIVV
- Prerequisites
- Installation introduction
- Configuring OpenManage Integration for VMware vCenter
- Configuration Wizard welcome page
- Creating a new Connection Profile [Wizard]
- Configuring Events And Alarms [Wizard]
- Setting Up A Proxy Server [Wizard]
- Scheduling Inventory Jobs [Wizard]
- Running A Warranty Retrieval Job [Wizard]
- Configuring the Deployment Credentials [Wizard]
- Setting The Default Firmware Update Repository [Wizard]
- Enabling The OMSA Link [Wizard]
- Configuring NFS Shares
- OpenManage Integration for VMware vCenter licensing
- More Configuration Information
- Related documentation and resources

8. In the OVF Template Details window, review the information presented.
9. Click Next.
10. In the Name and Location window, do the following:
a. In the Name text box, enter the name of the template. This name can contain up to 80 characters.
b. In the Inventory Location list, select a location to store the template.
11. Click Next.
12. Depending on the vCenter configuration, one of the following options displays:
● If resource pools are configured — On the Resource Pool page, select the pool of virtual servers to which the OMIVV is
deployed.
● If resource pools are not configured — On the Hosts/Clusters page, select the host or cluster to which the OMIVV is
deployed.
13. If there is more than one datastore available on the host, the Datastore page is displayed. Select the location to store OMIVV
files, and click Next.
14. In the Disk Format window, select the format in which you want to store the virtual disks:
a. Thick Provision Lazy Zeroed
A lazy-zeroed thick disk has all the disk space allocated at the time of creation, but each block is zeroed only on first
write. This results in a shorter creation time, but reduces the performance the first time a block is written to. Subsequent
writes have the same performance as eager-zeroed thick disks.
b. Thick Provision Eager Zeroed [Recommended]
An eager-zeroed thick disk has all the space allocated and zeroed out at the time of creation. This increases the time it
takes to create the disk, but results in the best performance, even on the first write to each block.
c. Thin Provision [Not Recommended]
Space required for a thin-provisioned virtual disk is allocated and zeroed upon first write, as opposed to upon creation.
There is a higher I/O cost (similar to that of lazy-zeroed thick disks) during the first write to an unwritten file block, but
on subsequent writes thin-provisioned disks have the same performance as eager-zeroed thick disks.
15. Click Next.
16. Select the appropriate network for the appliance under Destination Networks and click Next.
NOTE: It is recommended that OMIVV and vCenter Server are on the same network.
17. In the Ready to Complete window, review the selected options for the OVF deployment task and select Power on after
deployment and click Finish. The deployment job runs and provides a completion status window where you can track the
job progress.
Registering a vCenter server by using a user with necessary privileges
You can register vCenter servers for the OMIVV appliance with vCenter administrator credentials of the vCenter server or a
user with necessary privileges.
Perform the following steps to enable a user with the required privileges to register a vCenter server:
1. Add a role and select relevant privileges for the role, or modify an existing role to change the privileges selected for that role.
See VMware vSphere documentation for the steps required to create or modify a role and select privileges in vSphere client.
See Defining privileges on page 7 to select all the relevant privileges for the role.
NOTE: The vCenter administrator should add or modify a role.
2. After you define a role and select privileges for the role, assign a user and their role to the relevant inventory object. See
VMware vSphere documentation for more information on assigning permissions in the vSphere client. A vCenter server user
with the required privileges can now register and/or unregister vCenter.
NOTE: The vCenter administrator should assign permissions in the vSphere client.
3. Register a vCenter server in the administration console by using a user with necessary privileges. See Registering a vCenter
server by using a user with necessary privileges on page 6.
4. Associate the Dell privileges to the role created or modified in step 1 for performing the OMIVV operations. See Assigning
Dell privileges to the role on page 7.
6
Installing OpenManage Integration for VMware vCenter