
Install Guide
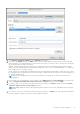
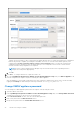

Table Of Contents
- OpenManage Integration for VMware vCenter Version 5.3 Installation Guide
- Contents
- Introduction
- Install and configure OMIVV
- Prerequisite checklist
- Download OpenManage Integration for VMware vCenter
- Deploy OMIVV OVF using vSphere Client (HTML-5)
- Generate a Certificate Signing Request (CSR)
- Upload HTTPS certificate
- Restore default HTTPS certificate
- Configure deployment mode
- Register vCenter server using a non-administrative account
- Register new vCenter server
- Configure OMIVV appliance
- Configure OMIVV appliance with two Network Interface Controllers (NICs)
- Change OMIVV appliance password
- Configure Network Time Protocol (NTP) and set local time zone
- Change hostname of OMIVV appliance
- Reboot OMIVV appliance
- Reset OMIVV appliance to factory settings
- Reconfigure OMIVV after upgrading registered vCenter version
- Recover OMIVV after un-registration
- Upgrade OMIVV appliance and repository location
- Configure OMIVV appliance using initial configuration wizard
- Accessing support content from the Dell EMC support site
- Related Documentation
- Contacting Dell
2. To upgrade the OMIVV plug-in from an existing version to the available version, perform one of the following steps:
● To upgrade using RPM that is available in Update Repository Path, ensure that Update Repository Path is set to the
path: https://linux.dell.com/repo/hardware/vcenter-plugin-x64/latest/
If the path is different, in the Appliance Management window, in the APPLIANCE UPDATE area, click Edit to update the
path to https://linux.dell.com/repo/hardware/vcenter-plugin-x64/latest/ in the Update Repository Path text box, and
click Apply.
3. Compare the available OMIVV appliance version and current OMIVV appliance version.
4. To apply the update to the OMIVV appliance, under Appliance Settings, click Update Virtual Appliance.
5. In the UPDATE APPLIANCE dialog box, click Update.
After you click Update, you are logged out from the ADMINISTRATION CONSOLE window.
6. Close the web browser.
During the upgrade process, the appliance restarts once or twice. Once the appliance is RPM upgraded, ensure that you
clear the browser cache before logging in to the Dell admin portal.
After the RPM upgrade is complete, you can view the login screen in the OMIVV console. Open a browser, enter the https:
\\<ApplianceIP|hostname> link, and go to the APPLIANCE UPDATE area. You can verify that the available and current
OMIVV appliance versions are same.
All the customization that is done on the registered Dell alarms and Dell health update provider for PHA cluster will be
restored to default after RPM upgrade.
Upgrade OMIVV appliance using RPM (using Intranet)
Create HTTP or HTTPS share. Ensure that the HTTP or HTTPS share supports file name which includes special character such
as ++ and space.
OMIVV supports the following:
● HTTP and HTTPS shares to upgrade from 5.1 to later versions
● HTTP, HTTPS, or NFS shares to upgrade from 5.2 to later versions
1. Download the RPM .zip package available at https://www.dell.com/support.
2. Extract the RPM .zip package and copy the files and folders from extracted location to HTTP or HTTPS share.
3. On the APPLIANCE MANAGEMENT page, in the APPLIANCE UPDATE area, click Edit, and then enter the shared
location path in Update Repository Path.
The update repository path format for HTTP is http://<IP or hostname>/<path to RepoConfig.xml>.
The update repository path format for HTTPS is https://<IP or hostname>/<path to RepoConfig.xml>.
The update repository path format for NFS is <IP or hostname>:/<path to RepoConfig.xml>.
4. Click Apply.
5. Compare the available OMIVV appliance version and current OMIVV appliance version.
6. To apply the update to the OMIVV appliance, under Appliance Settings, click Update Virtual Appliance.
7. In the UPDATE APPLIANCE dialog box, click Update.
After you click Update, you are logged out from the OMIVV ADMINISTRATION CONSOLE window.
It may take approximately 40 minutes to complete the update depending on your network speed.
8. Close the web browser.
Once the appliance upgrade is complete, ensure that you clear the browser cache before logging in to the OMIVV
ADMINISTRATION CONSOLE.
Manage backup and restore
By using the Administration Console, you can perform backup and restore related tasks.
● Configure backup and restore
● Schedule automatic backups
● Perform an immediate backup
● Restore the database from backup
● Reset backup and restore settings on page 39
Upgrade OMIVV appliance and repository location
37