
Users Guide
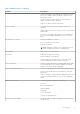

For the available OMIVV appliance version, the applicable RPM and OVF OMIVV appliance upgrade mechanisms are displayed
with a tick mark [ ].
2. To upgrade the OMIVV plug-in from an existing version to the available version, perform one of the following steps:
● To upgrade using RPM that is available in Update Repository Path, ensure that Update Repository Path is set to the
path: https://linux.dell.com/repo/hardware/vcenter-plugin-x64/latest/
If the path is different, in the Appliance Management window, in the APPLIANCE UPDATE area, click Edit to update the
path to https://linux.dell.com/repo/hardware/vcenter-plugin-x64/latest/ in the Update Repository Path text box, and
click Apply.
3. Compare the available OMIVV appliance version and current OMIVV appliance version.
4. To apply the update to the OMIVV appliance, under Appliance Settings, click Update Virtual Appliance.
5. In the UPDATE APPLIANCE dialog box, click Update.
After you click Update, you are logged out from the ADMINISTRATION CONSOLE window.
6. Close the web browser.
During the upgrade process, the appliance restarts once or twice. Once the appliance is RPM upgraded, ensure that you
clear the browser cache before logging in to the Dell admin portal.
After the RPM upgrade is complete, you can view the login screen in the OMIVV console. Open a browser, enter the https:\
\<ApplianceIP|hostname> link, and go to the APPLIANCE UPDATE area. You can verify that the available and current
OMIVV appliance versions are same.
All the customization that is done on the registered Dell alarms and Dell health update provider for PHA cluster will be
restored to default after RPM upgrade.
Upgrade OMIVV appliance using RPM (without Internet)
Create HTTP or HTTPS share. Ensure that the HTTP or HTTPS share supports file name which includes special character such
as ++ and space.
OMIVV supports only HTTP and HTTPS shares.
OMIVV supports upgrading from version 5.1 to 5.2 without having an Internet connection.
1. Download the RPM .zip package available at https://www.dell.com/support.
2. Extract the RPM .zip package and copy the files and folders from extracted location to HTTP or HTTPS share.
3. On the APPLIANCE MANAGEMENT page, in the APPLIANCE UPDATE area, click Edit, and then enter the shared
location path in Update Repository Path.
4. Click Apply.
5. Compare the available OMIVV appliance version and current OMIVV appliance version.
6. To apply the update to the OMIVV appliance, under Appliance Settings, click Update Virtual Appliance.
7. In the UPDATE APPLIANCE dialog box, click Update.
After you click Update, you are logged out from the OMIVV ADMINISTRATION CONSOLE window.
It may take approximately 40 minutes to complete the update depending on your network speed.
8. Close the web browser.
Once the appliance upgrade is complete, ensure that you clear the browser cache before logging in to the OMIVV
ADMINISTRATION CONSOLE.
Upgrade OMIVV appliance using backup and restore
It is recommended that you do not change or remove cluster or host that is managed by OMIVV after taking backup and before
restoring the backup file. If the cluster or host that is managed by OMIVV is changed or removed, reconfigure profiles (for
example, Host credential profile, cluster profile) associated with those clusters and hosts after restore.
Do not unregister the OMIVV plug-in from vCenter. Unregistering the plug-in from vCenter removes Dell health update provider
for Proactive HA clusters that are registered on vCenter by the OMIVV plugin.
It is recommended to take snapshot of appliance before upgrading the OMIVV appliance.
To update the OMIVV appliance from an older version to current version, perform the following steps:
1. Back up the data of earlier releases.
Log in to Dell EMC OMIVV administration console
19