
Reference Guide

● Authentication
● Digital signatures
Manage certificate
OMIVV uses certificates for secure HTTP access (HTTPS).
By default, OMIVV installs and uses the self-signed certificate for the HTTPS secure transactions.
For stronger security, it is recommended to use the Certificate Authority (CA) signed or custom certificates.
The self-signed certificate is sufficient to establish an encrypted channel between web browsers and the server. The self-signed
certificate cannot be used for authentication.
You can use the following types of certificates for OMIVV authentication:
● A self-signed certificate
OMIVV generates self-signed certificates when the hostname of the appliance changes.
● A certificate that is signed by a trusted certificate authority (CA) vendor.
NOTE: Consider company policies when creating certificates.
Update certificates for registered vCenter servers
About this task
The OpenManage Integration for VMware vCenter uses the OpenSSL API to create the Certificate Signing Request (CSR) by
using the RSA encryption standard with a 2048–bit key length.
The CSR generated by OMIVV gets a digitally signed certificate from a trusted certification authority. The OMIVV uses the
digital certificate to enable HTTPS on the web server for secure communication.
If the certificate is changed on a vCenter server, use the following tasks to import the new certificate for OMIVV:
Steps
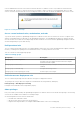
1. Go to https://<ApplianceIP/hostname/>.
2. In the left pane, click VCENTER REGISTRATION.
The registered vCenter servers are displayed in the working pane.
3. To update the certificate for a vCenter server IP or hostname, click Update.
Generate a Certificate Signing Request (CSR)
Prerequisites
Before registering an OMIVV to a vCenter, ensure that you upload the CSR.
About this task
Generating a new CSR prevents certificates that were created with the previously generated CSR from being uploaded to the
appliance. To generate a CSR, do the following:
Steps
1. On the APPLIANCE MANAGEMENT page, click Generate Certificate Signing Request in the HTTPS CERTIFICATES
area.
A message is displayed stating that if a new request is generated, certificates created using the previous CSR can no longer
be uploaded to the appliance. To continue with the request, click Continue.
2. If you continue with the request, in the GENERATE CERTIFICATE SIGNING REQUEST dialog box, enter information
about the common name, organization, locality, state, country, and email address. Click Continue.
3. Click Download, and then save the resulting CSR to an accessible location.
20
Product and Subsystem Security