
Install Guide


5. Retype the new password in the Confirm New Password text box.
6. Click Change Admin Password.
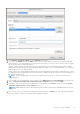
Configure Network Time Protocol (NTP) and set local time zone
1. Open the OMIVV web console.
2. In the OpenManage Integration for VMware vCenter Virtual Appliance Setup utility, click Date/Time Properties.
Ensure to enter the NTP details in Admin console. For more information, see Set up Network Time Protocol (NTP) servers
on page 33.
3. On the Date and Time tab, select Synchronize date and time over the network.
The NTP Servers window is displayed.
4. To add another NTP server IP or hostname (if required), click the Add button, and then press TAB.
5. Click Time Zone, select the applicable time zone, and then click OK.
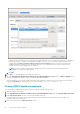
Set up Network Time Protocol (NTP) servers
You can use NTP to synchronize the OMIVV appliance clocks to that of an NTP server.
1. In the Administration Console, on the APPLIANCE MANAGEMENT page, click Edit in the NTP Settings area.
2. Select Enabled. Enter the hostname or IP address of a preferred and secondary NTP server and click Apply.
3. After configuring NTP, start the terminal console and select the Sychronize date and time over the network check box.
NOTE: It might take few minutes for the OMIVV clock to synchronize with the NTP server.
NOTE: If the OMIVV admin portal is taking a long time to load information, ensure that NTP settings are correct and the
NTP server is reachable by the OMIVV virtual machine.
Change hostname of OMIVV appliance
1. In the OpenManage Integration for VMware vCenter Virtual Appliance Setup utility, click Change Hostname.
NOTE:
If any vCenter servers are registered with the OMIVV appliance, unregister and re-register all the vCenter
instances.
2. Enter an updated hostname.
Type the domain name in the format: <hostname>.
3. Click Update Hostname.
The appliance hostname is updated and main menu page is displayed.
4. To reboot the appliance, click Reboot Appliance.
NOTE:
Ensure that you manually update all references to the virtual appliance across its environment such as provisioning
server in iDRAC and Dell EMC Repository Manager (DRM).
Reboot OMIVV appliance
1. Open the OMIVV web console.
2. In the OpenManage Integration for VMware vCenter Virtual Appliance Setup utility, click Reboot Appliance.
3. To reboot the appliance, click Yes.
Reset OMIVV appliance to factory settings
1. Open the OMIVV web console.
2. In the OpenManage Integration for VMware vCenter Virtual Appliance Setup utility, click Reset Settings.
Install and configure OMIVV
33