
Install Guide

You can use the HTTPS certificates for secure communication between OMIVV appliance and host systems. To set up this type of secure
communication, send the CSR certificate to a signing authority, and then upload the resulting CSR using the admin console. There is also a
default certificate that is self-signed and can be used for secure communication—this certificate is unique to every installation.
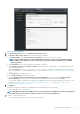
1. On the APPLIANCE MANAGEMENT page, click Upload Certificate in the HTTPS CERTIFICATES area.
2. Click OK in the UPLOAD CERTIFICATE dialog box.
3. To upload the certificate, click Browse, and then click Upload.
To check the status, go to Event Console of vSphere Client of registered vCenters.
While uploading certificate, OMIVV administration console becomes unresponsive for up to 3 minutes. After upload HTTPs certificate task
is complete, close the browser session and access admin portal in a new browser session.
Restore default HTTPS certificate
1. On the APPLIANCE MANAGEMENT page, click Restore Default Certificate in the HTTPS CERTIFICATES area.
2. In the RESTORE DEFAULT CERTIFICATE dialog box, click Apply.
While restoring certificate, OMIVV administration console becomes unresponsive for up to 3 minutes. After restore default HTTPs
certificate task is complete, close the browser session and access admin portal in a new browser session.
Configure deployment mode
For any of the mentioned deployment modes, ensure that you reserve sufficient memory resources to the OMIVV appliance using
reservations. See vSphere documentation for steps about reserving memory resources.
Ensure that the following system requirements for the required deployment modes are fulfilled by assigning these resources to the VM
containing OMIVV:
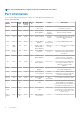
Table 14. System requirements for deployment modes
Deployment modes Number of hosts Number of CPUs Memory (GB) Minimum Storage
Small Up to 250 2 8 95 GB
Medium Up to 500 4 16 95 GB
Large Up to 1,000 8 32 95 GB
X Large mode Up to 2,000 12 32 95 GB
NOTE: MX chassis firmware update feature is supported only on medium, large, and extra large deployment modes.
You can select an appropriate deployment mode to scale OMIVV to match the number of nodes in your environment.
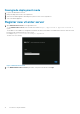
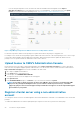
1. On the APPLIANCE MANAGEMENT page, scroll down to Deployment Mode.
The configuration values of the deployment mode such as Small, Medium, Large, and X Large are displayed. By default, the mode is
set to Small.
2. To edit a deployment mode based on an environment, click Edit.
3. In the Edit mode, ensure that the prerequisites are fulfilled and select the required deployment mode.
4. Click Apply.
The allocated CPU and memory are verified against the required CPU and memory for the set deployment mode.
• If the verification fails, an error message is displayed.
• If the verification is successful, the OMIVV appliance restarts and the deployment mode is changed after you confirm the change.
• If the required deployment mode is already set, a message is displayed.
5. If the deployment mode is changed, confirm the changes, and then the appliance is restarted to enable the deployment mode to be
updated.
NOTE:
During the OMIVV appliance bootup, the allocated system resources are verified against the set deployment
mode. If the allocated system resources are less than the set deployment mode, the OMIVV appliance does not boot to
the login page. To boot the OMIVV appliance, close the OMIVV appliance, update the system resources to the existing
set deployment mode, and complete the downgrade deployment mode task.
Install and configure OMIVV 17