
White Papers


Table Of Contents
- 1 Introduction
- 1 Introduction
- 1.1
- 1.1
- 1.1
- 1.1 Audience
- 1.1 Audience
- 1.1 Audience
- 1.1
- 1.1
- 1.1
- 1.1
- 1.1
- 1.1
- 1.1
- 1.1
- 1.1
- 1.1
- 1.1
- 1.1
- 1.1
- 1.1
- 1.1
- 1.1
- 1.1
- 1.1
- 1.1
- 1.1
- 1.1
- 1.1
- 1.1
- 1.1
- 1.2 Applicable scenario to configure dual-NIC
- 1.2 Applicable scenario to configure dual-NIC
- 1.2 Applicable scenario to configure dual-NIC
- 1.3 Possible Multi-NIC configuration
- 1.3 Possible Multi-NIC configuration
- 1.3 Possible Multi-NIC configuration
- 1
- 1
- 1
- 1
- 1
- 1
- 1
- 1
- 1
- 1
- 1
- 1
- 1
- 1
- 1
- 1
- 1
- 1
- 1
- 1
- 1
- 1
- 1
- 1
- 1
- 1
- 1
- 1
- 1
- 1
- 1
- 1
- 1
- 2 Configure dual-NIC in OMIVV
- 2 Configure dual-NIC in OMIVV
- 2 Configure dual-NIC in OMIVV
- 2.1 Configure dual-NIC with multiple subnets
- 2.1 Configure dual-NIC with multiple subnets
- 2.1 Configure dual-NIC with multiple subnets
- 1.1
- 1.1
- 1.1
- 1.1
- 1.1
- 1.1
- 2.2 Configure dual-NIC managed with FQDN on both the network with different DNS
- 2.2 Configure dual-NIC managed with FQDN on both the network with different DNS
- 2.2 Configure dual-NIC managed with FQDN on both the network with different DNS
- 1
- 1
- 1
- 1
- 1
- 1
- 1
- 1
- 1
- 3 Change in area in OMIVV due to dual-NIC configuration
- 3 Change in area in OMIVV due to dual-NIC configuration
- 3 Change in area in OMIVV due to dual-NIC configuration
- 4 Network Port information
- 4.1 OMIVV to in-band network
- 4.1 OMIVV to in-band network
- 4.1 OMIVV to in-band network
- 4.2 OMIVV to out-of-band network
- 4.2 OMIVV to out-of-band network
- 4.2 OMIVV to out-of-band network
- 1.1
- 1.1
- 4.3 OMIVV to Internet
- 4.3 OMIVV to Internet
- 1.1
- 1.1
- 1.1
- 4.3 OMIVV to Internet
- 4.3 OMIVV to Internet
- 4.3 OMIVV to Internet
- 5 Conclusion
- 6 Technical support and resources
13 Deploying and configuring OMIVV in a dual-NIC environment
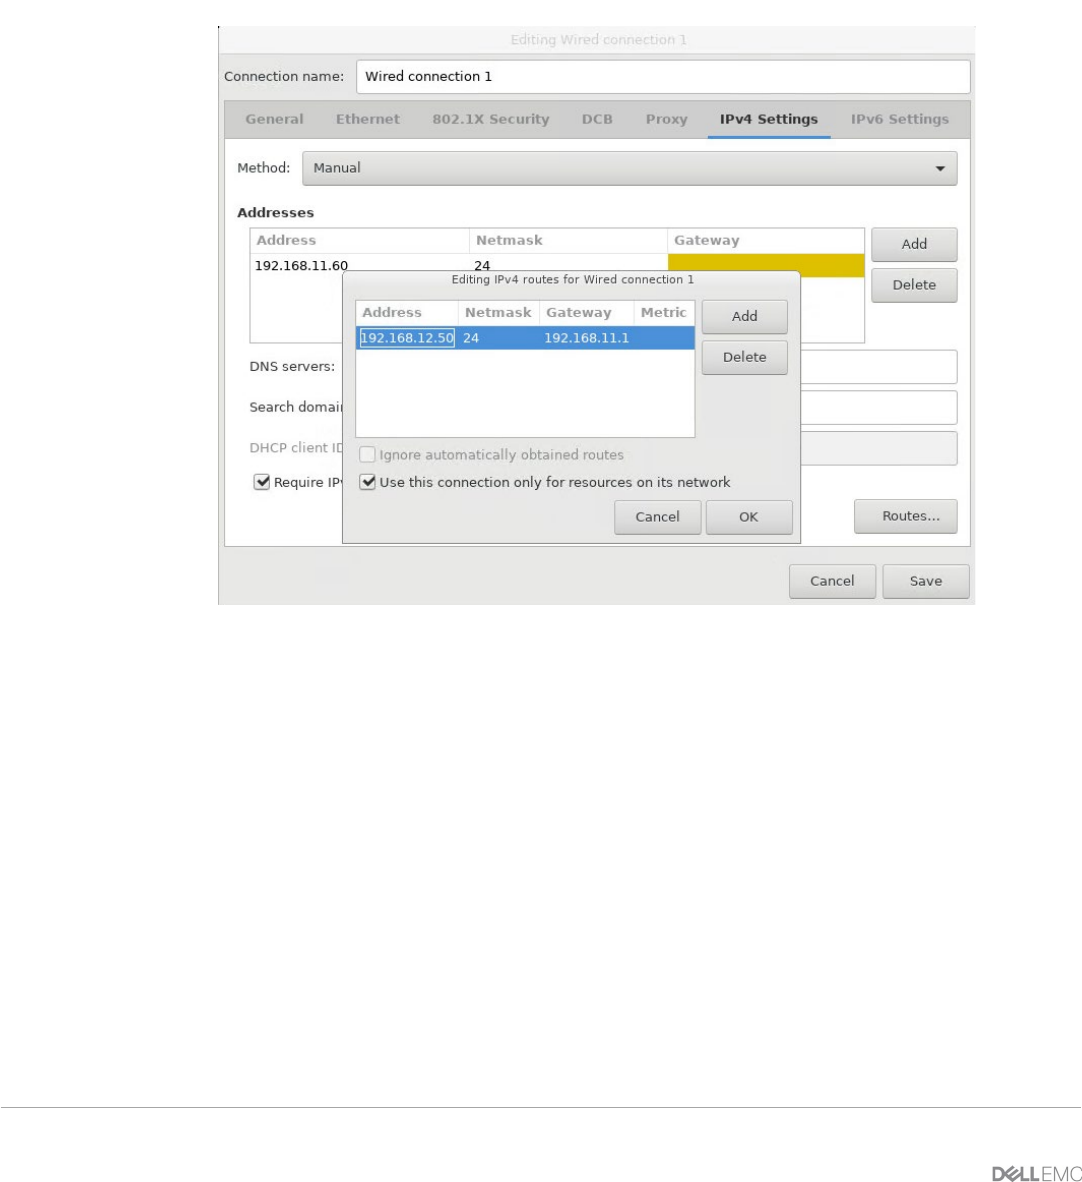
e. You must restrict the appliance to have only one default gateway. If the network interface you are
configuring is out-of-band network, click Routes, and then select the Use this connection only
for resources on its network check box.
Note: Adding multiple networks as default gateways may result in network issues, and OMIVV
functionalities may get affected.
f. If you want to reach to any external network using the known gateways, click Add on the same
page, and then add the network IP address, netmask (in the CIDR format), and gateway details
for a new static route.
Figure 10: Configure routes
Typically, the network that you have configured as the default gateway does not require any
manual route configuration because the gateway can provide the reachability.
However, for networks where default gateway is not configured (the Use this connection only
for resources on its network check box is selected to restrict connections only to the local
network), a manual route configuration may be required because the default gateway is not
configured for this network to reach external networks, manual routing configurations are
required.
Note: Incorrect routing configuration may abruptly stop the network interface from responding.
Ensure to configure the routing entries appropriately.
g. Click OK.
10. Click Save.
11. To configure another NIC, repeat the tasks 7—11.
12. Go to the Open Manage Integration for VMware vCenter Virtual Appliance Setup utility, click
Reboot Appliance. The network configuration is complete only after restarting the OMIVV appliance.
Note: After the appliance is successfully restarted, the NICs start working as configured.