
White Papers


Table Of Contents
- 1 Introduction
- 1 Introduction
- 1.1
- 1.1
- 1.1
- 1.1 Audience
- 1.1 Audience
- 1.1 Audience
- 1.1
- 1.1
- 1.1
- 1.1
- 1.1
- 1.1
- 1.1
- 1.1
- 1.1
- 1.1
- 1.1
- 1.1
- 1.1
- 1.1
- 1.1
- 1.1
- 1.1
- 1.1
- 1.1
- 1.1
- 1.1
- 1.1
- 1.1
- 1.1
- 1.2 Applicable scenario to configure dual-NIC
- 1.2 Applicable scenario to configure dual-NIC
- 1.2 Applicable scenario to configure dual-NIC
- 1.3 Possible Multi-NIC configuration
- 1.3 Possible Multi-NIC configuration
- 1.3 Possible Multi-NIC configuration
- 1
- 1
- 1
- 1
- 1
- 1
- 1
- 1
- 1
- 1
- 1
- 1
- 1
- 1
- 1
- 1
- 1
- 1
- 1
- 1
- 1
- 1
- 1
- 1
- 1
- 1
- 1
- 1
- 1
- 1
- 1
- 1
- 1
- 2 Configure dual-NIC in OMIVV
- 2 Configure dual-NIC in OMIVV
- 2 Configure dual-NIC in OMIVV
- 2.1 Configure dual-NIC with multiple subnets
- 2.1 Configure dual-NIC with multiple subnets
- 2.1 Configure dual-NIC with multiple subnets
- 1.1
- 1.1
- 1.1
- 1.1
- 1.1
- 1.1
- 2.2 Configure dual-NIC managed with FQDN on both the network with different DNS
- 2.2 Configure dual-NIC managed with FQDN on both the network with different DNS
- 2.2 Configure dual-NIC managed with FQDN on both the network with different DNS
- 1
- 1
- 1
- 1
- 1
- 1
- 1
- 1
- 1
- 3 Change in area in OMIVV due to dual-NIC configuration
- 3 Change in area in OMIVV due to dual-NIC configuration
- 3 Change in area in OMIVV due to dual-NIC configuration
- 4 Network Port information
- 4.1 OMIVV to in-band network
- 4.1 OMIVV to in-band network
- 4.1 OMIVV to in-band network
- 4.2 OMIVV to out-of-band network
- 4.2 OMIVV to out-of-band network
- 4.2 OMIVV to out-of-band network
- 1.1
- 1.1
- 4.3 OMIVV to Internet
- 4.3 OMIVV to Internet
- 1.1
- 1.1
- 1.1
- 4.3 OMIVV to Internet
- 4.3 OMIVV to Internet
- 4.3 OMIVV to Internet
- 5 Conclusion
- 6 Technical support and resources
12 Deploying and configuring OMIVV in a dual-NIC environment
7. To identify the correct NIC, use the MAC ID displayed on the Ethernet tab, and then compare it against
the MAC ID displayed in the vSphere Client. Ensure that you do not change the default MAC address
that is listed in the Ethernet tab.
8. Go to General tab and ensure that the check box against Automatically connect to this network
when it is available is selected.
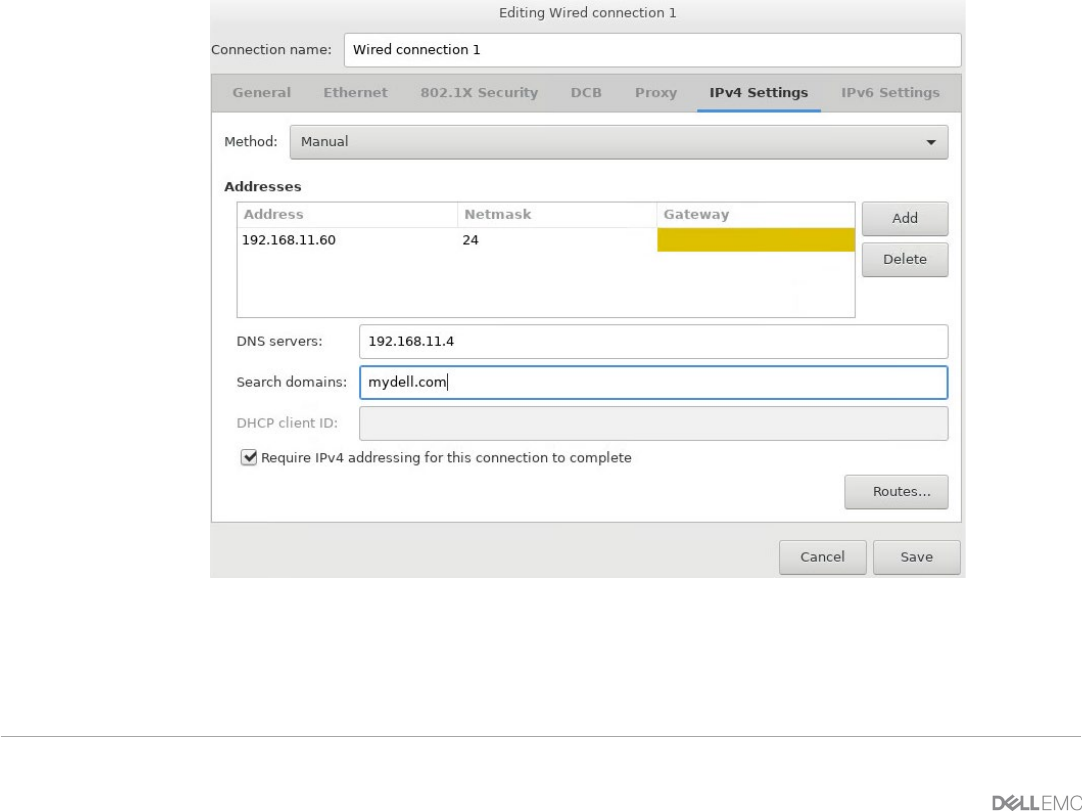
9. Click the IPv4 Settings tab, and do the following:
a. Select Manual or Automatic (DHCP) from the Method drop-down list.
b. If you select the Manual method, click Add, and then enter the valid IP address, Netmask (in the
CIDR format), and gateway details.
It is recommended to use the static IP in case if you want to control over the priority of the DNS
servers (primary and secondary DNS entries).
Note: It is recommended you to configure the DNS settings corresponding to the vSphere
management network for seamless operations.
Note: CentOS consumes the last configured DNS server as the primary DNS irrespective of which
network the DNS is configured for.
c. Enter the DNS server IP and domains to be searched for in the DNS Servers and Search
Domains fields respectively.
d. Select the Require IPV4 addressing for this connection to complete check box.
Figure 9: IPv4 Settings