
White Papers


Table Of Contents
- 1 Introduction
- 1 Introduction
- 1.1
- 1.1
- 1.1
- 1.1 Audience
- 1.1 Audience
- 1.1 Audience
- 1.1
- 1.1
- 1.1
- 1.1
- 1.1
- 1.1
- 1.1
- 1.1
- 1.1
- 1.1
- 1.1
- 1.1
- 1.1
- 1.1
- 1.1
- 1.1
- 1.1
- 1.1
- 1.1
- 1.1
- 1.1
- 1.1
- 1.1
- 1.1
- 1.2 Applicable scenario to configure dual-NIC
- 1.2 Applicable scenario to configure dual-NIC
- 1.2 Applicable scenario to configure dual-NIC
- 1.3 Possible Multi-NIC configuration
- 1.3 Possible Multi-NIC configuration
- 1.3 Possible Multi-NIC configuration
- 1
- 1
- 1
- 1
- 1
- 1
- 1
- 1
- 1
- 1
- 1
- 1
- 1
- 1
- 1
- 1
- 1
- 1
- 1
- 1
- 1
- 1
- 1
- 1
- 1
- 1
- 1
- 1
- 1
- 1
- 1
- 1
- 1
- 2 Configure dual-NIC in OMIVV
- 2 Configure dual-NIC in OMIVV
- 2 Configure dual-NIC in OMIVV
- 2.1 Configure dual-NIC with multiple subnets
- 2.1 Configure dual-NIC with multiple subnets
- 2.1 Configure dual-NIC with multiple subnets
- 1.1
- 1.1
- 1.1
- 1.1
- 1.1
- 1.1
- 2.2 Configure dual-NIC managed with FQDN on both the network with different DNS
- 2.2 Configure dual-NIC managed with FQDN on both the network with different DNS
- 2.2 Configure dual-NIC managed with FQDN on both the network with different DNS
- 1
- 1
- 1
- 1
- 1
- 1
- 1
- 1
- 1
- 3 Change in area in OMIVV due to dual-NIC configuration
- 3 Change in area in OMIVV due to dual-NIC configuration
- 3 Change in area in OMIVV due to dual-NIC configuration
- 4 Network Port information
- 4.1 OMIVV to in-band network
- 4.1 OMIVV to in-band network
- 4.1 OMIVV to in-band network
- 4.2 OMIVV to out-of-band network
- 4.2 OMIVV to out-of-band network
- 4.2 OMIVV to out-of-band network
- 1.1
- 1.1
- 4.3 OMIVV to Internet
- 4.3 OMIVV to Internet
- 1.1
- 1.1
- 1.1
- 4.3 OMIVV to Internet
- 4.3 OMIVV to Internet
- 4.3 OMIVV to Internet
- 5 Conclusion
- 6 Technical support and resources
10 Deploying and configuring OMIVV in a dual-NIC environment
2 Configure dual-NIC in OMIVV
This section describes how to configure dual-NIC in OMIVV, along with the steps for configuring DNS
forwarding as needed.
Ensure that the OMIVV appliance is imported, deployed, and not powered on for new installation.
Note: Any network configuration is done to the OMIVV appliance when the appliance is up and running will not
be reflected in the application until the VM is rebooted.
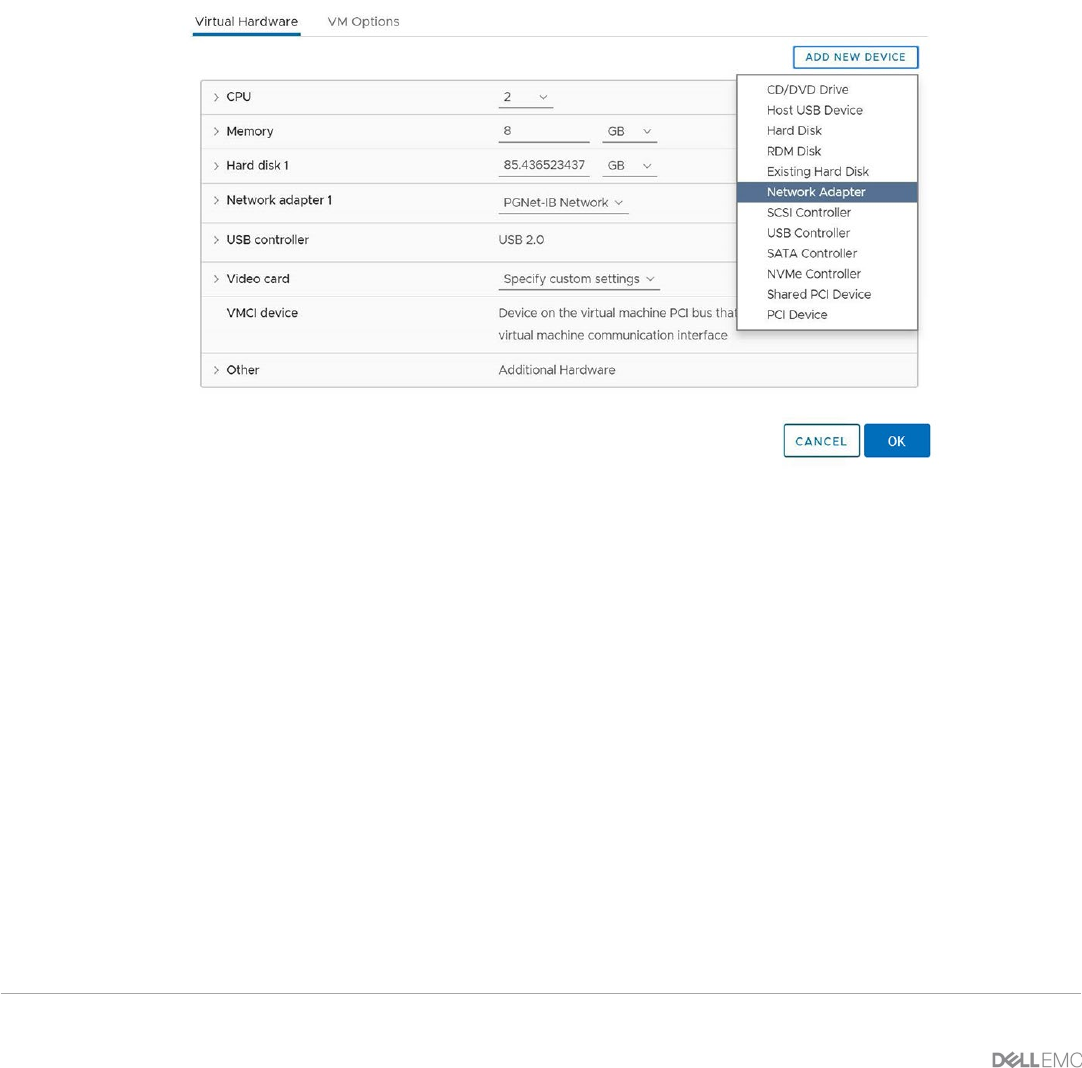
1. Edit the VM settings using the vSphere Client (HTML-5) and add the additional NIC. To edit the VM
settings, right-click VM, and then click Edit Settings.
2. Click ADD NEW DEVICE and select Network Adapter.
Figure 6: Select Network Adapter
a. Select the appropriate network for the NIC, and then select the Connect At Power On check
box.
b. Select the E1000/VMXNET3 adapter type from the Adapter Type drop-down menu. OMIVV
5.0 supports only E1000 type of NIC.