
Users Guide

• In the Profile Name text box, enter the profile name.
• In the Profile Description text box, type a description. The description value is optional.
4. Click Next.
The Reference Server dialog box is displayed. You can either select 14th generation reference servers from the dialog box directly or
through the browse button in the profile source page.
5. Select a 14th generation reference server by performing either of the following substeps:
NOTE: All hosts from 11th to 14th generations are displayed in the dialog box and the select link is enabled only for
14th generation complaint bare metal servers and hosts, whereas only 14th generation bare-metal servers are
displayed and the select link is enabled only for complaint bare-metal servers.
NOTE: Select a 14G reference server which is compliant managed host or bare-metal server. However, you cannot
select a host as a reference server which is managed through Chassis profile.
a. In the Reference Server dialog box, click the right 14th generation reference server, and click the Select link against the
reference server.
NOTE: The Select link is enabled only for complaint servers.
b. In the Reference Server page, click Browse to select a compliant 14th generation host reference server that is managed and
successfully inventoried by OMIVV, or a compliant 14th generation bare-metal server.
The Extract Confirmation dialog box that states extracting the settings is displayed. To extract the hardware configuration from
reference server, in the Extract Confirmation dialog box, click Yes, and the extracting is completed in few minutes.
The selected Server name, Reference Server Type, the iDRAC IP address, Model, and Service Tag are displayed in the Profile Source
page.
NOTE:
If Reference Server Type is a bare-metal server, only iDRAC IP is displayed whereas if Reference Server Type
is a host, both iDRAC IP and host IP/FQDN is displayed.
6. Click Next.
7. On the Profile Settings page, expand iDRAC to view the system profile attributes. You can sort the data grid columns in ascending
or descending order. Click the data filter icon to filter the data.
a. To quickly view the Set Password link in the Value column, click
, type 'password' in the Value Contains, and enter the
password for enabled user.
NOTE:
Dell EMC recommends you to provide the credentials same as the credentials used during addition of bare
metal server. If you change the password in the deployment template, the changes are not displayed to the root
user. During OS deployment, if Hypervisor Profile is associated with the deployment template, deployment takes
connection profile (iDRAC and ESXi) password.
NOTE: The Set Password option is available only for the iDRAC enabled user with valid user name.
Also, you can view the profile settings for the components based on the configuration of the Dell Reference Server such as iDRAC,
BIOS, RAID, NIC, CNA, FCoE, and EvenFilters.
b. Expand each of the components to display the setting options such as Instance, Attribute Name, Value, Destructive,
Dependency, and Group.
When you hover over the attributes, more information about the attribute is displayed.
By default, few attributes such as Read Only, System Specific, and Destructive attributes are disabled for selection.
If the dependency text is not available, dependency text is empty.
NOTE:
When performing RPM upgrade, or backup and restore, following are applicable for all the migrated profiles:
• When you hover over the attributes, attribute names are displayed.
• Only non system-specific attributes are selected.
• Dependency text is not displayed.
• Enabled attributes display the total number of selected attributes.
8. Click Next.
The Summary page is displayed that provides information about the profile details and the attribute statistics of the system
configurations.
The total number of attributes, total number of enabled attributes, total number of platform-specific attributes, and total number of
destructive attributes are displayed under attribute statistics.
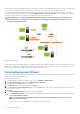
Deploying hypervisor
113