
Users Guide

Profile". By supporting Server Configuration Profile, OMIVV allows you to export the entire configuration of a 14th generation Dell EMC
server and import to target servers.
While applying a System profile of a modular server installed in an FX2 chassis to another similar server installed on another FX2 chassis,
the slot numbers of both the servers must be the same.
For example, System profile taken from an FC640 server in slot 1 of a FX2s chassis can only be applied on another FC640 server residing
in the slot 1 of another FX2s chassis.
NOTE: System profile does not support enabling and disabling of boot options.
NOTE: While using the system profile, exporting a system profile with enterprise license and importing the same system
profile on servers with express license fails, and conversely.
NOTE: You cannot import system profile by using the Express license of iDRAC9 firmware 3.00.00.00. You must have an
Enterprise license.
NOTE: The System profiles searches for exact instance (FQDD) while applying the profile, which works successfully on
rack servers (identical), but may have few restrictions in modular servers. For example, in FC640, the System profiles
created from one modular server cannot be applied on other modular servers in the same FX chassis because of NIC
level restrictions. In this case, it is recommended to have a reference System profile from each slot of the chassis and
apply these System profiles across the chassis for the corresponding slots only.
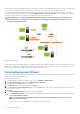
The typical tasks of using a system profile include:
• Creating or capturing the system profile information from a reference server. See Creating system profile on page 112.
• Applying the profile on selected servers by using the deployment template. See Creating deployment templates on page 118.
NOTE: It is recommended to use system profile for 14th generation and later servers.
To launch the system profile page, perform the following steps:
1. In OpenManage Integration for VMware vCenter, on the Manage > Deployment tab, select Deployment Templates > System
Profiles.
a. In the System Profiles page, view the list of System profiles that you have created.
A table is displayed that lists the System profiles along with profile name, description, server model, and reference server
information.
b. To view further details of a system profile host, select a system profile.
Review the system profile information that displays details such as profile name, iDRAC IP, iDRAC type, Service Tag, Host Name,
Server Model, created date, modified date, and modified by whom.
c. To swap the columns within the data grid, drag and drop columns within the data grid.
d. To filter or search the content of the data grid, click the Filter field.
e. To export the system profile information to a .CSV file, select a system profile, and then in the right-hand corner of the data grid,
click the
icon.
Creating system profile
Ensure that the following conditions are met before creating a system profile:
• The reference server is configured as per the requirement, outside of OMIVV. Modifying any values of any of the attributes is not
supported in the current version, except for the iDRAC user passwords.
• Collect System Inventory On Restart (CSIOR) is enabled on a reference server, and the reference server is rebooted, so that the data
returned from iDRAC is up-to-date.
• OpenManage Integration had performed a successful inventory on each of the vCenter managed hosts.
• Bare-metal servers have the minimum BIOS and firmware versions already installed. See OpenManage Integration for VMware
vCenter Compatibility Matrix for more information about the minimum firmware levels for iDRAC, BIOS, and Lifecycle Controller.
You can create a system profile by using only a 14th generation reference server.
1. In OpenManage Integration for VMware vCenter, on the Manage > Deployment tab, select Deployment Templates > System
Profiles.
2. Click
.
3. On the Welcome page, read the instructions, and click Next.
112
Deploying hypervisor