
Install Guide


During deployment, if you select Power on after Deployment, the VM is powered on automatically after deployment is complete.
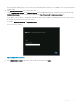
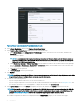
2 To run the Administration Console, click the Console tab in the main VMware vCenter window.
3 Allow OMIVV to complete booting up, and then enter the user name as, Admin (the default is Admin), and press Enter.
4 Enter a new admin password. Ensure that the admin password complies with the password complexity rules displayed in the interface.
Press Enter.
5 Reenter the password that was provided earlier and press Enter.
To congure the network and time zone information in the OMIVV appliance, press Enter.
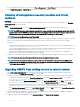
6 To congure the OMIVV time zone information, click Date/Time Properties.
Figure 1. Console tab
7 In the Date and Time tab, select the Synchronize date and time over the network.
The NTP Servers box is displayed.
8 Add valid NTP server details to which your vCenter is synchronized with.
9 Click Time Zone and select the applicable time zone, and click OK.
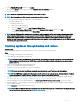
10 To congure static IP to the OMIVV appliance, click Network Conguration, or skip to step 17.
11 Select Auto eth0, and then click Edit.
12 Select the IPV4 Settings tab, and select Manual in the Method drop-down.
13 Click Add, and then add a valid IP, Netmask, and Gateway information.
14 In the DNS Servers eld, provide the DNS server detail.
15 Click Apply.
16 To change the host name of the OMIVV appliance, click Change Hostname.
17 Enter a valid host name, and click the Update hostname.
NOTE
: After host name and NTP are changed, ensure that the system is rebooted.
NOTE: If any vCenter servers are registered with the OMIVV appliance, unregister and re-register all the vCenter instances.
24 Introduction