
Install Guide


Steps
1 Go to https://www.dell.com/support.
2 Perform one of the following actions:
• Enter the Service Tag of your Dell EMC PowerEdge server, and then select search.
• Select Browse all products > Servers > PowerEdge.
3 Select the appropriate model of your PowerEdge server.
4 On the support page of your server, select Drivers & downloads.
5 From the Operating System list, select the appropriate version of VMware ESXi.
6 From the Category list, select Systems Management.
The supported version of OMIVV is displayed.
7 Click Download or select the check box to add the software to your download list.
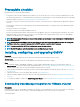
Deploying OMIVV OVF using vSphere web client
Prerequisite
Ensure that you have downloaded and extracted the product .zip le, Dell_OpenManage_Integration_<version number>.<build
number>.zip
from the Dell website.
Steps
1 Locate the OMIVV virtual disk that you downloaded and extracted, and run Dell_OpenManage_Integration.exe.
The supported client OS version for extracting and running the exe is Windows 7 SP1 and later.
The supported server OS version for extracting and running the exe is Windows 2008 R2 and later.
2 Accept EULA, and save the .OVF le.
3 Copy or move the .OVF le to a location accessible to the VMware vSphere host to which you upload the appliance.
4 Start the VMware vSphere Web Client.
5 From the VMware vSphere Web Client, select a host, and in the main menu click Actions > Deploy OVF Template.
You can also right-click Host and select Deploy OVF Template.
The Deploy OVF Template wizard is displayed.
6 In the Select Source window, perform the following subtasks:
a Select URL if you want to download the OVF package from Internet.
b Select the Local le and click Browse if you want to select the OVF package from your local system.
NOTE
: The installation process can take between 10-30 minutes if the OVF package resides on a network share. For a quick
installation, it is recommended that you host the OVF on a local drive.
7 Click Next.
The Review Details window is displayed with the following information:
• Product—The OVF template name is displayed.
• Version—The version of the OVF template is displayed.
• Vendor—The vendor name is displayed.
• Publisher—The publisher details are displayed.
• Download Size—The actual size of the OVF template in gigabytes is displayed.
• Size on Disk—Details of thick and thin provisioned details are displayed.
• Description—The comments are displayed here.
8 Click Next.
The Select Name and Folder window is displayed.
9 In the Select Name and Folder window, perform the following substeps:
a In Name, enter the name of the template. The name can include up to 80 characters.
Introduction
19