OpenManage Integration for VMware vCenter Version 4.
Notes, cautions, and warnings NOTE: A NOTE indicates important information that helps you make better use of your product. CAUTION: A CAUTION indicates either potential damage to hardware or loss of data and tells you how to avoid the problem. WARNING: A WARNING indicates a potential for property damage, personal injury, or death. © 2011 - 2018 Dell Inc. or its subsidiaries. All rights reserved. Dell, EMC, and other trademarks are trademarks of Dell Inc. or its subsidiaries.
Contents 1 Introduction....................................................................................................................................................5 OpenManage Integration for VMware vCenter licensing..............................................................................................5 License requirements for hosts and vCenter servers..............................................................................................6 Buying and uploading software license.........
Configuration tasks through settings tab..................................................................................................................... 36 Appliance settings......................................................................................................................................................36 vCenter settings.........................................................................................................................................................
1 Introduction This guide provides step-by-step instructions for installing and configuring OpenManage Integration for VMware vCenter (OMIVV) for use with PowerEdge servers. After the OMIVV installation, for information about all aspects of administration including—inventory management, monitoring and alerting, firmware updates, and warranty management; see OpenManage Integration for VMware vCenter User's Guide available at Dell.com/support/manuals.
License requirements for hosts and vCenter servers The following are the licensing requirements for hosts and vCenter: • You can purchase a license to support the quantity of Dell EMC servers to be managed by OMIVV. A license is used only after a host is added to a connection profile. License is not associated with a particular server. • One instance of OMIVV supports up to 10 instances of vCenter servers. There is no separate license for the number of vCenter servers.
There are some restrictions around the functionality of stacking licenses. If a new standard license is uploaded before the existing standard license expires, the licenses stack. Otherwise, if the license expires and a new license is uploaded, only the number of hosts from the new license is supported. If there are already multiple licenses uploaded, the number of supported hosts are the sum of the hosts in the nonexpired licenses at the time the last license was uploaded.
– DNS requirements for vSphere 6.0 – DNS requirements for vSphere 6.5 and Platform Services Controller appliance • For the OMIVV appliance mode, ensure that you deploy OMIVV in the appropriate mode based on your virtualization environment. For more information, see Configuring deployment mode. • Configure your network to match the port requirements. For more information, see Port information.
5 • If the required deployment mode is already set, a message is displayed. If the deployment mode is changed, confirm the changes, and then proceed with rebooting the OMIVV appliance to allow the deployment mode to be updated. NOTE: During the OMIVV appliance boot up, the allocated system resource is verified against the set deployment mode. If the allocated system resources are less than the set deployment mode, the OMIVV appliance does not boot up to the login screen.
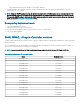
Server Minimum version PowerEdge M710HD 5.0.1 or later PowerEdge M910 2.5.0 or later PowerEdge M915 2.6.0 or later PowerEdge T110 II 1.8.2 or later PowerEdge T310 1.8.2 or later PowerEdge T410 1.9.0 or later PowerEdge T610 6.1.0 or later PowerEdge T710 6.1.0 or later Table 3. BIOS for PowerEdge 12th generation servers Server Minimum version T320 1.0.1 or later T420 1.0.1 or later T620 1.2.6 or later M420 1.2.4 or later M520 1.2.6 or later M620 1.2.6 or later M820 1.2.
Server Minimum version R930 1.0.2 or later R230 1.0.2 or later R330 1.0.2 or later T630 1.0.2 or later T130 1.0.2 or later T330 1.0.2 or later T430 1.0.2 or later M630 1.0.0 or later M830 1.0.0 or later FC430 1.0.0 or later FC630 1.0.0 or later FC830 1.0.0 or later Table 5. BIOS for PowerEdge 14th generation servers Server Minimum Version R940 1.0.0 or later R740 1.0.0 or later R740xd 1.0.0 or later R640 1.0.0 or later M640 1.0.0 or later T640 1.0.0 or later T440 1.
Generation Version PowerEdge 14th generation servers 3.00.00.00 and later 3.00.00.00 and later Model BIOS iDRAC with Lifecycle Controller C6320 1.0.2 2.30.30.30 or later C4130 1.0.2 2.30.30.30 or later C6420 1.0.0 or later 3.00.00.00 or later C4140 1.0.0 or later 3.00.00.00 or later Table 7. BIOS and iDRAC requirements for cloud server Supported features on PowerEdge servers The following features are supported on the hosts managed by OpenManage Integration for VMware vCenter: Table 8.
Platform Features 11th 12th and 13th 14th ^ Cluster Profile N Y Y Host management using unified chassis IP N N Y@ Support for OEM server N Y~ Y * In Cloud with model number C6320, health monitoring is not supported for the mezzanine cards. # In Cloud with model number C6320, firmware updates are not supported for the mezzanine cards. $ Proactive HA feature is only applicable on vCenter 6.5 or later that has ESXi 6.0 or later.
Software requirements Ensure that the vSphere environment fulfills virtual appliance, port access, and listening port requirements. Requirements for VMware vSphere web client • Supports vCenter 6.0 and later • Requires web client services from vCenter (vSphere Desktop client is not supported) For specific software requirements, you can also see OpenManage Integration for VMware vCenter Compatibility Matrix available at Dell.com/support/manuals.
The OpenManage Integration for VMware vCenter supports any of the following vCenter server versions: Table 11. Supported vCenter server versions vCenter version Web client support v6.0 U2 Y v6.0 U3 Y v6.5 Y v6.5 U1 Y v6.5 U2 Y v6.7 Y v6.7 U1 Y NOTE: For more information about registering a vCenter server, see OpenManage Integration for VMware vCenter Version 4.3 Web Client Install Guide available at Dell.com/support/manuals. The OpenManage Integration for VMware vCenter version 4.
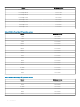
Port Number Protocols Port Type Maximum Encryption Level Direction Destination Usage Description 162 SNMP Agent UDP None In iDRAC/ESXi to OMIVV appliance SNMP Agent (server) To receive SNMP traps from managed nodes. 443 HTTPS TCP 128-bit In OMIVV UI to OMIVV appliance HTTPS server Web services offered by OMIVV. These Web services are consumed by vCenter Web Client and Dell Admin portal.
Port Number Protocols Port Type Maximum Encryption Level Direction Destination Usage Description 443 HTTPS TCP 128-bit In OMIVV appliance to ESXi HTTPS server Used to provide information to the management station. This port has to open from ESXi. 8080 HTTP TCP 128-bit Out ESXi to OMIVV appliance HTTP server; downloads the OMSA VIB and fixes noncompliant vSphere hosts. Helps ESXi to download the OMSA/ driver VIB. Table 14.
Prerequisite checklist Checklist before you start the product installation: • Verify that you have user name and password for OMIVV to access the vCenter server. The user may have an administrator role that has all necessary permissions or a non-administrator user with the necessary privileges. For more information about the list of privileges required for OMIVV to operate, see Required privileges for non-administrator users.
Steps 1 Go to https://www.dell.com/support. 2 Perform one of the following actions: • Enter the Service Tag of your Dell EMC PowerEdge server, and then select search. 3 • Select Browse all products > Servers > PowerEdge. Select the appropriate model of your PowerEdge server. 4 On the support page of your server, select Drivers & downloads. 5 From the Operating System list, select the appropriate version of VMware ESXi. 6 From the Category list, select Systems Management.
10 b In the Select a folder or datacenter list, select a location for deploying the template. Click Next. The Select Storage window is displayed. 11 In the Select Storage window, perform the following substeps: a b 12 In the Select Virtual Disk Format drop-down list, select either of the following formats: • Thick Provision (lazy Zeroed) • Thick Provision (Eager zeroed • Thin Provision It is recommended that you select, Thick Provision (Eager Zeroed).
4 If you want to cancel the upload, click Cancel. NOTE: If you want to upload a custom certificate for the appliance, ensure that you upload the new certificate prior to vCenter registration. If you upload the new custom certificate after vCenter registration, communication errors are displayed in the web client. To fix this issue, unregister, and re-register the appliance with the vCenter.
– Cancel task – Log event – Settings NOTE: Assign the following health update privileges, if you are using VMware vCenter 6.5 or upgrading to vCenter 6.5 or later: • Health Update Provider – Register – Unregister – Update • Host – CIM ◦ CIM Interaction – Configuration ◦ Advanced settings ◦ Connection ◦ Maintenance ◦ Network configuration ◦ Query patch ◦ Security profile and firewall NOTE: Assign the following privileges, if you are using VMware vCenter 6.5 or upgrading to vCenter 6.
Registering vCenter server by non-administrator user with required privileges You can register a vCenter server for the OMIVV appliance by using a non-administrator user with the required privileges. See step 5 to step 9 of Registering OpenManage Integration for VMware vCenter and importing license file topic. for information about registering a vCenter server through a non-administrator user or as an administrator.
During deployment, if you select Power on after Deployment, the VM is powered on automatically after deployment is complete. 2 To run the Administration Console, click the Console tab in the main VMware vCenter window. 3 Allow OMIVV to complete booting up, and then enter the user name as, Admin (the default is Admin), and press Enter. 4 Enter a new admin password. Ensure that the admin password complies with the password complexity rules displayed in the interface. Press Enter.
Before opening the administration console, ensure that you manually update all references to the appliance such as, provisioning server in iDRAC, DRM. 18 Open Administration Console from a supported browser. To open Administration Console, in the Help and Support tab of OpenManage Integration for VMware vCenter, click the link under Administration Console or start a web browser and provide the https:// url.
Figure 3. vCenter registration window from Administration Console 20 In the vCenter Registration window, click Register a New vCenter Server. 21 In the Register a New vCenter Server window, perform the following substeps: a Under vCenter Name, in the vCenter Server IP or Hostname text box, enter the server IP or host name, and then in the Description text box, enter a description. The description is optional.
Figure 4. OpenManage Integration for VMware vCenter successfully added to vCenter Example For all vCenter operations, OMIVV uses the privileges of a registered user and not the privileges of a logged-in user. For example: User X with the necessary privileges registers OMIVV with vCenter, and user Y has only Dell privileges. User Y can now log in to the vCenter and can trigger a firmware update task from OMIVV.
For more information about the access restrictions for Plug-In Management or Client Plug-Ins page, see VMware documentation. 5 In the Plug-In Management or Client Plug-Ins window, verify if OMIVV is installed and enabled. Updating virtual appliance repository location and virtual appliance Prerequisite To ensure that all data is protected, perform a backup of the OMIVV database prior to an update of the virtual appliance. See Managing backup and restore topic in User's Guide .
5 In the UPDATE APPLIANCE dialog box, click Update. After you click Update, you are logged off from the ADMINISTRATION CONSOLE window. 6 Close the web browser. NOTE: During the upgrade process, the appliance restarts once or twice. NOTE: Once the appliance is RPM upgraded, ensure that you do the following: • Clear the browser cache before logging in to the Dell admin portal. • Reinstall the VMware tools. To reinstall the VMware tools: a Right-click the OMIVV appliance.
NOTE: If the IP address of the new OMIVV version y is changed from the OMIVV version x, configure the trap destination for the SNMP traps to hover over the new appliance. For 12th and later Gen servers, the IP change is fixed by running the inventory on these hosts. While running the inventory on 12th Gen hosts, if SNMP traps do not hover over the new IP, those hosts are listed as noncomplaint.
2 Appliance configuration for VMware vCenter After you complete the basic installation of OMIVV and registration of the vCenters, the Initial Configuration Wizard is displayed when you click the OMIVV icon. You can proceed to configure the appliance by using one of the following methods: • Configuring the appliance through the Initial Configuration Wizard. • Configuring the appliance through the Settings tab in OMIVV.
Selecting vCenters About this task In the vCenter Selection dialog box, you can configure the following vCenters: • A specific vCenter • All registered vCenters To access the vCenter Selection dialog box: Steps 1 In the Initial Configuration Wizard, in the Welcome dialog box, click Next. 2 Select one vCenter or all registered vCenters from the vCenters drop-down list. Select a vCenter that is not configured yet or if you have added a vCenter to your environment.
1 In Active Directory User Name, type the username. Type the username in one of these formats: domain\username or username@domain. The username is limited to 256. 2 In Active Directory Password, type the password. The password is limited to 127 characters. 3 In Verify Password, type the password again. 4 Depending on your requirement, perform one of the following actions: – To download and store the iDRAC certificate and validate it during all future connections, select Enable Certificate Check.
NOTE: If the OEM hosts are not displayed on the Select Hosts window, add the OEM hosts using the Add OEM Hosts wizard, see Adding OEM Hosts topic in User's Guide. 7 To test the connection profile, select one or more hosts and click Test Connection. NOTE: This step is optional and checks the host and iDRAC credentials. Although this step is optional, Dell EMC recommends that you test the connection profile. NOTE: If the WBEM service is disabled for all hosts running ESXi 6.
b In Data Retrieval Time, enter the time in HH:MM format. c The time you enter is your local time. Therefore, if you want to run the inventory at the virtual appliance time zone, calculate the time difference between your local and virtual appliance time zone, and then enter the time appropriately. To apply the changes and continue, click Next. Once you click next, all details that you provide in this wizard is saved and you cannot modify the details from this wizard.
NOTE: The Dell EMC hosts that have alarms enabled respond to some specific critical events by entering in to maintenance mode and you can modify the alarm, when required. The Enabling Dell EMC Alarm Warning dialog box is displayed. 3 To accept the change, click Continue, or to cancel the change, click Cancel. NOTE: Ensure that you complete this step only if you select Enable Alarms for all Dell EMC Hosts.
Configuring warranty expiration notification settings 1 In OpenManage Integration for VMware vCenter, on the Manage > Settings tab, under Appliance Settings, click Warranty Expiration Notification.
• CIFS share for .XML file—\\host\share\filename.xml • CIFS share for .gz file—\\host\share\filename.gz NOTE: OMIVV supports only Server Message Block(SMB) version 1.0 and SMB version 2.0 based CIFS shares. Dell EMC recommends using SMB version 2.0 based CIFS shares. c NOTE: If you are using CIFS share, OMIVV prompts you to enter the username and password. To validate the given catalog file location, click Begin Test. This validation is mandatory to continue further.
Configuring deployment credentials The deployment credentials allow you to set up credentials to communicate securely with a bare-metal system that is discovered using auto discovery until the OS deployment is complete. For secure communication with iDRAC, OMIVV uses deployment credentials from initial discovery until the end of the deployment process. Once the OS deployment process is successfully complete, OMIVV changes the iDRAC credentials as provided in the connection profile.
NOTE: If you do not select the check box, the OMSA URL is applied only to one vCenter. 4 To verify that the OMSA URL link that you provided works, navigate to the Summary tab of the host and check that the OMSA console link is live within the OMIVV Host Information section. Configuring events and alarms About this task The Events and Alarms dialog box enables or disables all hardware alarms. The current alert status is displayed on the vCenter alarms tab.
3 4 • Whether the inventory and/or warranty retrieval option is enabled or disabled? • The weekdays for which it is enabled. • The time of day it is enabled. To edit the data retrieval schedules, perform the following steps: a b c Under Inventory/Warranty Data, select the Enable Inventory/Warranty Data Retrieval check box. Under Inventory/Warranty Data Retrieval Schedule, select the days of the week for your job.
• For the first time after the chassis is selected • When you change the credentials • If the chassis is newly selected NOTE: For an MX chassis configured with an MCM group, Dell EMC recommends managing all the lead and member chassis using the lead chassis. The member chassis test connection operation will fail and test result status that is indicated as Fail. Click the lead chassis IP link to discover the complete MCM group. The test result is displayed in the Test Result column as Pass or Fail.
3 Accessing documents from the Dell EMC support site You can access the required documents using the following links: • For Dell EMC Enterprise Systems Management documents — www.dell.com/SoftwareSecurityManuals • For Dell EMC OpenManage documents — www.dell.com/OpenManageManuals • For Dell EMC Remote Enterprise Systems Management documents — www.dell.com/esmmanuals • For iDRAC and Dell EMC Lifecycle Controller documents — www.dell.
4 Related Documentation In addition to this guide, you can access the other guides available at Dell.com/support. Click Choose from all products, then click Software and Security > Virtualization Solutions. Click OpenManage Integration for VMware vCenter 4.3 to access the following documents: • OpenManage Integration for VMware vCenter Version 4.3 Web Client User's Guide • OpenManage Integration for VMware vCenter Version 4.3 Release Notes • OpenManage Integration for VMware vCenter Version 4.