
Users Guide


NOTE: During the upgrade process, the appliance restarts once or twice.
NOTE: Once the appliance is RPM upgraded, ensure that you do the following:
• Clear the browser cache before log in to the Dell admin portal.
• Reinstall the VMware tools.
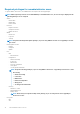
To reinstall the VMware tools:
1. Right-click the OMIVV appliance.
2. Hover over Guest, and then click Install/Upgrade VMware Tools.
3. On the Install/Upgrade VMware Tools dialog box, click Automatic Tools Upgrade, and then click OK.
You can view the installation status in the Recent Tasks.
NOTE: After the RPM upgrade is complete, you can view the login screen in the OMIVV console. Open a browser,
provide the
https:\\<ApplianceIP|hostname>
link, and navigate to the APPLIANCE UPDATE area. You can verify that
the available and current virtual appliance versions are same. If you have enabled Proactive HA on clusters, OMIVV
unregisters the Dell Inc provider for those clusters and re-registers the Dell Inc provider after upgrade. Hence, health
updates for the Dell EMC hosts are not available until upgrade is complete.
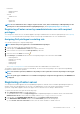
Updating appliance through backup and restore
To update the OMIVV appliance from an older version to current version, perform the following steps:
1. Take a backup of the database for the older release.
2. Turn off the older OMIVV appliance from vCenter.
NOTE:
Do not unregister the OMIVV plug-in from vCenter. Unregistering the plug-in from vCenter removes all the
alarms registered on vCenter by the OMIVV plug-in and all the customization that is performed on the alarms, such
as actions, and so on.
3. Deploy the new OpenManage Integration appliance OVF.
4. Power on the OpenManage Integration new appliance.
5. Set up the network, time zone, and so on, for the new appliance.
NOTE: Ensure that the new OpenManage Integration appliance has the same IP address as the old appliance.
NOTE: The OMIVV plug-in might not work properly if the IP address for the new appliance is different from the IP
address of the older appliance. In such a scenario, unregister and re-register all the vCenter instances.
6. The OMIVV appliance comes with default certificate. If you want to have a custom certificate for your appliance, update the same.
See Generating Certificate Signing Request and Uploading HTTPS certificate. Else, skip this step.
7. Restore the database to the new OMIVV appliance. See Restoring the OMIVV database from a backup.
8. Verify the appliance. See the Installation verification in OpenManage Integration for VMware vCenter Installation Guide available at
Dell.com/support/manuals.
9. Run the Inventory on all the registered vCenter servers.
NOTE:
Dell EMC recommends that after the upgrade, you run the inventory again on all the hosts that the plug-in
manages. To run the inventory on demand, see the Scheduling inventory jobs.
NOTE: If the IP address of the new OMIVV version y is changed from the OMIVV version x, configure the trap
destination for the SNMP traps to point to the new appliance. For 12th and later generation servers, the IP change is
fixed by running the inventory on these hosts. While running the inventory on 12th generation hosts, if SNMP traps
do not point to the new IP, those hosts are listed as noncomplaint. For hosts earlier than 12th generation that were
compliant with earlier versions, the IP change is displayed as noncompliant and requires you to configure Dell EMC
OpenManage Server Administrator (OMSA). To fix vSphere host compliance issues, see Running the fix
noncompliant vSphere hosts wizard.
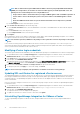
Downloading the troubleshooting bundle
1. In the APPLIANCE MANAGEMENT page, click Generate Troubleshooting Bundle.
2. Click the Download Troubleshooting Bundle link.
About Administration Console
17