
Users Guide

3. In the Hypervisor Profile dialog box, do the following subtasks:
• In the Profile Name text box, enter the profile name.
• In the Description text box, enter description, which is an optional entry.
4. Under Choose the Reference ISO Path and Version, in the Installation Source (ISO) text box, type the path to the hypervisor
share location.
A copy of the hypervisor image is modified to permit a scripted installation. The reference ISO location can be in one of the following
formats:
• NFS format: host:/share/hypervisor.iso
• CIFS format: \\host\share\hypervisor.iso
NOTE: OMIVV supports only Server Message Block(SMB) version 1.0 and SMB version 2.0 based CIFS shares.
If using a CIFS share, enter the User Name, Password, and Verify Password. Ensure that the passwords match.
5. In the Select a version list, select an ESXi version.
All servers deployed using this hypervisor profile has this image, and if the servers are from versions earlier than 12th generation, the
latest recommended version of OMSA is also installed.
6. To verify the path and authentication, click Begin Test under Test Settings.
7. Click Apply.
Managing hypervisor profiles
There are several management actions that you can perform on existing hypervisor profiles, including:
• Viewing or editing hypervisor profiles
• Deleting hypervisor profiles
Viewing or editing hypervisor profiles
1. In OpenManage Integration for VMware vCenter, on the Manage > Deployment tab, select Deployment Templates > Hypervisor
Profiles.
The hypervisor profiles are displayed.
2. Select a profile, and click
.
3. In the Hypervisor Profile dialog box, provide updated values.
4. To apply changes, click Save, or to cancel changes, click Cancel.
Deleting hypervisor profile
NOTE: Deleting a hypervisor profile that is part of a running deployment task can cause the task to fail.
1. In OpenManage Integration for VMware vCenter, on the Manage > Deployment tab, select Deployment Templates > Hypervisor
Profiles.
2. Select a profile, and click
.
3. In the confirmation dialog box, to remove the profile, click Delete, or to cancel, click Cancel.
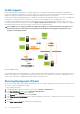
Creating deployment templates
A deployment template contains a system profile, hardware profile, hypervisor profile, a combination of system profile and hypervisor
profile, or a combination of the hardware profile and hypervisor profile. The Deployment Wizard uses this template to provision server
hardware and deploy hosts within vCenter.
1. In OpenManage Integration for VMware vCenter, on the Manage > Deployment tab, select Deployment Templates.
2. Click .
3. In the Deployment Template dialog box, enter a name for the template.
4. Enter Description for the deployment template, which is optional.
5. Click System Profile or Hardware Profile and select the appropriate profile from the drop-down menu.
108
Deploying hypervisor