
Users Guide

• Cloning a hardware profile
Enabling CSIOR on reference server
Before creating a hardware profile by using a reference server, enable the Collect System Inventory On Reboot (CSIOR) setting, and
reboot the server to provide accurate inventory and configuration information.
There are two methods for enabling CSIOR:
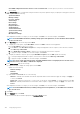
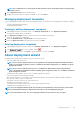
Table 36. Methods for enabling CSIOR
Method Description
Locally Uses an individual host by using the Dell Lifecycle Controller United Server Configurator
(USC) user interface.
Remotely Uses a WS-Man script. For more information on scripting this functionality, see Dell
TechCenter and DCIM Lifecycle Controller Management Profile.
To enable CSIOR locally on a reference server:
1. Power on the system, and during POST, press F2 to start USC.
2. Select Hardware Configuration > Part Replacement Configuration.
3. Enable the Collect System Inventory on Reboot setting, and exit USC.
Creating or customizing hardware profile
1. In OpenManage Integration for VMware vCenter, on the Manage > Deployment tab, select Deployment Templates > Hardware
Profiles.
2. Click the
icon.
3. In the Hardware Profile Wizard, click Next on the Welcome page and do the following:
• In the Profile Name text box, enter the profile name.
• In the Description text box, type a description. The description is optional.
4. Click Next.
The Reference Server dialog box is displayed. You can either select reference servers from the dialog box directly or through the
browse button in the reference server window.
5. Select a reference server by performing either of the following substeps:
• In the Reference Server dialog box, choose the right reference server, and click the Select link against the reference server.
The Extract Confirmation dialog box that states extracting the settings is displayed. To extract the hardware configuration from
reference server, in the Extract Confirmation dialog box, click Yes, and the extracting is completed in few minutes.
• In the Reference Server page, click Browse to select a compliant reference server that is managed and successfully inventoried by
OMIVV, or a compliant bare-metal server.
To extract the hardware configuration from reference server, in the Extract Confirmation dialog box, click Yes.
The selected Server name, the iDRAC IP address, model, and Service Tag are displayed in the Reference Server page.
6. In the Reference Server page, to customize the reference server settings, click Customize Reference Server Settings, and choose
the following settings that can be optionally included and customized:
• RAID Settings
• BIOS Settings
• Boot Order
• iDRAC Settings
• Network Settings
• User List
7. In the RAID Configuration window, select one of the following, and click Next:
• Apply RAID1 + create a dedicated hot spare, if applicable—use this option, if you want to apply default RAID configuration
settings to the target server. The RAID configuration task defaults to RAID1 on the first two drives of the integrated controller that
are RAID1 capable. Also, a dedicated hot-spare for the RAID1 array is created, if a candidate drive that meets the RAID criteria
exists.
Deploying hypervisor
105