
Install Guide

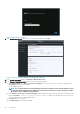

7. In the Date and Time tab, select the Synchronize date and time over the network.
The NTP Servers box is displayed.
8. Add valid NTP server details to which your vCenter is synchronized with.
9. Click Time Zone and select the applicable time zone, and click OK.
10. To configure static IP to the OMIVV appliance, click Network Configuration, or skip to step 17.
11. Select Auto eth0, and then click Edit.
12. Select the IPV4 Settings tab, and select Manual in the Method drop-down.
13. Click Add, and then add a valid IP, Netmask, and Gateway information.
14. In the DNS Servers field, provide the DNS server detail.
15. Click Apply.
16. To change the host name of the OMIVV appliance, click Change Hostname.
17. Enter a valid host name, and click the Update hostname.
NOTE: After host name and NTP are changed, ensure that the system is rebooted.
NOTE: If any vCenter servers are registered with the OMIVV appliance, unregister and re-register all the vCenter
instances.
Before opening the administration console, ensure that you manually update all references to the appliance such as, provisioning server
in iDRAC, DRM.
18. Open Administration Console from a supported browser.
To open Administration Console, in the Help and Support tab of OpenManage Integration for VMware vCenter, click the link
under Administration Console or start a web browser and provide the https://<ApplianceIP or Appliance hostname>
url.
The IP address is the IP address of the appliance VM and not the ESXi host IP address. The Administration Console can be accessed
by using the URL mentioned at the top of the console.
For example: Https://10.210.126.120 or Https://myesxihost
The URL is not case-sensitive.
Introduction
19